• Untitled Document

    Join us on April 26th, 7pm EST

    for the CBEC Virtual Meeting

    All EYO members and followers are welcome to join the fun and get to know the guest speaker!

    See the link below for login credentials and join us!

    April Meeting Info

    (dismiss this notice by hitting 'X', upper right)

Cleaning a fuel tank

Tin Kicker

Sustaining Member
Moderator
There are previous threads but thought I'd post my method, which is pretty easy.

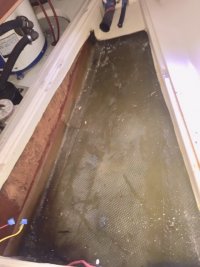
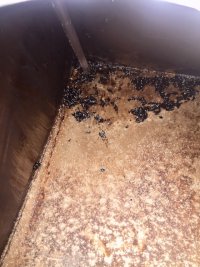
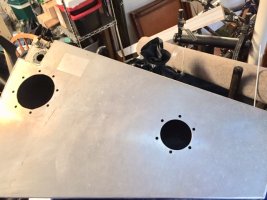
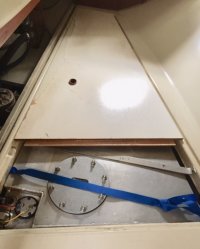
Had to replace the 35 year old fuel hoses, which meant pulling the tank. Here's the low corner with the sending unit and before de-fueling the fuel level was at about the bottom of the sending unit housing. The floor of the tank was about like soft asphalt and the walls were fairly hardened with a bit of stickiness. A paint scraper will not work.
20200212_143037-X3.jpg

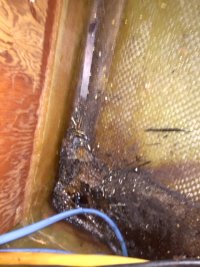
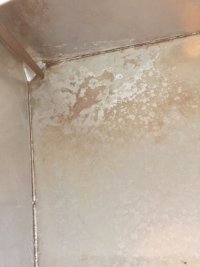
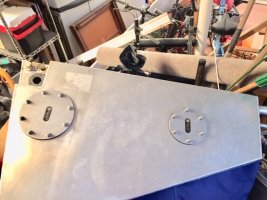
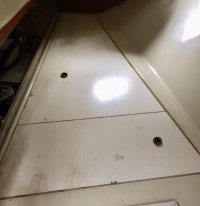
Here's the uphill baffle corner:
20200212_143140-X3.jpg


Capped all of the outlets, poured in a gallon of acetone, swished it around to wet all the surfaces, and let it sit outside in the yard for about two days. Occasionally I'd swish it again in that period.

Drained the acetone thru the fill port back into the gallon can for haz-mat disposal and most of the gunk came out like gritty brown paint. At this point the inside of the tank still has stuff clinging to the surfaces and touching it is pretty oily. Plus from past experience, the acetone dries fast and leaves a hard residue. This is the point to mix up two buckets of hot water with a half bottle of Pine-Sol in each and pour one in. Cap the fill tube and tank inspection port and swish it again. Let it sit a while.

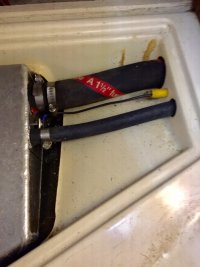
Put on a pair of long sleeve gloves: https://www.harborfreight.com/oil-re...ves-99677.html

Open the inspection port and get to everything possible with a kitchen bottle brush and scotch-brite pads.

Dump it back into the bucket.

Rinse.

Put in the second bucket of Pine-Sol, swish it and let it sit for another day.

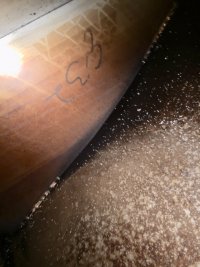
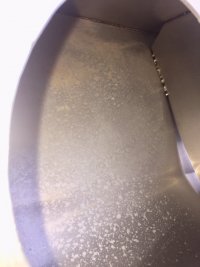
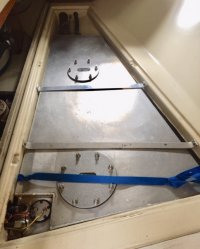
Dump the Pine-Sol, rinse till the water is clear, and let it dry. Getting in there with my phone camera, you can see that even where I missed isn't too bad and the baffled area which I could not get to should look the same.
20200216_180133-X3.jpg

20200216_180220-X3.jpg


20200216_180214-X3.jpg


btw -

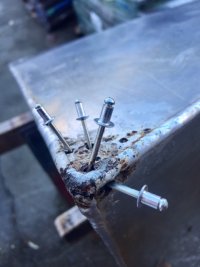
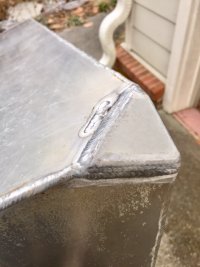
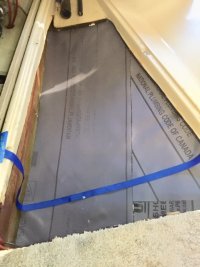
It turned out the tank needed to come out anyway, as there were two pin-hole leaks at chafe points and each were where previous repairs had been in touch with the fiberglass hull. I'll be re-installing the tank on rubber shower pan liner.
20200216_181702-X3.jpg

(I'd already scotch brited the brown tell-tale stain off before taking the photo.)
 

nquigley

Sustaining Member
Same story from me - finished a month ago. Pictures below.
- noticed increasing amount of diesel in main bilge - assumed a tank leak, based on other reports on this forum.
- removed tank - discovered small pool of a horrible concoction under lowest point of tank - it overflowed into the bilges
- I put a little Lacquer Thinner in the tank - it leaked slowly out of the low-point corner as the holes were blocked with tank gunk
- cleaned outside of that corner - found it pock-marked with corrosion, and several holes
- cut a 6" hole in tank (ready for 8" inspection port) so I could reach in and thoroughly clean that end of the tank before giving it to thee welder
- easy repair was made; had machine shop cut a 4" how in other end of tank (beyond the baffle)
- cleaned that end of tank; then installed both inspection ports (Seabuilt; Seattle WA; http://www.seabuilt.com/plates.php )
- for all cleaning, I used Lacquer Thinner (Home Depot) and lint-free rags (NAPA Auto), and thick black nitrile gloves
- lined tank bed with gray rubber 'shower liner' sheet (Home Depot); left a lift-out strap under forward end of tank - for next time
- cut plywood cover for easier access to main inspection port and the fuel pick-up and fill-gauge wiring; glued a batten under forward edge of the main cover to strengthen that edge, and to give the small cover something to rest on (installed a teak-lined pull-hole in the small cover)
Photos for part 1: diagnosis, surgery and cleaning
 

Attachments

  • 1 empty tank bed.jpg
    1 empty tank bed.jpg
    99.3 KB · Views: 18
  • 2 gunk in corner under low point in tank.jpg
    2 gunk in corner under low point in tank.jpg
    123.6 KB · Views: 20
  • 3a Holes in corner of 32-3 fuel tank.jpg
    3a Holes in corner of 32-3 fuel tank.jpg
    83.2 KB · Views: 21
  • 3b after surgery - outside.jpg
    3b after surgery - outside.jpg
    94.6 KB · Views: 22
  • 4a gunk deposits under fuel pickup.jpg
    4a gunk deposits under fuel pickup.jpg
    142.9 KB · Views: 18
  • 4b inside pickup corner_after repair.jpg
    4b inside pickup corner_after repair.jpg
    84.3 KB · Views: 17
  • 5a gunk against baffle.jpg
    5a gunk against baffle.jpg
    111.9 KB · Views: 17
  • 5b baffle area cleaned.jpg
    5b baffle area cleaned.jpg
    84.7 KB · Views: 18
Last edited:

nquigley

Sustaining Member
Part 2: full recovery (even better than the original)
 

Attachments

  • 6a Holes cut_then cleaned tank_before repair.jpg
    6a Holes cut_then cleaned tank_before repair.jpg
    107.8 KB · Views: 20
  • 6b plates installed.jpg
    6b plates installed.jpg
    113.2 KB · Views: 20
  • 7 rubber-lined bed_retrieval strap.jpg
    7 rubber-lined bed_retrieval strap.jpg
    100.5 KB · Views: 21
  • 8 tank re-installed.jpg
    8 tank re-installed.jpg
    101.2 KB · Views: 21
  • 9a cover cut & reinforced.jpg
    9a cover cut & reinforced.jpg
    89 KB · Views: 19
  • 9b 2-piace cover installed.jpg
    9b 2-piace cover installed.jpg
    70.5 KB · Views: 20
Last edited:

Kenneth K

1985 32-3, Puget Sound
Blogs Author
You guys put me to shame.....my tank is still sitting in the garage awaiting the improvements you've done. Ever since rigging up a temporary tank, the incentive has been lacking to finish the job correctly.
20190602_192920.jpg

@ nquigly - I was only going to put in a single 6"/8" port where you put yours. I was assuming all the sludge went to the low/forward part of the tank and a single cleanout would work. What did you find in the aft compartment when you cut the 4" hole? And, did you find a height-clearance problem between the top of the inspection port bolts and the plywood compartment covers? I was wondering if clearance would be a problem.

@ both - Love the shower pan liner idea!
 
Last edited:

Christian Williams

E381 - Los Angeles
Senior Moderator
Blogs Author
Nice work all. As regards bedding the tank, Ericson used expanding foam around mine to keep it from shifting and binding.
 

nquigley

Sustaining Member
Hi Ken,

I thought the same thing - "surely all the gunk accumulates at the low end".
But, I could see a little past the baffle with a flashlight - saw gunk on wall and bottom of the tank just past the baffle. I figured that, 'while I'm at it ...' I should probably just do it right. Sure enough, there was a good film of asphaltene on the walls and bottom of that end of the tank too - all the way to the inlet port. The 4"/6" port was a bit cheaper than the 6"/8", which was why I got it for that end - I put it in the very middle of that space so I could (just) reach all the walls from that opening. But, if I had Popeye forearms, that hole might have been a bit too small (?)
No, I did not have any problem with the bolts of the inspection ports reaching up to the cover board - I was ready with my Dremel and cutting disk, but didn't need them (that would have been a pain, with so many bolts). Tighten the nuts evenly, and no more than needed to slightly squish the rubber seal.
You may notice in pic #8 that I had to relocate the bracing strap that's over the aft end of the tank to a position just forward of the aft inspection port (about 6-8" forward of where it used to be), which made the original strap too short. I got a length of 1" Aluminum strap from Home Dept that I bent in my vice (measure twice ... how would I know?). In a knock-down, it's probably better to have that strap a little closer to the middle of the tank where it can 'help' the forward strap, since the filler hose will probably do a good job holding the aft end down.
I had a fair bit of trouble getting a grip on the forward end of the tank when removing it - that's why I added the length of webbing (~8' from West Marine) under the tank when I laid it back in there.
The shower liner is a mosaic of a few oddly shaped pieces, tacked in place with a few strategically placed dollops of Silicon caulk so it didn't slip while wrestling the tank back in place.
 
Last edited:

nquigley

Sustaining Member
Nice work all. As regards bedding the tank, Ericson used expanding foam around mine to keep it from shifting and binding.
I was very glad NOT to see any expanding foam around my tank ;-) Mine was just lying in there, held down by the 2 Aluminum straps, I guess.
I looked for evidence if it having chafed against the fiberglass bed, but only saw a few minor 'scuffs' - I figured the rubber liner I used might provide a little cushioning where ever the tank rests on the hull.
 

Tin Kicker

Sustaining Member
Moderator
This is a follow-up post on how the leaks developed in mine, because it was NOT from chafing. We have a very long time experienced shop which fixes a lot of tanks and radiators for trucks, boats, and you name it. The owner didn't need long to show that the cause of my leaks and the earlier repairs was fatigue micro-cracking along the edge of the baffle welds. It turns out they've seem this before in both boat tanks and Volvo trucks. The repair was to clean the surface to bare aluminum, immediately weld along the edge of the baffle, then weld scab patches over the length.

Here's what the repair looks like:
20200303_173543-X3.jpg
 

Kenneth K

1985 32-3, Puget Sound
Blogs Author
Wow, that's a pretty extensive repair.

I am going to take my tank in to a shop for pressure testing after I install the cleanout ports. I don't expect them to find anything because the tank has never leaked. But I don't suspect they can find "worn" but not-leaking areas. How does one locate "micro cracks" in aluminum?
 

Tin Kicker

Sustaining Member
Moderator
With the two wood scraps that my tank was sitting on, there may've been flexing unique to my boat.

Looking at the leaks with a magnifying glass it's pretty clear.
 

Kenneth K

1985 32-3, Puget Sound
Blogs Author
Did either of you guys consider (or perform) a change out of the filler hose while the tank was out? Why/why not? Seems like it would be hard to access. Or, maybe with the deck fill removed, the hose would lift right out?

I'm only considering because the hose is likely original (35 years old) and I haven't reinstalled the tank yet.
 

Tin Kicker

Sustaining Member
Moderator
I let the acetone and Pine-Sol soften anything in the hard pick-up tube that is in the tank, then hit it with commpressed air. The external hose was 35 years old and trashed.
 

Loren Beach

O34 - Portland, OR
Senior Moderator
Blogs Author
When I replaced the original tank with a larger one, about a decade ago, it was also time to replace the fill hose. I diagnosed the smell (no liquid ever apparent ) around that hose with the old hot-damp-towel trick = rub the hose sections that were reachable, and smell the towel. Obvious diesel smell; case solved... :(

The new hose totally ended the odor we had noticed for several seasons. Still no odor. Out of that era's project came a new deck fill fitting and new ground wire. Just another project that provoked several more time-consuming ones!
 

Kenneth K

1985 32-3, Puget Sound
Blogs Author
Thanks Loren.

Tin Kicker-so you DID change the filler hose? Did you reuse the deck-fill plate or buy new. What was the PITA rating (1-10) of accessing and replacing the hose on a 32-3?
 

Tin Kicker

Sustaining Member
Moderator
Sorry - Didn't realize you meant the filler hoses (2) from the deck. I'm still in process but don't foresee them being too bad with the tank now out. So far I've found no clamps on the big hose and only one on the vent. The plan is to sew the end of each new hose to the end of the old one, wrap with tape, and see if they will pull through.

Separately, After cleaning the hull where the tank sits, I've lined it with fluted Coroplast, held in place with Gorilla Tape. Coroplast is the stuff yard signs are made of and the polypropylene is rated A1 for diesel exposure. This will stop the aluminum tank from rubbing on the hull.

20200304_154146-4K.jpg
 

Loren Beach

O34 - Portland, OR
Senior Moderator
Blogs Author
What was the PITA rating (1-10) of accessing and replacing the hose on a 32-3?

Wow! We need a new spreadsheet for this 'rating' for a lot of projects.... !
Of course, most all of them would rate a 9 or up to a 12, anyway.
:(
 
Last edited:

nquigley

Sustaining Member
The big filler hose and the smaller vent hose were in good condition in my boat (two clamps on the filler hose). Plus, ... they would have been a bear the remove/replace - especially the 1.5" filler hose because it's very stiff/rigid. I resisted the 'while I'm back there' temptation.
 

Attachments

  • E32-3 tank filler:vent hose connections.jpg
    E32-3 tank filler:vent hose connections.jpg
    89.7 KB · Views: 9
Top