• Untitled Document

    Join us on April 26th, 7pm EST

    for the CBEC Virtual Meeting

    All EYO members and followers are welcome to join the fun and get to know the guest speaker!

    See the link below for login credentials and join us!

    April Meeting Info

    (dismiss this notice by hitting 'X', upper right)

Getting to the CORE of the problem ('84 E381)

DrZiplock

Member II
Hey, folks

Just back from doing an Atlantic crossing with some friends and the drive to get my own projects started, wrapped, and Respira into the water is running hard.

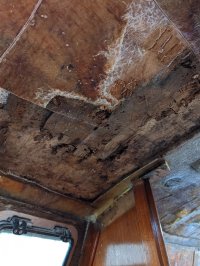
To that end I began to tackle what I knew to be a soft spot in the deck. Because of all the work I'm doing on the interior it was figured that it would be easier to attack this problem from below rather than above. Test holes were drilled to find the good and the bad core and then work to remove began. So far I've ended up with what you see here..and I'm sure there is more to be found.
PXL_20220717_132038186.jpg

The entire section in the passageway between the main salon and the v-berth has now been cleaned out. The nice part is that it seems that this particular section was pretty isolated curtesy of a lip of fiberglass that runs all the way around it, so I cut and then cleaned out everything so that lip. Currently there is a fan blowing directly onto it. Some of the balsa was rotted out to the point of it no longer being ID'able as wood and then water could be squeezed out of other locations. Not great.

The on deck work to stop the intrusion is well underway with all deck hardware having been removed, holes overdrilled, and then refilled. We're going for dry or busy, friends.

The replacement itself will be fairly straightforward if not a bit of a pain in the ass because I'm working against gravity, but not much I can do about that at this point. Any tips or suggestions would of course be appreciated.


Here's something I didn't expect though:

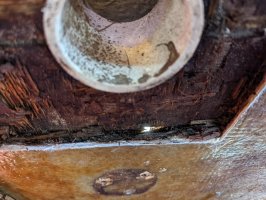
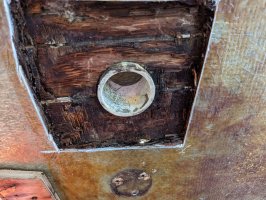
While removing the headliner it became wildly clear that the core around the dorade vents was shot. So I cut out the glass to see what I'd be dealing with.
PXL_20220717_144620137.jpg

PXL_20220717_144616950.jpg

PLYWOOD?!

And you can see the drainage hole from the on deck box showing daylight through the "core." Awesome.

So who else has tackled this? Is the plywood just located under the dorade? I'm going to have to rip it all out and replace it, reglass, and then reglass the topside portion as well. And while I'm at it I'm going to fill in that weird "tool storage" whatever place in between the two vents.

Thoughts? Advice? Suggestions?
 

Loren Beach

O34 - Portland, OR
Senior Moderator
Blogs Author
Good start on a messy, albeit low tech, project. Somewhere on the site I recall a picture from over a decade ago of a similar recore-from-inside of the entire foredeck of an E-35 Mk2. It showed the forepeak with a small 'forest' of upright wood 2X2 props holding up the flexible plywood layer that was against the heavy clear plastic that was pressing the new balsa blocks against the underside of the foredeck. I would imagine that once the new coring was cured in place and rough sanded, the layer(s) of bi-ax would adhere from below without the up pressure of the sticks n plywood, but have no experience of my own.
Thanks again for the photos, and do keep posting.
 

LameBMX

Member II
PLYWOOD?!

I dont know about these boats, but a scrap San Juan 21' I bought over the brand new 16lb Danforth in the boat, had the entire mast step step area, cockpit sole, and cockpit seats using 1/2" or 3/4" marine ply as the core material. Probably a full sheet for the cockpit and another nearly full sheet with the masts tabernacle about in the middle of it, I think the handrails and most of the desk stuff would have been in plywood core. Take the desk with a grain of salt, I diced it up into 3ft x 3ft or so chunks so the trash truck would take them.
 

DrZiplock

Member II
Hi there, in case it helps, I did a similar job on my 25 https://ericsonyachts.org/ie/ubs/e25-deck-re-coring.989
but it was all balsa core, I guess as long as it doesn't have a camber it will work, make sure you saturate that ply pretty well

Oh this is exceptionally helpful, thank you!

Yea, I'm guessing (hoping?) that the plywood is only under the dorade structure and doesn't extend too far from there. Regardless, it's being removed and will be replace by either balsa or a composite.

I know that I'm at least getting a long term solution out of this which is good, but I have no idea how much of the deck is shot which is bad. Thankfully I've already got damn near all of the deck hardware removed and those holes overdrilled and filled. Just a few more things to go, but they are not my "high leak probability" candidates.
 

gargrag

Member II
Some of my recommendations would be to make sure you. take temperature and how that impacts the viscosity of your resin into account.
if it's hot, and it's low viscosity, you can have a hard time wetting out the outer skin

feel free to reach out to me for any questions, I'm happy to help
 
Last edited:

DrZiplock

Member II
Some of my recommendations would be to make sure you. take temperature and how that impacts the viscosity of your resin into account.
if it's hot, and it's low viscosity, you can have a hard time wetting out the outer skin

feel free to reach out to me for any questions, I'm happy to help

Funny you should mention that - it's been in the 90s with 95%+ humidity here in North Carolina for the last few weeks so any and all resin/epoxy work had been put on hold. That is until I just this weekend knocked together some companion way boards that now play home to a small window air conditioner. Holy crap it has been getting pretty gnarly trying to work in there.

Related: I just checked out your blog posts and you are I are of very similar mindsets for final product on the ceiling and headliner. My ceiling is pretty well rotted away and needs to be ripped out and then sanded down. Did you lay down pvc stringers to get back to the right thickness for the portlights?
 

Christian Williams

E381 - Los Angeles
Senior Moderator
Blogs Author
The 381 has plywood under all deck fittings. Some light fittings such as the turning block for the roller furler are screwed directly into it, rather than through-bolted.
 

DrZiplock

Member II
The 381 has plywood under all deck fittings. Some light fittings such as the turning block for the roller furler are screwed directly into it, rather than through-bolted.

I'd noticed that some things were only screwed in when I was stripping off all of the deck hardware, but that's good to know about the plywood. Not sure I'm comforted by it, but still good to know.

Do you happen to know if that holds true for the stanchion bases as well?
 

Loren Beach

O34 - Portland, OR
Senior Moderator
Blogs Author
I'd noticed that some things were only screwed in when I was stripping off all of the deck hardware, but that's good to know about the plywood. Not sure I'm comforted by it, but still good to know.

Do you happen to know if that holds true for the stanchion bases as well?
AFAIK all the stanchion bases on 80's EY boats were thru bolted with ss backing plates.
 

DrZiplock

Member II
Not sure if you could hear it from Oregon, but there was an audible sigh of relief reading that.

I haven't peeled back that far yet, but I'm heading in that direction. Have new to me stanchions ready to go and just need to get the plates up, rebedded, and wheeee.
 

Loren Beach

O34 - Portland, OR
Senior Moderator
Blogs Author
I haven't peeled back that far yet, but I'm heading in that direction. Have new to me stanchions ready to go and just need to get the plates up, rebedded, and wheeee.
Please perform the ritual of "over drill, epoxy fill, and redrill" for all the holes. Adds a bit of time, but then the core is protected forever.
 

DrZiplock

Member II
Please perform the ritual of "over drill, epoxy fill, and redrill" for all the holes. Adds a bit of time, but then the core is protected forever.

Absolutely. It's time well spent. Current deck work is in prep for it to be a full repaint, so once that's done all the hardware will return and the ritual will be complete.

In the meantime the current ritual is burning sage, lighting candles, and asking whatever deity is in earshot for help.
 

dhill

Member III
Hi @DrZiplock ,

Here are some links that may be helpful:

(First of 3, replacing from below)

(First of many videos, replacing from above, but with lots of detail, particularly around epoxy prep with various temperatures)

I’m eager to see how it turns out!

Dave
 
Last edited:
Top