• Untitled Document

    Join us on April 26th, 7pm EST

    for the CBEC Virtual Meeting

    All EYO members and followers are welcome to join the fun and get to know the guest speaker!

    See the link below for login credentials and join us!

    April Meeting Info

    (dismiss this notice by hitting 'X', upper right)

Making a sliding hatch...

jthistle

Member II
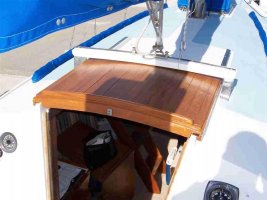
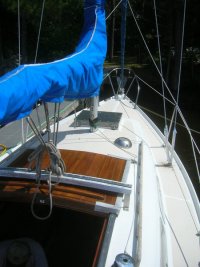
I've been debating doing a major refurb on my original 35 year old sliding hatch or making a new one.

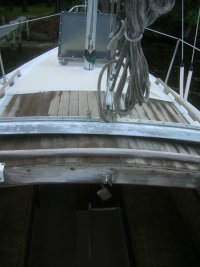
In the process of evaluating the situation I have damaged the hatch so as the 1st option is no longer viable...(like that hasn't happened to anyone before:confused:) essentially the hatch fell apart and I found more rot than I could fix.

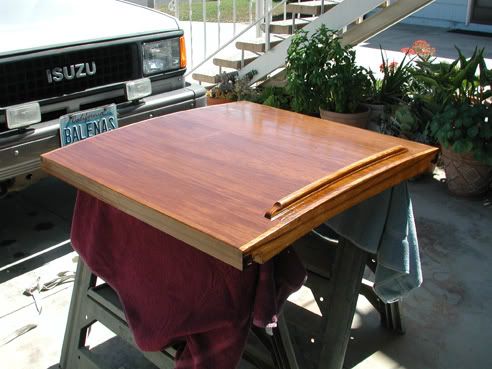
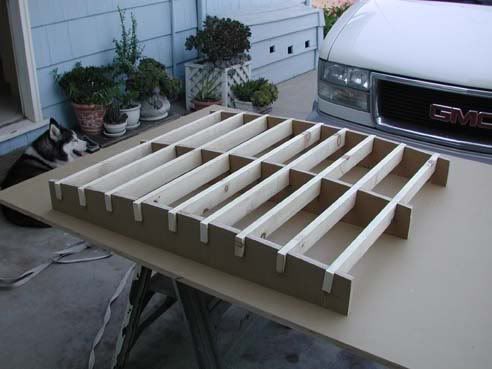
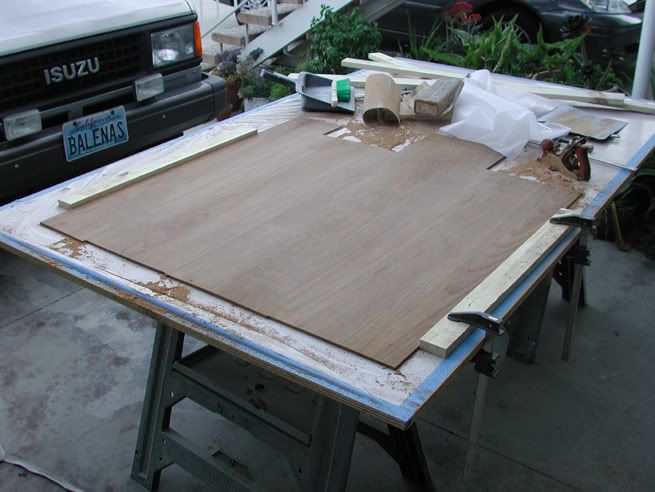
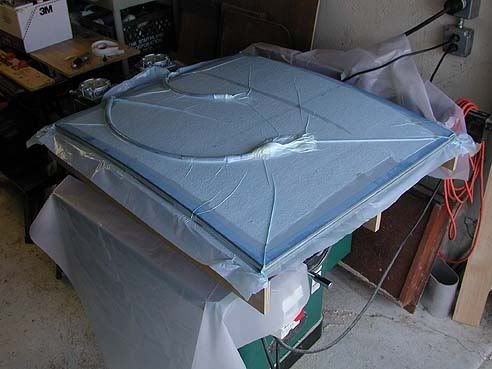
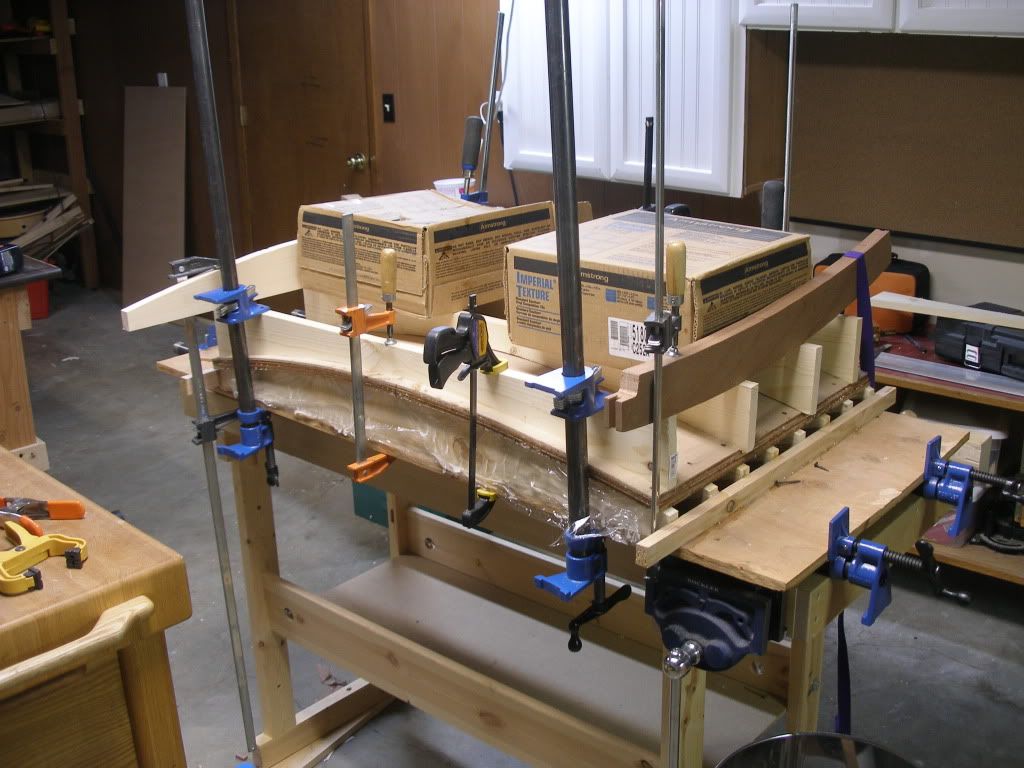
Has anyone done this before. I know its only 4 or 5 pieces of wood but the angles, grooves and bows are a bit intimidating. I'm planning to make this out of Mahogany and hit it with alot of varnish.

Anyone do this before? I'd love to have some pics...advice or instruction. Whenever I post it always seems to save me time and effort.

cheers
jt
 

Martin King

Sustaining Member
Blogs Author
Here's a pic of the one I built

slidinghatch.jpg
 

treilley

Sustaining Partner
Martin, can you describe the construction method you used? Any photos of the work in progress?

Very nice work BTW.
 

Loren Beach

O34 - Portland, OR
Senior Moderator
Blogs Author
JT, If you can build a form (or use the old hatch as a form) you could lay up a composite hatch over the form. Use a veneer layer for the top and bottom and a core of balsa with some 9 oz cloth between the top and bottom and the core. I am not sure of how many layers of cloth would be proper, but several might be involved. This would give you a reasonably light structure that would be very strong and, being sealed in epoxy, would never delaminate again. Finish out the wood surface with epoxy and layers of UV-resistant varnish and "Bob's your uncle."

Of course, being several thousand miles away, it's easy for me to Armchair Quarterback!
:rolleyes:

Best of luck,
Loren
 

rgoff

Member III
I rebuilt my E27 hatch a few years back. The curved plywood base had begun to delaminate. I took all the wood pieces off it and replaced it with a piece of bendable plywood coated with epoxy resin. I then reattached all the wood pieces. Bendable plywood is made with the grain of all the layers running in the same direction. Still holding up well a few years later.

This way I didn't have to reproduce the existing tricky angles in new wood.
 

Attachments

  • hatch3.jpg
    hatch3.jpg
    56.1 KB · Views: 8,922

Martin King

Sustaining Member
Blogs Author
Martin, can you describe the construction method you used? Any photos of the work in progress?

Very nice work BTW

Thanks, Tim. I posted this project before but this question comes up
pretty regularly. Maybe we should start a wiki/knowlege base so folks
won't have to do a search all the time.

The problem with these hatches on older Ericsons is they sit out in
the weather usually and unless carefully maintained, the ply delaminates.
The companionway hatch is usually the first to go. It certainly was
the first woodworking project I dealt with on my boat. There are
different ways to go about constructing stuff like this, and since I
love the look of bright finished wood aboard my boat, my choice of
materials was a foregone conclusion. You can build something out of
'glass but that would have been inappropriate on a 31C. Here is how
I did it:
Any fine woodworking project starts with wood selection. Good
looking straight grain teak was selected and resawn and planed
down to 1/4" and left for a couple weeks to acclimate in my shop.
Meanwhile, I got busy making a form to bend the lams. The curve was
taken off the existing hatch and radiused slightly more to account for
some springback.
hatchform.jpg

This thing was built heavier than it had to be out of scrap wood
I had laying around. I finished the form with a piece of luan tacked
and glued down and then epoxy coated to seal it.

The teak was then jointed on the edges and then glued up to form
the outer skin of the hatch paying attention to grain patterns.
veneer.jpg


I selected 2 1/4" (6mm) Baltic Birch ply for my lams and then glued
up my panel using a foam roller to spread the epoxy evenly. For clamping,
I vacuum bagged right to the form using standard techniques here.
vaccumbagging.jpg


The rest is just straightforward wooddorking: Trimming the panel to size,
and attaching the solid teak frame work with screws and glue. I basically
followed Ericsons design here with one modification. Instead of having
the hatch ride directly on the runners, I installed small blocks of UHMW
on the inside corners cut to the correct bevel. These blocks really improve
the sliding function and are easily replaceable. After 5 years of service,
the hatch still looks and works great.
 
Last edited:

jthistle

Member II
Wow...Thanks for the input. I'm goin to have a go at this asap.

Martin...that`s one heck of a job you have done there - absolutely beautiful.

I`m going to go a little more quick and dirty and as suggested...get me a good piece of 5/8 mahogany plywood and bend it to fit the front and back curvy pieces. Might cut some kerfs in underside before epoxy coating and curving - that should help with keeping the form.

thanks again all - for your help. I'll post some snaps of before, during and after.

cheers
jt
 

davisr

Member III
For the many who have refurbished a companionway hatch, I have a question: have you ever found that Ericson used something other than plywood as the substrate beneath the teak? I ask because the hatch on my E25cb is rather thin. There is teak on the exterior; glass on the interior. Certainly there is something between. The arched top of the teak exterior is firm. The sides, however, are spongy, (not the teak, but beneath the teak), which suggests that there is delamination of some sort between the teak and the glass. A buddy of mine, who is the owner of a wooden sailboat, checked out my hatch today. He thinks that I can get away with injecting epoxy into the spongy areas on the sides. He also thinks that I should strengthen the underside by adding several more layers of glass with stiffeners. Just wondering if anyone else out there in the Ericson community has attempted a fix along these lines. I hate to tear the whole thing apart.

I include here a picture of the hatch as it appeared when I first checked out the boat when it was for sale. The next picture shows it on the day of the survey. The owner had decided to caulk the cracks and put two coats of varnish on it to dress it up for the survey.

Thanks for any suggestions,
Roscoe
 

Attachments

  • DSCN7987.jpg
    DSCN7987.jpg
    53.8 KB · Views: 258
  • DSCN8115.jpg
    DSCN8115.jpg
    61.6 KB · Views: 343

Martin King

Sustaining Member
Blogs Author
construction of your companionway hatch

--------------------------------------------------------------------------------

Hey Martin,

I've read many threads about the construction of companionway hatches, and I have found your posting and pictures most helpful. As many times as I have read this information and thought about it, I am still stumped on one (or maybe two) of the steps. You show, in your pictures, the heavily built wooden form, and you say that you tacked and glued luan on top of it. Afterwards, you epoxied the top of the luan in order to seal it up. Two pictures/captions later you mention that you used 2 1/4 birch plywood for your lams. The teak veneer then went on top of this. What I don't fully understand is the step that takes place between the laying of the luan on the form and the application of the birch plywood. I'm guessing that since you speak of putting epoxy on the luan in order to seal it up, the luan is the substrate upon which the birch is itself epoxied. If this is correct, the other step that I am unsure about is this: how did you remove the whole thing (the luan, birch, and teak sandwich if you will) from the heavy wood form, if the luan (the first layer in the sandwich) had earlier been tacked and glued on top of that heavy form?

Thanks so much for any help you may offer,
Roscoe

Roscoe Davis
E25, cb, #226
Charleston, SC

P.S. I don't mind if you respond to this message publicly on the forum for the sake of helping others with this

Roscoe,
Sorry for the confusion. The luan I spoke of was tacked down and
epoxy coated in preparation for vacuum bagging. It was not part of my
laminate schedule. You need an airtight surface to bag against. The
laminations were 2 6mm baltic birch plys with a 6mm finish layer of teak
laid on top. The form was built wide enough to allow for my part +room
for the bagging tape and the part was glued up in one session. It's been
quite a while since I made this and my memory aint so great but I probably
spread wax over the luan to help with any epoxy bleed through. If I were
doing it again today, I would opt for a piece of formica over the luan instead
of waxing. Hope that cleared it up for you.

Martin
 

davisr

Member III
Martin,

Thanks for getting back in touch. I see now what you're talking about. The wooden-framed form with the luan on top is a form not much different from a mold used in creating a custom fiberglass shape; it is simply there to give a proper form, i.e., shape to the working piece. As in fiberglass work, the goal is to be able to remove the working piece easily from the form/mold after the working piece has attained a solid or cured form. This is why you say that, if you were to do it again, you would probably put a piece of formica over the luan instead of waxing the epoxy-coated luan. The smooth surface of the formica would be an easier way of ensuring that the bottom piece of birch would not accidentally adhere to the form in the event that the epoxy used to bond the bottom and top pieces of birch were to penetrate the bottom piece.

I also understand what you are saying about the necessity of constructing the form so that it will be slightly larger (i.e, wider and longer) than the three-layer birch-birch-teak sandwich. By making it slighly larger, you allowed there to be a space along the edge of the sandwich. It was on this space (which likely resembled a picture frame of sorts around the sandwich) that you taped the vacuum bag.

If I am understanding you correctly, what you did next was turn on the vacuum. The vacuum then forced the bag downward, which, in turn, forced the birch-birch-teak sandwich downward with such force that it forced the sandwich to assume the shape of the form. Then, after the epoxy cured, you turned off the vacuum, removed the bag, and then removed the sandwich from the form.

Now that I think I understand this technique, I am wondering if I could do something similar in a two stage process without the vacuum bag (since I don't own vacuum bag materials). I could construct the form in a similar fashion. Then, in the first stage of the laminate process I could epoxy the bottom piece of birch to the top piece and then clamp the two pieces together so that they conform to the form. After the epoxy in these two pieces cured, I could, as the second stage of the process, epoxy the veneer on top of the birch-birch lams. I'm not sure when vacuum bagging came into existence (maybe it's been around a long time), but I would think that the technique I just described is the older method used for the construction of these hatches.

Does it sound like I'm on the right track with this proposed alternate technique?

Thanks for all the help,
Roscoe
 

Martin King

Sustaining Member
Blogs Author
Glad you understand the process. Regarding alternative methods,
you could do it with clamps and cauls but the gentle curve of this part is ideal for vacuum pressing. Vacuum pressing ensures the part is squeezed evenly over the entire surface and results in a void free laminate. It's
also very easy to do-all you need is a pump, some plastic and some
bagging tape.
 

sveinutne

Member III
Hi Roscoe,
I had problems with my hatch. It was leaking and did not look nice. The teak had started to come loose and a previous owner had used long screws to hold it together. I removed the screws, and sanded each teak board and put it in with teak oil so it got the nice color back. The hatch got a layer of fiberglass on the inside and then two layers of paint. The top got two layers of new fiberglass and then a thick layer of epoxy. The teak planks was glued in the epoxy.
Now the hatch is very strong and looks nice.
Svein
 

windjunkee

Member III
This is slightly off topic, but I have the typical hatch on my E-32 and when we get green water on the cabin top with the hatch closed, its like someone is dumping buckets of water below. I've been told you can install something called a "turtle" over the hatch to prevent some of this water intrusion.

Anyone ever heard of this or know where to get one?

Jim McCone
Voice of Reason E-32-2 Hull #134
Redondo Beach, CA

p.s. VOR has committed to the Del Rey YC Puerto Vallarta race again next February. We're either crazy or stooooopid .. or perhaps a little of both, but here we go again!
 

davisr

Member III
caul technique for constructing hatches

Svein,

I started off thinking that I could repair the hatch on my E25. The more I disassembled the water-damaged pieces the more I came to the realization that I had no choice but to build a new one. I have pictures of the disassembly of the old hatch, and I plan to post them for the sake of sharing knowledge of the original construction pattern.

Loren,

That is an excellent thread that you provided for the E27 hatch rebuild. I especially like it because you can see the alternate version of constructing the curved plywood laminate piece through the use of cauls. It was Martin, of course, who mentioned cauls as an alternative to the use of vacuum bagging. I must admit that I had never before heard the word "caul." After reading Martin's thread I Googled "caul" and the first thing that came up were strange websites about the mystical importance of a child who is born "in caul," or "under the caul," which means born with some sort of eveloping membrane around it. When I Googled "caul AND woodworking," I gladly found some helpful information on the sort of caul that I was looking for. For those who don't know - and there must be many, for a friend of mine who is a wood-working professional finish carpenter said that he had never heard of such a thing - a caul is a bow-shaped piece of wood that is used to span a curved surface so that with clamps placed at either end of the caul, the entire curved surface can be pressed firmly.

This caul technique must have been the technique used before the advent of vacuum bagging. Perhaps it was the technique used for the construction of the hatches by the Ericson people back in the 70s. I don't know when vacuum bagging was invented. At any rate, the link that Loren provided is very helpful. Thanks man!!

Best regards,
Roscoe
 

Kevin Johnston

Member III
Turtle cover for your hatch

This is slightly off topic, but I have the typical hatch on my E-32 and when we get green water on the cabin top with the hatch closed, its like someone is dumping buckets of water below. I've been told you can install something called a "turtle" over the hatch to prevent some of this water intrusion.

Anyone ever heard of this or know where to get one?

Jim McCone
Voice of Reason E-32-2 Hull #134
Redondo Beach, CA

p.s. VOR has committed to the Del Rey YC Puerto Vallarta race again next February. We're either crazy or stooooopid .. or perhaps a little of both, but here we go again!


Below is a pretty good link that describes a turtle cover for hatches (pg. 8 of the link below). I have taken on alot of water before on my E27 via the hatch as well. The site suggests finding some one good with glass work and commissioning the work.

http://books.google.com/books?id=P7...&resnum=4&ved=0CCAQ6AEwAw#v=onepage&q&f=false
 
Last edited:

davisr

Member III
picture of caul technique

So that everyone understands what I was talking about in the earlier posting, here are pictured cauls and the caul technique. I extracted this photo from the link that Loren provided. It's a lengthy thread, so it takes a while to locate this picture.

This picture is really helpful. Last week I spent a good bit of time on Google Images or Google Web looking for examples of cauls being used in the construction of a companionway hatch. No luck. Without a picture, I was having a difficult time trying to figure out how I could adequately clamp bow-shaped cauls on top of the arch, since the bottom of the arch would be resting on the wooden form. The problem, as I saw it, was that the wooden form beneath the arch would interfere with the clamping of cauls. I could only conceive of the cauls as bow-shaped, since all of the cauls I saw on the web were bow-shaped. Notice how this fellow solved the problem. Instead of making the cauls truly bow-shaped, i.e. shaped like a bow that would shoot an arrow, he made the cauls concave on the bottom side and flat on the top. This allowed him to set the heavily weighted boxes on the flat top. Weighted boxes therefore serve as clamps in the center portion of the arch.

Hope this helps anyone who may be facing a similar task,
Roscoe


P2140087.jpg
 

davisr

Member III
Martin,

In re-reading your posting, I have a follow-up question about your use of UHMW. Here's what you say:

"The rest is just straightforward woodworking: Trimming the panel to size,
and attaching the solid teak frame work with screws and glue. I basically
followed Ericsons design here with one modification. Instead of having
the hatch ride directly on the runners, I installed small blocks of UHMW
on the inside corners cut to the correct bevel. These blocks really improve the sliding function and are easily replaceable.
After 5 years of service, the hatch still looks and works great."

Having nevered heard of UHMW, I googled it and discovered that it stands for Ultra High Molecular Weight (Polyethylene). Apparently this has a wide range of uses from artificial joints in medical procedures to throat plates for table saws.

Just wondering if you could provide a more thorough description of the way in which you installed the UHMW. Sounds like the UHMW has served you well. I'm hoping to built this hatch right the first time. The main reason why I removed the old hatch in the first place was because one of the teak runners had deteriorated to the point where it was no longer capable of gripping the stainless steel track.

Thanks again for the help,
Roscoe
 
Top