I had posted some time ago that I was getting to this project. It took some time but I have just made some major repairs and thought I would share my thoughts on the process.
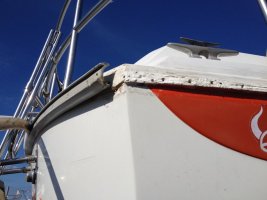
I removed the rub rail and mounting bracket. The bracket is in good condition and the rubber is holding up for it's age although it is oxidized and quite hard in spots.
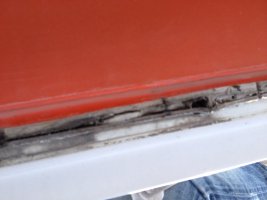
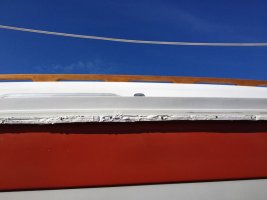
Upon removal of the bracket I noticed quite a few gaps between the hull/deck joint. There are also signs that there was a repair made by the PO.
One of the biggest problems was at midships where there was a half inch gap, yikes. (sorry, pic is upside down. But you get the idea)

After much thought and varying advice from fellow boaters I decided to clean the gap and screw holes and apply 3M 5200 between the seam. 5200 is often used as the adhesive to bind hull deck joints. In order to keep the screw holes from filling with 5200 as well, I stuck chopsticks in the holes while filling the gap in between. While this was setting, I set to work cleaning the track and rubber rail to remove debris and allow for an easier installation of the rubber rail.


I also bought screws with the same thread but a quarter inch shorter and with a phillips head so that they could be screwed in with a drill (lots of screws). Some of the previous screws we long enough that they slightly punctured into the interior hull and may be the source of a leak in the quarter berth. (I will let you know if this was the fix as the season progresses)
Once the 5200 was set, I completely filled the screw holes with 3M 4200, more of a sealant than an adhesive and screwed the track back into place.
The weather has been quite cold and many a member was warning of the dangers of shrinkage (fill in your own joke here). One fellow sailor, when doing the same job wound up with 1.5 feet short of rub rail on each end. Luckily, I didn't have this problem. We greased the track with Armor All and began to install the rail: A line tied to a hole in one end of the rubber allowing one person to pull and another person on the other end feeding the rubber rail into the track. After about 2 feet, friction quickly halted our progression.
With our McGuyver hats on, we noticed that the boat on the hard in front of us had a winch in line with our track. Very lucky indeed! We used the winch to haul the entire rail through the track while lubricating the track with Armor All. Not only did we easily get the rail back into the track but the force on the rubber rail has left me with an extra 6" of rail at the end of the track. I have bolted in the front of the rail and will wait a few days to see if some of the slack will slide in. If not, I will trim the excess and put the corner cap back on.
Hope this helps if anyone is thinking of tackling the same job.
Cheers,
James
I removed the rub rail and mounting bracket. The bracket is in good condition and the rubber is holding up for it's age although it is oxidized and quite hard in spots.
Upon removal of the bracket I noticed quite a few gaps between the hull/deck joint. There are also signs that there was a repair made by the PO.
One of the biggest problems was at midships where there was a half inch gap, yikes. (sorry, pic is upside down. But you get the idea)

After much thought and varying advice from fellow boaters I decided to clean the gap and screw holes and apply 3M 5200 between the seam. 5200 is often used as the adhesive to bind hull deck joints. In order to keep the screw holes from filling with 5200 as well, I stuck chopsticks in the holes while filling the gap in between. While this was setting, I set to work cleaning the track and rubber rail to remove debris and allow for an easier installation of the rubber rail.


I also bought screws with the same thread but a quarter inch shorter and with a phillips head so that they could be screwed in with a drill (lots of screws). Some of the previous screws we long enough that they slightly punctured into the interior hull and may be the source of a leak in the quarter berth. (I will let you know if this was the fix as the season progresses)
Once the 5200 was set, I completely filled the screw holes with 3M 4200, more of a sealant than an adhesive and screwed the track back into place.
The weather has been quite cold and many a member was warning of the dangers of shrinkage (fill in your own joke here). One fellow sailor, when doing the same job wound up with 1.5 feet short of rub rail on each end. Luckily, I didn't have this problem. We greased the track with Armor All and began to install the rail: A line tied to a hole in one end of the rubber allowing one person to pull and another person on the other end feeding the rubber rail into the track. After about 2 feet, friction quickly halted our progression.
With our McGuyver hats on, we noticed that the boat on the hard in front of us had a winch in line with our track. Very lucky indeed! We used the winch to haul the entire rail through the track while lubricating the track with Armor All. Not only did we easily get the rail back into the track but the force on the rubber rail has left me with an extra 6" of rail at the end of the track. I have bolted in the front of the rail and will wait a few days to see if some of the slack will slide in. If not, I will trim the excess and put the corner cap back on.
Hope this helps if anyone is thinking of tackling the same job.
Cheers,
James
