• Untitled Document

    Join us on April 26th, 7pm EST

    for the CBEC Virtual Meeting

    All EYO members and followers are welcome to join the fun and get to know the guest speaker!

    See the link below for login credentials and join us!

    April Meeting Info

    (dismiss this notice by hitting 'X', upper right)

1st and 2nd reef downhaul

Bolo

Contributing Partner
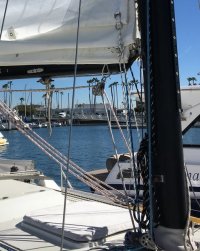
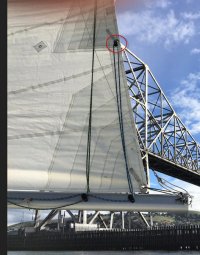
I own a 32-3 and I'm in the process of moving the spinnaker and jib halyards from the cockpit to the mast to make room for 1st and 2nd reef downhauls. There are a few reasons for doing this that I don't want to go into here because I think it's been covered in other posts. But my main objective is to be able to reef the main from the cockpit without going to the mast. I mostly use the 1st reef for now so I'm starting with that one first. I have most all of it figured out and have all of the parts to move the halyard to the mast (winch, winch plate, fasteners that include pop rivets and rivet nut for the cleat). But there is one detail about the downhaul at the mast I'm not sure about. Do I need to have some sort of block near the goose neck (besides the one at the mast base to turn towards the cockpit) so that when I tighten up the reef line at the clew the new tack isn't pulled away from the mast and putting too much strain on the sail around the new tack? The downhaul will be pulling down not towards the mast the way a reefing cringle would when put over a hook at the gooseneck. But I'm thinking that if I place the block for the downhaul on the plate at the bottom of the mast (where it turns towards the cockpit) forward enough that this might help in pulling the clew more towards the mast. Am I over thinking this! Us sailor are a paranoid bunch so maybe thats my real problem. :egrin: I've not been able to locate any photos of a set up like I'm planning to do so any advice from someone who's done it would be helpful. (Christian?)
 

Christian Williams

E381 - Los Angeles
Senior Moderator
Blogs Author
Turning blocks at the base of the mast work fine for me. The pull on the luff is straight down.

Number 1 and 2 reef downhauls lead to a double line clutch on the port cabin house. A deck organizer is required en route.

A winch for the downhauls is not usually necessary, since they are secured in the line clutch before the mainsail is winched up again (using the main sheet winch on starboard side).

Therefore, I don't see why you would have to move any winches just for reef luff downhauls.

The outhaul reef lines, however, do require a winch every time.

1-reef #3 close.jpg
 
Last edited:

Bolo

Contributing Partner
Turning blocks at the base of the mast work fine for me. The pull on the luff is straight down.

Number 1 and 2 reef downhauls lead to a double line clutch on the port cabin house. A deck organizer is required en route.

A winch for the downhauls is not usually necessary, since they are secured in the line clutch before the mainsail is winched up again (using the main sheet winch on starboard side).

Therefore, I don't see why you would have to move any winches just for reef luff downhauls.

View attachment 25237

Christian, Thanks for the photo, makes me feel better. I probably wasn't clear enough in my description. I'm not adding a winch for the downhaul. The added winch is for the spinnaker halyard that I'm moving to the mast along with adding a cleat below to tie it off. This move will clear up another slot in the deck organizer and the cleat that the spinnaker halyard is currently tied off to in the cockpit. I may change it to a rope clutch later on but for now the cleat will work. I don't use a spinnaker (opting for a whisker pole with the jib) but I have used it to bring the dinghy up on deck so having it at the mast will actually be better and open up a path for the downhaul. Later I'll be doing the same sort of thing for the jib halyard (port side) in the cockpit which I use twice a year. Once to raise the jib and the second to lower it so putting it up on the mast (after I obtain parts for that) and opening a path for the second reef downhaul (which I'll rarely use) would be comforting to have. Yes, not having BOTH reef downhauls on the same side as the main halyard is not the best way to do it but it allows me to make all of these changes without having to add a rope clutch for both.....which I may do later.
 

oldfauser

Member III
after seeing this thread...

we are looking into adding the downhaul lines for the forward end of the main for our two reefs. We currently have a Schaefer triple deck organizer; thinking about replacing it with a double stack version. I'm thinking it's a series 5 organizerdeck organizer.JPG Without driving back to the boat... can anyone confirm this? (I'm hoping that the mounting holes are the same to avoid the filling and redrilling of hole in the boat!)

thanks!
 

Kenneth K

1985 32-3, Puget Sound
Blogs Author
I'm thinking it's a series 5.

Yes. That looks like a series 5 (2" dia sheave).

I'm doing a similar thing with my boat. I bought a 7 series 2x2 stacked double on eBay. I'm going to replace the existing 2-sheave organizer (5 series, to starboard) with this one, then stack the old double on top of the original triple to port (so 5 sheaves to port, 4 to stbd).

The stacked models are just two "singles" stacked atop each other with a single cover plate and longer screws. If you wanted, you could buy a new 3 sheave single and stack it atop/below your existing one. If you want all new sheaves as well, though, it might just be a wash to buy the new 3x3.

Also, if you're running wire-rope halyards, you may need to buy metal sheave(s). The organizers only come with the Delrin?? sheaves.
 
Last edited:

oldfauser

Member III
thanks Ken... you have great ideas! I was thinking that they are one piece units, but your correct that they are not. I really like the idea of stacking a second three on top of what we have.. :egrin:

less holes and cheaper too..

thanks!
 

tenders

Innocent Bystander
The black anodization of mine wore off after who-knows-how-many years (more than the 26 I've owned the boat), so I bought some black "vinyl wrap" from eBay and put it on. This took five minutes and I expected it to last half a season, didn't really care if it came off.

Well, that was two years ago. It's still on there and looks great.
 

supersailor

Contributing Partner
I wanted to go to single line reefing for each reef on my 34-2. Litterly everyone advised against it because of too much friction. Being a stubbron old Scotsman, I did it anyway. It works great and frees up two slots in the turning shives. Having Barient 24 two speeds on the cabin top probably helps too. This freed up two slots in the turning blocks so I only thave 5 (douple stacked) on one side and three on the other. Quite a little spaghetti factory!
 

Kenneth K

1985 32-3, Puget Sound
Blogs Author
I wanted to go to single line reefing for each reef on my 34-2. Litterly everyone advised against it....

Bob, I've been considering single line reefing too. Judging from the excess length of the reefing lines and a few extra cheek blocks on the boom, I think my boat may have previously been rigged that way.

Do you have any pictures of your rig? Especially at the mast/downhaul end? I'm assuming the setup at the outhaul end is the same regardless of single line or double line reefing.
 

supersailor

Contributing Partner
Hi Kenneth,

Unfortunately, I have had and am still having medical problems. My daughter and a couple guys from the Yacht Club re-winterized the boat in late April so the sails are in my men's master closet. And the lines are wrapped up around the boom. I am still under "house arrest" and cannot go down to the boat at this point. A quick scan of my photos doesn't show the setup in good detail so a description of it is the best I can do at the moment. I believe the 32-3 has the same setup as the 34-2.

The aft reef lines disappear into the back of the mast and reappear at turning shives at the front bottom of the boom. The front reef was hooked on a reef hook screwed onto the mast. It seemed a pretty dumb system to me as you had to lower the halyard at the cockpit reef the back reef at the cockpit, then go forward to hook the front reef. If you misjudged the drop, you had to go back to the cockpit again to lower it more then forward again while the boat was bouncing like a bronco and the spray was flying. Much better doing the reef in one place whether it be forward or aft

Because I didn't want to relocate those shives to the top of the boom and cut two slots in the top of the boom until I knew the system worked, I ran them down to a double block back up to the reef point on the sail and back to the double block. That worked so I haven't felt the need to do the extra work to bring them out the top. It means a little extra line but it also means another two to one reduction for ease of use.
 

Kenneth K

1985 32-3, Puget Sound
Blogs Author
Bob, sorry to hear you've been ill. I hope you're back up and at it soon.

I lost most of last summer's sailing to hip replacement surgery. It took a few months before I could manage the maneuver from the dinghy to the boarding ladder.

Your boat, in prime shape, will be ready for you when you return.
 

Bolo

Contributing Partner
Jib halyard moved.

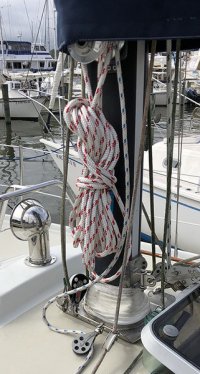
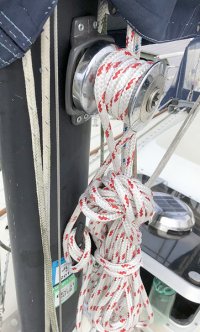
I completed my work in moving the jib halyard, on the port side, out of the cockpit and back to the mast, since this line is rarely used. This opened a path for me to install a 1st reef downhaul through a block at the mast base, through the deck organizer and through the rope break in the cockpit making it easier and safer to reef while under sail. In the process I’ve learned a few things along the way, as is the case with most projects, so I’ll share it with you since that’s one of the main reasons for this forum.
JH4.jpg

I have a saying that I use, “POE”, which stands for Plan, Organize, Execute.

PLAN
So the planning for this project was fairly straight forward especially with info gathered from a few sources on this web site. My plan was simply to move the jib halyard to a new winch on the mast, add a cleat to tie off the line and then a first reef down haul line back to the cockpit using the same path that the halyard had used to the mast from the cockpit.

ORGANIZE
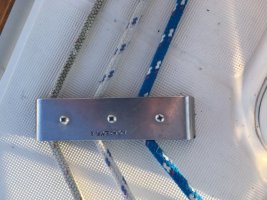
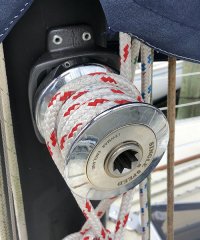
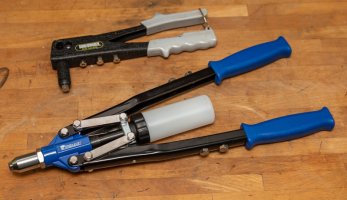
The organizing part took more time, of course. First I had to gather all the parts to relocate the halyard to the mast. I was fortunate to find a single speed #8 Lewmar winch on eBay, for $65, that was in great shape and appeared to never been installed. From Defender I ordered a Selden Winch Pad with a 5 degree rake (to prevent over wrapping) for $78 and from West Marine a 6” Nylon horn cleat for $3. On Amazon I bought a package of (30) 1/4-20 stainless steel rivet nuts for $8, the smallest amount I could find even though I really needed only two for the cleat. The Selden Winch Pad came with the five biggest pop rivets that I ever saw and I believe that they were stainless steel. They would require a 1/4” hole drilled into the mast to mount the pad. My “puny” little pop rivet gun just wasn’t up to the job and it didn’t have a head to fit the large pop rivets anyway so I found a “Pittsburg” large, double handled pop rivet gun at my local Harbor Freight store that could handle the five large pop rivets that came with the winch pad. That cost me $20. Finally I had to find a rivet nut tool that cold handle the 1/4-20 stainless steel rivet nuts. After looking for the best deal I found an “Astro Pneumatic Tool 1442 13" Hand Rivet Nut Setter” for $62 on Amazon. I did find a smaller tool at Harbor Freight that could handle 1/4-20 rivet nuts but only aluminum ones and not the the stainless steel kind because they were so much harder. I also ordered a small bag of 1/4-20 x 1/2 stainless steel flathead screws from Amazon for $12 to mount the winch to the winch pad.
JH2.jpg
Lewmar #8 Winch mounted to Selden winch pad
PITTool.jpg
Double handled pop rivet next to my totally inadequate small pop gun.
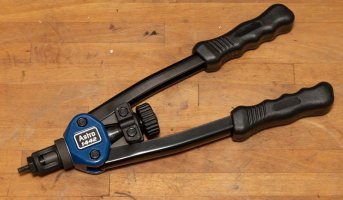
Astro1442.jpg
Astro Pneumatic Tool 1442 to seat the 1/4-20 s/s rivet nuts

EXECUTE
The first thing was to drill and tap five 1/4-20 threaded holes into the winch pad that went without a hitch. Special care should be taken to drill the holes into the correct places on the Selden winch pad and that is info shown on the pad itself. Back on the boat I located the position of the winch pad and cleat then marking holes on blue tape I put over the areas. Then I used a punch on each point before drilling. Mounted the winch plate using the five pop rivets that came with it. Even with the large double handled pop rivet gun it was a bit of a strain to pop the rivets in but it’s not impossible. It just took more effort then I expected. The Astro Rivet Nut setter was another matter. I used it to seat the two 1/4-20 stainless steel rivet nuts in the mast for the cleat. When I used it I learned that I had to adjust the tool so that the handles were closer together, about a little more then half way between fully open and closed, because in the fully open position it was impossible to seat the stainless steel rivet nuts. One of the rivet nuts were malformed after I seated it, probably because of my inexperience even though I did practice with the tool at home, but I was able to use the same drill bit I used to make the original holes to drill the rivet out and do it again. Second time worked well. I highly recommend practicing with the rivet nut setting tool.


This past weekend, with winds gusting to over 20 knots I was able to reef the main from the cockpit so moving the jib halyard to the mast and adding a 1st reef downhaul has already paid off. I’m going to do the same thing for the 2nd second reef down haul on the starboard side by moving the spinnaker halyard to the mast and opening another path to the cockpit.
 

Attachments

  • JH1.jpg
    JH1.jpg
    74.4 KB · Views: 132

G Kiba

Sustaining Member
Bob, I've been considering single line reefing too. Judging from the excess length of the reefing lines and a few extra cheek blocks on the boom, I think my boat may have previously been rigged that way.

Do you have any pictures of your rig? Especially at the mast/downhaul end? I'm assuming the setup at the outhaul end is the same regardless of single line or double line reefing.

single line reef2.jpg
I have been using a single line reef for over 10 years on my E27 (small main). It works well. You are right! Friction is a problem. I used soft shackles to attach small Harken blocks at the reef points on the sail. Huge difference. Got the idea from a Beneteau 323.
 

goldenstate

Sustaining Member
Blogs Author
Type/Diameter of downhaul lines?

I am curious what type/diameter of lines people use for reefing clew downhauls. I have a first and second reef points in my main and contemplate adding a third at some point in the future. Assuming a line to outhaul (3) clews and and downhaul (3) tack points, the potential for six lines elevating and lowering with the main sail would suggest to use as light of a line as possible.

I will winch-tighten the clew lines, so having a thicker line that is easier to handle for those makes sense.

For the tack downhauls though, I have the main halyard to re-engage tension in the luff. Should I just use a narrow gauge strong line to keep things as light as possible? The idea would be to lower the main the the appopriate height, cleat off the downhaul with a tug but no winching, then raise the halyard.

Are there other factors I should consider?
 

Christian Williams

E381 - Los Angeles
Senior Moderator
Blogs Author
I use 3/8s double braid on the E38 reef lines. They're subject to chafe when used a lot, so lighter wasn't persuasive. But a test with 5/16th might be useful on a 32.

I use reef downhauls simply so I can reef at night, alone, without leaving the cockpit. They replace a crew. For normal coastal sailing I wouldn't bother with them, and just have the appropriate "dog bones" on the cringles and expect someone to climb onto the cabin house each time and hook the tack to the reef horns. We often have to go there anyhow to clear fouls or neaten the reef or just as an excuse to get out of the cockpit.

I think my downhauls are 5/16ths.

By the way, we only have two sheaves at the end of the boom. Therefore, a third reef means rigging the lines (temporarily) so you have no first reef. You also have to transfer the downhauls from the first reef luff cringle to the third reef luff cringle.

Dog bones are dead simple, once installed need no attention, and we can make them ourselves out of a loop of line or Dacron tape and two
stainless rings

.dog bones.jpg

The third-reef dog bone is likely longer (6" maybe"), because there is so much sail stacked above the horn.

Jeez what a blast of jargon this is.
 
Last edited:

goldenstate

Sustaining Member
Blogs Author
@Christian Williams Thank you for the information on your downhaul line diameters.

I've inherited a Harken 251 single-line reefing system mounted on the outside of the boom, which does not work very well as intended. However I could use the blocks to mount a 'permanent' third reef clew line (in addition to the two in-boom ones). Three attached would probably be "too many damn lines" on the cabin top and the sails. I need more practice with my first and second to make a more informed decision. Thank you again for your help.
 

bgary

Advanced Beginner
Blogs Author
I use 5/16 VPC for my reef-lines. More than strong enough, run smoothly through the sheaves, a pretty low-friction cover, and a lot more flexible than what I had tried previously (MPX).

For the forward end, I made up a couple of tackles: single-block with a hook for the top end, single block with becket and snap-shackle and cam-cleat at the bottom. The hook, obviously, goes to the sail, the bottom snaps to a spare hole in the mast collar, with the tail led back. I can pull the tack down easily (2:1 advantage), and can run the tail to either cabin-top winch if needed, all without leaving the cockpit. As a side-bonus, I can also use that tackle as a preventer - hook the hook to the boom-vang bail, snap the bottom block to a stanchion base, and I've got a preventer I can snug or release from the cockpit.

Obnote, yes, it can be a challenge to run a 3rd-reef line when you need one.. especially as you may not know you'll need it at the time you put in the first reef. One approach is to run an endless loop of cord (tagline, dyneema cord, whatever) between the 2nd-reef cringle and the 3rd-reef cringle (and leave it there all the time). If/when the 3rd reef is needed, you can un-reave whichever of the two reeflines is not currently in use, tie or tape it to the cord and use the cord to pull the line up through the 3rd-reef cringle and back down to you. It requires that you be able to reach the end of the boom, which may be problematic in conditions that would warrant a 3rd reef, but it does work.

$.02
Bruce
 

Christian Williams

E381 - Los Angeles
Senior Moderator
Blogs Author
Hadn't heard about that endless loop. Certainly better than lowering the sail to install the third reef in 30 knots. No problem for me, of course, with my superhuman strength and lightning reflexes and exquisite balance whilst on tiptoes on the coaming. But others complain that the sail flaps raaather a lot, and it is easier to pass a camel through the eye of the cringle than the reef line in your hand.
 
Top