• Untitled Document

    Join us on March 29rd, 7pm EST

    for the CBEC Virtual Meeting

    All EYO members and followers are welcome to join the fun and get to know the guest speaker!

    See the link below for login credentials and join us!

    March Meeting Info

    (dismiss this notice by hitting 'X', upper right)

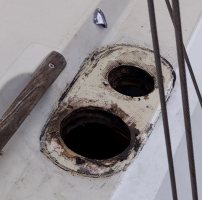
A "big one" - rotten deck under heater chimney

bgary

Advanced Beginner
Blogs Author
Use regular neat epoxy and just paint it in with a long-handled brush and a prayer

I agree. And one possible old-school trick from back in the day is to use a partially-inflated ziplock bag. We used to mix up (as my aussie friends used to call it) a "pot of bog" - thickened epoxy, to a consistency of putty with a little "slump" to it - slather it into the gap, and then shove a partially-inflated ziplock in behind it. If you do it right, the ziplock bag will wedge into the gap and provide a bulkhead, of sorts, holding the epoxy into solid contact with the core and the top/bottom skins until it sets. Once it is set you can pull out the ziplock bag and know you have a solid surface to work against.

May or may not be appropriate in this circumstance, but a useful trick to have in your bag.

Bruce
 

bgary

Advanced Beginner
Blogs Author
gorilla tape (though this was not perfect

Get some "preservation tape". Amazon has a whole bunch of sizes in the "Dr. Shrink" brand, way cheaper than the same stuff from 3M:

https://www.amazon.com/s?k=dr.+shri...prefix=dr.+shrink,aps,330&ref=nb_sb_ss_i_2_10

Designed to seal a shrink-wrapped pallet of cargo, this stuff is magical. Waterproof, sticks to fiberglass easily (even non-skid), bends and stretches to accomodate shapes, and comes off without leaving any residue.

Bruce
 

Geoff W.

Makes Up For It With Enthusiasm
Blogs Author
Get some "preservation tape". Amazon has a whole bunch of sizes in the "Dr. Shrink" brand, way cheaper than the same stuff from 3M:

https://www.amazon.com/s?k=dr.+shrink+tape&crid=1JC67JNTLLMDV&sprefix=dr.+shrink,aps,330&ref=nb_sb_ss_i_2_10

Designed to seal a shrink-wrapped pallet of cargo, this stuff is magical. Waterproof, sticks to fiberglass easily (even non-skid), bends and stretches to accomodate shapes, and comes off without leaving any residue.

Bruce

Sold!
 

Geoff W.

Makes Up For It With Enthusiasm
Blogs Author
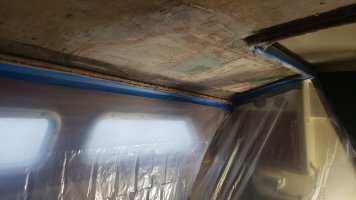
Close the bottom sides of the two holes, between the headliner and interior layer of structure, with a piece of aluminum flashing that has a few thick coats of floor wax. The reason I use aluminum is it's cheap, just stiff enough but not too stiff, easily cut with scissors, and won't have a problem with the heat of epoxy. The fiberglass on the cabin side will be rough and the flashing can be effectively sealed in place with a ring of modeling clay around the holes. Not a good place to use tape so press the flashing up to stay in place across the bottoms of the two holes with a long piece of furring strip and a pad of rags on a small flat board. Now you have a one sided repair and stuff won't drain into the cabin.

Been thinking about this as I let things dry out (been difficult with the rain)

Do you have any pictures or diagrams of what you're talking about here? I'm trying to visualize it but not sure I understand the rags/furring strip/board setup to cover the holes from the bottom.

Another question - in your instructions, do I go straight to packing in the mud-consistency epoxy mix, or should I first spread around a thin layer of neat epoxy to coat the raw balsa? Anyone have recommendations for long brushes for this purpose?

Is this the kind of shredded mat you're talking about? (link)

Also thanks to trickdhat for recommending a cold-weather epoxy without the amine blush. That's one part I don't quite understand - if I did a prep coat of neat epoxy before packing in the mud epoxy, how would I overcome the amine blush issue (if I was using West Systems)? And to what degree do I need to let the neat epoxy coating set before packing in the mud epoxy?
 

Tin Kicker

Sustaining Member
Moderator
See the photo in Post #12 above from bigd14 on how to hold up stuff to seal the bottom of the holes.

Not much sticks to wood with moisture in it. You're working in the end of a narrow slot so I'd just pack in the putty/matt thick mud mix with paint sticks or some other disposable tools.

Yes, a can of shredded matt like that will work great or if you have remnants of cloth you can make your own.
 

tenders

Innocent Bystander
I keep a ziplock bag full of fiberglass cloth remnants around specifically for the purpose of chopping up when I need that kind of filler. It is satisfying to have years of accumulation disappear into one project.

But personally, for this project I might just use an inch or so of that to interface between the edges of the intact core and the new core, whether that’s foam, plywood, or Azek (a very interesting idea I’d never heard of before). I think you’ll find it difficult to insert or move quantities of liquid or paste laterally like that with any consistency. Maybe put some into the edges of the hole, and then push it back with the inserted core material.

Regarding blushes: not a concern if you add subsequent epoxy layers within 24 hours of the initial layers. I must confess, I have rarely worried about and never noticed blush, and never had an adverse outcome with blush using West System.

Regarding brushes: this isn’t rocket surgery. Duct tape a Harbor Freight acid brush to a paint stirrer and make the magic happen.
 

tenders

Innocent Bystander
So the question arose concerning where you get “foam core” and it’s a good one. These materials really aren’t marketed to DIY boatowners and there isn’t much information on them out there and certainly no advertising.

I’ve used “Core-Cell” foam from Jamestown Distributors, or the equivalent from Defender. 1/2” thickness, and scored on both sides - not so necessary for a repair like this, but some repairs do require that scoring so the foam can follow a curve, so that’s what I buy for all repairs because there is often a decent amount of leftover. Do not run out of this stuff halfway through your fix and have to wait days to finish up while the first part of the project is cured. Just don’t.


The foam core, although it is a weird and sturdy-feeling material in its particular way, isn’t really there for strength. It’s there to give separation to the layers of fiberglass, which imparts stiffness on the structure, exactly like the tall center part of an I-beam. That Azek stuff at Home Depot isn’t foamy but it is similarly kinda sturdy-feeling, won’t rot either, I think it would take well to epoxy, it’s local, and it’s pretty cheap. I think it would work pretty well for this purpose.
 

Geoff W.

Makes Up For It With Enthusiasm
Blogs Author
Still working on this. Foam core finally arrived today from Jamestown Distributors - decided to go with core material instead of straight packing with epoxy due to the size and relative regularity of the area to be filled.

The nice thing about the few weeks wait is my tape/tarp hole cover has worked well after a minor adjustment (don't tape the bottommost edge - allows condensation to drain), and I believe it's as dry in the deck core as it's going to get.

Now to epoxy - looking at the Cold Cure stuff someone posted previously, and also looking at West Systems 205 Fast Hardener. Says minimum temp is down to 40F, but cure time is 8-12 hours still. This should still work fine, right? And do I have to worry about the heat generative capabilities of a deep hole packed full of uncured epoxy? It'd be nice not to melt my deck or start a fire.

Otherwise, all that's left is to get some brushes, some paint stirrers, plastic sheeting, various other bits and bobs and then hope and hope for a day where it's both above 40 and not raining... hard to come by around here lately. It'll be nice to get my heater back... my little Caframo space heater is working doubletime these days.
 

bigd14

Contributing Partner
Blogs Author
You most likely wont start a fire, but the epoxy could bulge or distort things if it goes off too quickly. Worst case scenario is that it bulges out the tape and plastic you tried to seal the underside of the deck with and the remaining uncured epoxy suddenly drains into the boat. Yes, that happened to me. After that I started laying a layer of fiberglass on the underside of the hole and let it cure before filling in the hole. Either way, you might consider two pours a while apart and let the first pour harden until its firm but tacky before pouring the next round. If it cures solid be sure to wash the amine blush off the surface of the first pour and sand it to get the next pour to bite.

Are you adding thickeners? Ideally you would use epoxy thickened with fumed silica for this work, instead of straight epoxy. Its the best filler, not lumpy and you can control the consistency just right to flow into all the crevices, but not so thick as to disappear out the bottom of your taped off areas or into voids in the core. I would coat all exposed surfaces with neat epoxy by brush first though, just to seal things off and create a good bond between the boat and the thickened epoxy.

Good luck and take lots of photos!
 

tenders

Innocent Bystander
If I correctly understand your plan, you aren’t going to have a deep hole packed full of uncured epoxy. You’re going to be coating foam core and the inside of the hole with epoxy, which isn’t going to generate or retain a lot of heat.

Epoxy gets interesting, in my experience, in the mixing container, and within about 10 minutes of mixing a batch of more than about a cup at a time. This is quite a bit of epoxy. If you’re paying attention to it, but not holding the cup in your hand, the first sign of trouble you get is an unusual medicinal/antiseptic smell, followed by a clump of epoxy forming in the cup with a jellylike consistency that quickly gets larger, followed by a very alarming degree of visible steam/fumes and eventually, I hear, flames, although I’ve never experienced that myself. The epoxy batch is pretty much useless once it gets to the jelly stage, and if it doesn’t combust whatever is left in the container will cure with miserable brittleness and sometimes holes in it. For this reason I pretty much always use the “slow” formulation of epoxy.

However, once a large batch gets spread out on anything with reasonable alacrity, the arrangement dissipates plenty of heat and there is no problem. So the trick to using larger batches of epoxy is to get it onto the repair as quickly as possible, ie when wetting out a large area of glass cloth or foam.

Again I don’t think you’re going to encounter these problems with your repair, because (1) you won’t be mixing large batches of epoxy to begin with, (2) you won’t be putting large amounts of epoxy anywhere, and (3) it’s cold outside.
 

Geoff W.

Makes Up For It With Enthusiasm
Blogs Author
Yes, the plan is currently a hybrid of what was suggested in this thread:
  1. Debond + clean the !@#$ out of the nonskid in the area
  2. Grind and scarf the nonskid around the forward hole to be filled
  3. Use aluminum flashing + preservation tape to cover up the bottoms of the holes as tight as possible.
  4. Plastic sheeting and masking tape everywhere, inside and outside.
  5. As light a coating of "neat" epoxy as I can get back there with an acid brush + paint stirrer. Main concern is it running down to the headliner.
  6. Maybe 1/2 - 1 inch of epoxy thickened with chopped fiberglass strands as a goopy "bed" to insert the foam core into. Applied to all available edges. Thick enough that it fills crevices but doesn't "flow", if that's possible.
  7. French toast foam sticks brushed with neat (or thickened?) epoxy and packed as tightly into the hole(s) as possible.
  8. Thin coating of thickened epoxy over the tops of the foam in the holes
  9. Roll out a new circle of cloth over the forward hole
  10. Let everything cure a couple days
In parallel is a workstream going on to procure some sort of replacement deck block to mount the chimney on, and to cover the forward hole with. Trying to find a woodworker around here to see how much it'd cost to pay a handyman to do it, as I don't have tools, a garage, or anything for wood work.

Once the deck block is procured,

  1. Re-cut the chimney hole
  2. Re-mount the deck block with RTV or some other temp-resistant caulk (could use suggestions here, not sure butyl is the move)
  3. Reconstruct the chimney stack, getting a good seal with RTV or other temp-resistant cault
  4. Stop freezing my @$$ off.
Lots of new stuff to me, but nothing new to the boat world, fortunately. The helpfulness of the forums is, as ever, invaluable.
 

Nick J

Sustaining Member
Moderator
Blogs Author
I'll throw one more pitch for removing the bottom skin to replace the core. The downside is having to peel back the headliner which is no small task. However, there are a few advantages to doing it this way.

1.) Although epoxy is fairly accommodating to surface prep, it still requires some (the more the better) and it can be difficult to clean and prep the surface of the inner and outer skins the further away from from hole you get. It wouldn't be any fun to go through this process and have the core delaminated due to a surface that wasn't prepped properly.

2.) foam is probably stiffer than balsa, but it will still be difficult to slip between the skins.

3.) You will be able to ensure all of the rotten core is removed. I don't think this is a huge deal breaker, but it is nice knowing you got everything, not just what you can reach from the hole. There is a small chance of water left in the core going through a freeze/ thaw cycle which will propagate delamination at the edge of your repair.

4.) it will use less epoxy which will eliminate the concerns you've listed above. However, like tenders said, it's cold outside and if you use Cold Cure or West System you shouldn't have an issue. (If you do end up using West System, place some kind of insulation on the deck so the top skin doesn't get below West System's 40 degree minimum cure temp)

Like I said, I'm going through a similar repair, just down to laminating the bottom skin. Your solution will probably work well enough and I know it can be stressful hearing an alternative after you've made up your mind on what you want to do. You're just in a perfect position to go at it from below. Which ever way you decide to go, good luck!20200207_105952.jpg
 

Kenneth K

1985 32-3, Puget Sound
Blogs Author
Replacing that teak deck block is very similar to replacing a teak winch pad. BGary and I had posts about this a few years back when we were replacing ours. You can search "winch pad" on Amazon and lots of products come up in various diameters. The problem is, none are beveled properly for our angled cabin tops, and most of us don't have the equipment to cut or sand 6-7" diameter wood pads.

Many of us end up pouring our own bases with epoxy. Bruce did a great blog post on his project here:

https://ericsonyachts.org/ie/ubs/halyard-winch-rehab-part-2-of-2.623/

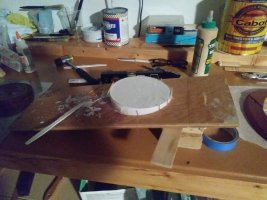
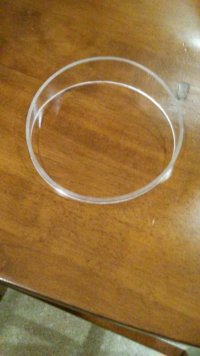
I'm still working on mine, but here is the process I used:20180909_231824.jpg

20180909_231824 (1).jpg I got the plexiglass tubing for the mold free from a local plastics shop. It has an inner diameter of 5 3/4." I have a some left over if you need it. You have to paint the epoxy when done, to protect it from UV, and the paint will likely never be an exact match, but you are avoiding the use of wood, which created your problem in the first place, and also requires more upkeep--varnish, cetol, etc.
 
Last edited:

Geoff W.

Makes Up For It With Enthusiasm
Blogs Author
@trickdhat - The way you're doing it is what I would consider the 100% correct way, which is the way I SHOULD really be doing it, but for a number of reasons I think I'm going to take the shortcut. I think at the very least, it'll get me at LEAST a few more years down the line. I will keep an eye on the area in general, and through other projects (rebedding deck hardware, rearranging deck equipment, etc) and if things seem to be going south, we'll re-do. I probably won't be living aboard by then and full surgery won't be as invasive :)

@ken - I've actually been thinking about the poured epoxy route a lot for this project, having read and re-read yours and Bruce's posts. My only hesitation is having a nice teak block vs. painted epoxy, though I have a feeling price may be prohibitive if I go the teak route for a number of reasons.
 

Kenneth K

1985 32-3, Puget Sound
Blogs Author
@ken - I've actually been thinking about the poured epoxy route a lot for this project, having read and re-read yours and Bruce's posts. My only hesitation is having a nice teak block vs. painted epoxy, though I have a feeling price may be prohibitive if I go the teak route for a number of reasons.

The teak "winch pads" are "solid" and have only five small 1/4" bolt holes drilled in them. And yet they still are subject to cracking (abeit, only one of three cracked on my boat, and that is after 35 years). However, your deck block has a large cutout in the center, and the inboard edge will be pretty thin due to the slope--so that is obviously the weak point. I'd guess that epoxy (maybe even reinforced with cloth or fibers) would hold up much better.
 

Nick J

Sustaining Member
Moderator
Blogs Author
Ah! I missed the live aboard part. That's a huge factor. My boat has been difficult to work on in it's current state. I couldn't imagine living aboard at the same time.
 

tenders

Innocent Bystander
I look at those winch pads and think: slab of 1” StarBoard, scrap sourced on eBay, trimmed with a router, and sanded to create the angle. Maybe a 90 minute project.

But I will keep those thoughts to myself, as people seem to enjoy pouring and painting (and re-painting, and re-painting) these things.
 

Geoff W.

Makes Up For It With Enthusiasm
Blogs Author
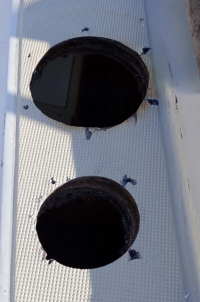
Well, we got our first good work day in on the project. Of course, nothing ever goes quite to plan but I'm feeling better about getting started here.

I did debond and clean the heck out of the area. A steel bristle detail brush worked nicely here, though I would have considered something else if the area weren't going to get covered back up. I also made sure any remaining debris was out of the hole, although we had a minor emergency when the large allen key I was using fell into the core and got stuck. As much as a "steel-reinforced" deck core would've sounded cool, we managed to pull it out using some bent wire.
1582052595911.png
1582052847723.png

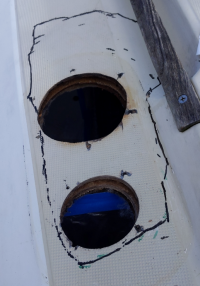
We stole an idea from someone I saw on the Ericson Facebook group, and used a basswood stick and dry-erase marker to sketch a rough idea of the interior size/shape of the hole. We then cut and numbered foam strips to match the shape.
1582052960486.png

We then mixed up a batch of neat epoxy, which I gobbed against the edges of the hole as best I could with a glue brush taped to a mixing stick. This was mostly a hope and a prayer mixed with solid-feeling contact with the brush on the back edges. We did make a whole two-pump cup of West Systems disappear into there, so it had to have gone somewhere.

We then mixed up a three-pump batch of fiber-thickened epoxy, mixed to the point where it was only slightly slumpy, maybe like "natural" chunky peanut butter, instead of the Jif kind. We used icing piping cones, like the plastic cones you cut the tips off of, to shove the epoxy far back in the hole. Again, we made the whole cup disappear into the hole and packed it back using the brush+stick combo.

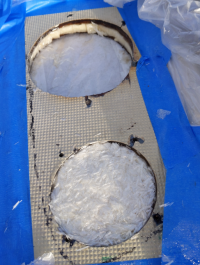
Plans started to fall apart a bit when it came time to shoving the foam strips in. Even at 1/4", which matches the width of the core slot, it was a hell of a time jamming the sticks in. A couple broke and got stuck, but we made do and the forward hole actually ended up very nicely slotted in. We whittled off a very slight edge from the remaining sticks in advance, and they slid in a little easier but still firmly filling the gap between the skins.

The bigger rear hole was slightly more challenging, but we did get all the foam in, and by the end we were squeezing epoxy back out from the deck, which I took as a good sign.

We covered the top of the forward hole with a slight coating of neat epoxy and another layer of thickened stuff. There wasn't time (or equipment) to grind/scarf the edges and roll out the new glass mat, so that will come another day. Similarly, we need to dremel the core from the rear hole and finish packing / sealing the edge with thickened epoxy here as well.
1582053456476.png

For now everything is covered again with plastic sheeting and tape. We'll have to wait for the next good day to get in there. I think if I were to do it again, I might've skipped the foam strips and just jammed it with thickened epoxy until full. We had plenty of working time due to it being mid-40s and sunny, even using the 205 Fast Hardener.

Part 2, and probably 3, still to come....
 

Loren Beach

O34 - Portland, OR
Senior Moderator
Blogs Author
FWIW, I have used a drill sanding drum, about 1.5 or 2." for a lot of holes around the boat that needed to be trued up. 80 grit works well, even at a slow speed with a variable speed 3/8 drill motor.
 
Top