• Untitled Document

    Join us on April 26th, 7pm EST

    for the CBEC Virtual Meeting

    All EYO members and followers are welcome to join the fun and get to know the guest speaker!

    See the link below for login credentials and join us!

    April Meeting Info

    (dismiss this notice by hitting 'X', upper right)

Anchor Locker Hose Failure

Christian Williams

E381 - Los Angeles
Senior Moderator
Blogs Author
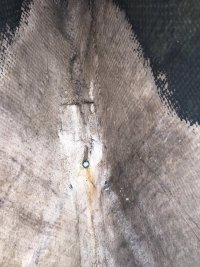
My anchor locker drain hose failed offshore. The stub installed in the stem was a short length of 1/2" copper tubing, which corroded in salt water after 37 years of service.

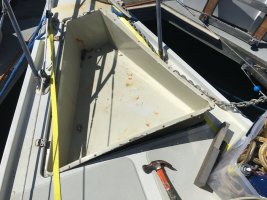
I yanked the pan this week, which required only a few hours patience with pry bars and caulk softener, and will install a new stub and hose.

I wonder why the factory used copper. Perhaps for its antifouling character? Copper seems wrong for salt water.

Even so, I'll probably install a new copper stub for the hose to mate to. Another 37 years seems acceptable.

The hose is worth checking, since a detached hose will sink the boat if nobody is paying attention. Water only comes in when bashing into head seas, but it comes in fast. Visual inspection is not reliable for this inaccessible part. My new rule is: "you haven't inspected a fitting unless you have touched it," which in the case of the drain hose on the E38 is not possible to do.
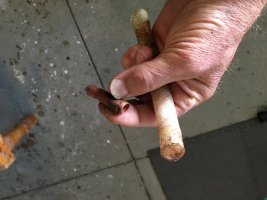
anchor locker copper tube.JPG...1 pry up chain lokcer.JPG...stud copper broken chain lockerIMG_7172.JPG
 

Lucky Dog

Member III
Is that a straight coupler?
The medical uses stainless for piping.

side bar
Your interest in peal ply for fiberglass.
I have using 3M shrink wrap for concave shapes.
Much cheaper.
 

Rocinante33

Contributing Partner
You could use G-10 tubing also, like this stuff:


BTW, my holding tank vent is the same copper pipe you describe here. More corrosion from chemicals in the tank.
 

Loren Beach

O34 - Portland, OR
Senior Moderator
Blogs Author
FWIW, same species of copper tube and reinforced hose on our '88 Olson. Ours is much easier to access, tho. (Getting my head and shoulders into that part of the boat is picturesque , FWIW. :(
 

Second Star

Member III
I have installed a 6 inch inspection plate in the forepeak bulkhead so I can inspect the hose as required. Can't actually change out the hose because the stem is too far away. Couldn't work that out until the hole was cut! I have thought about another port in the bottom of the anchor rode pan so I can reach the subject copper tube ...
 

Christian Williams

E381 - Los Angeles
Senior Moderator
Blogs Author
A (big) inspection port in the pan would work, so long as it was sturdy--any leakage goes into the V berth.

I considered it, but removed the locker pan so as to also rebed the pulpit mounts and check wiring, which is a side benefit of getting full access.
 

Neil Gallagher

1984 E381
Christian, how did you get your anchor locker pan removed? I had a new stem head chain plate made for my E381 and my guy was going to remove the anchor pan as a means to get to the bow chain plate bolts but he could not get the anchor pan out so he cut an access hole. By the way I just replaced my anchor well drain too. I used copper and plastic tubing similar to the original design. So far so good.
 

Christian Williams

E381 - Los Angeles
Senior Moderator
Blogs Author
As everyone says, there is little room for a pry tool under the lip--but that's the only way. I bought a can of spray caulk remover ("Anti-Bond 2015") from West Marine the size of a monkey's thumb, for $43 after taxes. It does work.

The large perimeter of caulk is the issue. After initial prying attempts were unsuccessful I considered bringing a jack to press the pan up from below. But creating a base for it in the V-hull would have been a lot of work.

I tried using a halyard and winch to lift the pan by its installed U-bolt fixture, but the pan flexes and no good purchase was obtained.

I recalled forum reports of prying and tried some more. What works best is a paint scraper, the narrow scraping blade of which can be maneuvered into the gap, and then hammered sideways to break the seal. The visible caulk needs to be scraped out with a knife or screwdriver so the "Anti-Bond 2015" dissolver can work. With local success, screwdrivers can be pounded in as levers. Once the caulk gives way it gives up.

The corners are hardest, as the radius of the pan there discourages prying. But the pan, of robust molded fiberglass, can take a bit of abuse as required. I did chip some gelcoat off the lip, but the integrity was unaffected.

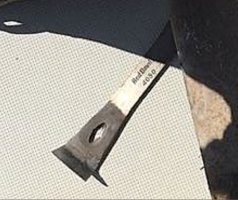
An all-steel Red Devil scraper worked best for me. Job time: 2 hours.

red devil scraper.JPG
 

peaman

Sustaining Member
I've read with interest about the anchor locker drain tube and wish I could at least get an eyeball on mine. The anchor pan in the 32-3 is quite deep: I think it reaches down to approximately the level of the V berth. There is a deep locker under the forward part of the V berth, with a fairly tight forward angle, so I don't see how an inspection port could be installed there.

I'd kind of like to see the drain tube, but that would require either removing the anchor locker pan, or installing an inspection port (I think). I'd kind of like to remove and re-bed the anchor locker pan, but if I do, I would need to be able to reconnect the pan drain tube, and so would need to install and access port (I think).

I wonder if anyone familiar with the 32-3 arrangement can shed some light on best way to access the drain tube?
 

Kenneth K

1985 32-3, Puget Sound
Blogs Author
Peaman, check out this post, starting at about post #30. Lots of good pictures of the 32-3 anchor locker drain tube.


peaman

Sustaining Member
Ken, thanks for that link. Sadly, it confirms my understanding of the arrangement of things. nquigley cut off the bottom 2" of his pan because he found no better way to accomplish what I would like to do. So I guess, I'll just monitor the area under the V berth for any water intrusion and deal with it if/when it arises.
 
Top