• Untitled Document

    Join us on April 26th, 7pm EST

    for the CBEC Virtual Meeting

    All EYO members and followers are welcome to join the fun and get to know the guest speaker!

    See the link below for login credentials and join us!

    April Meeting Info

    (dismiss this notice by hitting 'X', upper right)

E35/3 autopilot questions

gabosifat

Member III
Greetings everyone,
My son and I are replacing our old Autohelm 4000 with a new Raymarine EV 1 wheel pilot.

im curious where others may have placed the following parts on the boat;
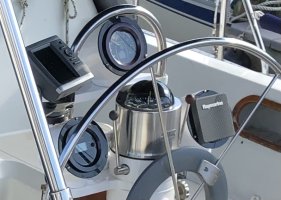
- autopilot controller
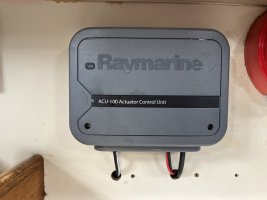
- ACU
- EV-1 sensor — Seatalk 5 way block

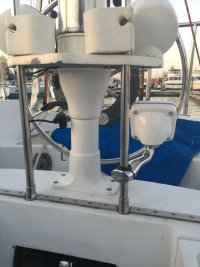
We’re playing around trying To find the best location for all these parts for a clean and functional install.
Many thanks to all who reply.

cheers,
Steve Gabbott
E35/3 Silent Dancer
Gabriola Island BC
 

Bolo

Contributing Partner
On my E32-3, which is somewhat similar to the 35, the ACU is located on the wall directly below the companion way, just behind the ladder but above the engine cover. Easy access with cable runs to the wheel and EV-1 sensor. That I mounted to the starboard back wall in the galley. There is a small space there where some owners mount a paper towel holder. I did the same thing so I had to move it, the towel holder, a bit towards the front of the cabin to make room for the EV-1. The Seatalk block is located in the starboard lazaret adjacent to the ”trash can” space but I don’t think the E35 has a trash can feature like the E32 so you’ll need to find another spot for it.

I mounted the controller in one of the old Yacht Specialties metal pods and it just fits too. As a side note - I’m also adding Raymarine wind and depth gauges and mounting all of them in the remaining pods where my old Datamarine units were located. I’m hoping to do a video about it all but for now it’s a working in progress. I like the “retro” look of the old pods over one large one containing all the instrumentation at the helm.
 

Attachments

  • 6E86D7A9-B296-4F03-ADBA-3E45DCFE3B34.jpeg
    6E86D7A9-B296-4F03-ADBA-3E45DCFE3B34.jpeg
    228.4 KB · Views: 15
  • 52E6ECA2-15CD-4EB3-A4E7-5C1D999A72EF.jpeg
    52E6ECA2-15CD-4EB3-A4E7-5C1D999A72EF.jpeg
    164.5 KB · Views: 15
  • 944C26D8-5854-4B04-8BB3-A28D55146E31.jpeg
    944C26D8-5854-4B04-8BB3-A28D55146E31.jpeg
    177.7 KB · Views: 15

gabosifat

Member III
On my E32-3, which is somewhat similar to the 35, the ACU is located on the wall directly below the companion way, just behind the ladder but above the engine cover. Easy access with cable runs to the wheel and EV-1 sensor. That I mounted to the starboard back wall in the galley. There is a small space there where some owners mount a paper towel holder. I did the same thing so I had to move it, the towel holder, a bit towards the front of the cabin to make room for the EV-1. The Seatalk block is located in the starboard lazaret adjacent to the ”trash can” space but I don’t think the E35 has a trash can feature like the E32 so you’ll need to find another spot for it.

I mounted the controller in one of the old Yacht Specialties metal pods and it just fits too. As a side note - I’m also adding Raymarine wind and depth gauges and mounting all of them in the remaining pods where my old Datamarine units were located. I’m hoping to do a video about it all but for now it’s a working in progress. I like the “retro” look of the old pods over one large one containing all the instrumentation at the helm.
Thanks Fir your reply Bolo!
Good spots to consider for sure. I’m plannining on using the same YSS pod to replace the old data marine instruments. One question - does the control unit affect your Ritchie compass because of its proximity?
Many thanks,
Steve
 

peaman

Sustaining Member
On my 32-3, I found the starboard cockpit coaming (high in the starboard cockpit locker) to be a fine place for the EV-1 (forward), as well as the ACU-100. A backboard was made for mounting of the ACU, SeaTalk manifold, and an electrical terminal strip. The backboard was secured to the hull with 4200. That location is protected from all imaginable physical hazards, but is acceptably accessible. The control head is mounted in a NavPod where it is several inches away from the magnetic compass.
 

Christian Williams

E381 - Los Angeles
Senior Moderator
Blogs Author
proximity of the controller affect your Ritchie compass

No issue for me. But if in doubt you can hold the P70 control head in position and see if the compass needle moves. That's good enough for me, since the whisky compass is pretty much obsolete anyhow.

Can't say the same for my cockpit umbrella with steel post, which moves the needle 70 degrees. It was a worrisome hour at sea before I figured that one out. .
 

Bolo

Contributing Partner
Thanks Fir your reply Bolo!
Good spots to consider for sure. I’m plannining on using the same YSS pod to replace the old data marine instruments. One question - does the control unit affect your Ritchie compass because of its proximity?
Many thanks,
Steve
No, not at all but the old Garmin chart plotter, that's in the photo, did! That's because it had a small magnet glued to the inside of the chip slot to keep the door to it closed. I think the installation instructions stated that the unit had to be 3 or 4 feet away from any compass. Well, that wasn't going to work so in flagrant violation of the warranty I "removed" the magnet from its spot in the chart plotter and threw it into the nav station desk....just in case. I will be replacing it with a new Raymarine chart plotter as part of the mast (still down and being upgraded/repaired) and binnacle upgrades.

If you use one of the YSS pods to install the control unit you need to be right on when cutting a new circular panel for it. The tolerances are very close (for us amateurs) but it is possible. I had to do one of them three times before I got it right.

garmin magnet.jpg
 

william.haas

1990 Ericson 28-2
On my 1990 E28 the EV1 sensor is installed forward of the water tank (starboard side) very close to the bulkhead and centerline. The controller is mounted in the starboard side cabinet with closing doors. One Seatalk block is behind the AC electrical panel on a wood block epoxied to the hull (but lower than all of the wiring). My second Seatalk block is inside my Navpod at the helm.
 

gabosifat

Member III
No, not at all but the old Garmin chart plotter, that's in the photo, did! That's because it had a small magnet glued to the inside of the chip slot to keep the door to it closed. I think the installation instructions stated that the unit had to be 3 or 4 feet away from any compass. Well, that wasn't going to work so in flagrant violation of the warranty I "removed" the magnet from its spot in the chart plotter and threw it into the nav station desk....just in case. I will be replacing it with a new Raymarine chart plotter as part of the mast (still down and being upgraded/repaired) and binnacle upgrades.

If you use one of the YSS pods to install the control unit you need to be right on when cutting a new circular panel for it. The tolerances are very close (for us amateurs) but it is possible. I had to do one of them three times before I got it right.

View attachment 45574
Thanks Bob!
cheers,
steve
 

gabosifat

Member III
My design:

and build:

Is there anything else that should be upgraded, once you open the can of worms of running wires to your binnacle etc.?
I opted for a mass upgrade.

Actuator in the cockpit locker, P70 on the helm. Compass in the cabin inside.
Good point!
Eventually may add more Raymarine instruments.
cheers,
steve
 

gabosifat

Member III
On my 1990 E28 the EV1 sensor is installed forward of the water tank (starboard side) very close to the bulkhead and centerline. The controller is mounted in the starboard side cabinet with closing doors. One Seatalk block is behind the AC electrical panel on a wood block epoxied to the hull (but lower than all of the wiring). My second Seatalk block is inside my Navpod at the helm.
Thanks Bill.
Cheers,
Steve
 

Pete the Cat

Member III
One thing not mentioned here is where to mount the control head. I have delivered a couple boats with the control head in awkward places. Can be a miserable experience. Best to have it right in front of you where you can tap it or adjust it without contorting. I put mine front and center in the cluster.
 

Bolo

Contributing Partner
One thing not mentioned here is where to mount the control head. I have delivered a couple boats with the control head in awkward places. Can be a miserable experience. Best to have it right in front of you where you can tap it or adjust it without contorting. I put mine front and center in the cluster.
As I mentioned in my first posting on this subject, I mounted mine in one of the old YSS pods that formerly housed the “speed through water” gauge. I don’t use that gauge anymore because Chesapeake Bay water soon clogs the “speed paddle wheel” protruding from the hull. SOG (speed over ground) is more important to me and I get that off the chart plotter.

Yes, having the control head at the helm is the best location even if, as in my situation, it’s slightly behind the wheel (see photo). The buttons are still accessible through the spokes of the wheel (I know, not recommended) or by reaching over the top of the wheel. Soon the other two pods will be housing other Raymarine instruments with a new chart plotter on its own bracket placing it over the top of the binnacle rail.
 

Attachments

  • 127EF924-BFF5-42E8-9A5C-92D0DFA11619.jpeg
    127EF924-BFF5-42E8-9A5C-92D0DFA11619.jpeg
    177.7 KB · Views: 9

gabosifat

Member III
One thing not mentioned here is where to mount the control head. I have delivered a couple boats with the control head in awkward places. Can be a miserable experience. Best to have it right in front of you where you can tap it or adjust it without contorting. I put mine front and center in the cluster.
Thanks Ray. The plan is to put the controller in one of the yss pods on the binnacle.
cheers,
Steve
 

gabosifat

Member III
I must say, with two power supplies required in the system, I found the fusing requirements rather unclear from the manual direction. My plan is to use a 10 amp breaker switch on my main panel, then dividing that wire into two limbs to supply the two power connections. The 10 amp breaker switch will protect the ACU and motor circuit, but It looks like an additional 5 amp fuse is required on the limb to the seatalk power supply cable.
Can anyone chime in on what they did re fusing for their systems?
Many thanks,
Steve
 

goldenstate

Sustaining Member
Blogs Author
I must say, with two power supplies required in the system, I found the fusing requirements rather unclear from the manual direction. My plan is to use a 10 amp breaker switch on my main panel, then dividing that wire into two limbs to supply the two power connections. The 10 amp breaker switch will protect the ACU and motor circuit, but It looks like an additional 5 amp fuse is required on the limb to the seatalk power supply cable.
Can anyone chime in on what they did re fusing for their systems?
Many thanks,
Steve
I would advise against using a common circuit for both the wheel drive and the NMEA network. My autopilot craps out with some frequency (simply stops driving, usually because it is overpowered by wind) and my normal solution is to treat it like a Windows PC. I turn it off and back on several different ways. Power down the drive, flip the circuit breaker, even pull the fuse contained in the ACU. I have an panel breaker, then an in-line fuse for the ACU, then the ACU itself has an on-board 10am blade fuse.

Pulling and reinstalling the in-line fuse between the panel and ACU controller usually works when other attempts have failed.

You shouldn't need to take down the NMEA (Seatalk) network at the same time while you are messing with the autopilot.

Once you go to the trouble of bringing a Seatalk cable to your helm for the control head, that same cable can carry data from your wind instruments sounder, etc.. You might well want all of that stuff to operate independently of your wheel pilot. But it can take 30-60 seconds for the network to boot up if you have to shut it down.

For people who want a stand-alone autopilot, the multiple power sources can be annoying/frustrating. But the paradigm that all the manufacturers are following now is that one should be running a network. You need the 5amp circuit for the network and the 10amp to turn the steering wheel.

$.02
 

JPS27

Member III
Not that my e27 can inform a 35 much, but I kept my signet instruments in their cases on the pedestal platform and bought this over priced nav pod for my autopilot.
 

Attachments

  • IMG_0097.JPG
    IMG_0097.JPG
    105.6 KB · Views: 9

Christian Williams

E381 - Los Angeles
Senior Moderator
Blogs Author
Regarding the Raymarine wheel pilot becoming overpowered, a common complaint, allow me to comment that like any self-steering they are hugely dependent on sail trim.

A wheel pilot requires weather helm to be reduced or eliminated. This means shortening sail, sometimes a lot. Off the wind, it means close attention to the mainsail, which is often overtrimmed when self-steering. If the main is allowed to luff a bit, that effectively reduces the difficulty of the little motor to steer the boat. This is revealed by the simple test of feeling the wheel on a broad reach in 15 knots. With our fin keels and spade rudders such sailing requires attention, often quite a lot of it, with determined corrections to keep on course, which we take as the fun of reaching on a sparkly day.

But let the mainsail out more, let it luff a bit or reef it, and the helm corrections required are radically reduced. And the wheel pilot works again, without beeping and turning itself off. Similar strategies are necessary with wind vanes, which are also sensitive to sail set, and often require reduced sail area compared to hand steering.

One thing a wheel pilot can't handle is waves on a reach, which are what makes all the work for a human helmsman. If the boat is caused to roll by a quartering sea, the hull form makes it turn powerfully as it rolls, and the little gizmo cannot compensate. Otherwise, though, wheel pilots work well if we remember to accommodate their needs.
 
Top