• Untitled Document

    Join us on April 26th, 7pm EST

    for the CBEC Virtual Meeting

    All EYO members and followers are welcome to join the fun and get to know the guest speaker!

    See the link below for login credentials and join us!

    April Meeting Info

    (dismiss this notice by hitting 'X', upper right)

E38-200 Autopilot Question ??

rbonilla

"don't tread on me" member XVXIIIII
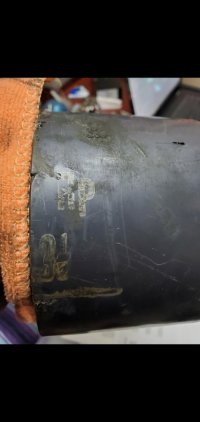
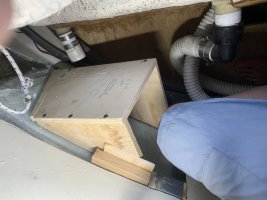
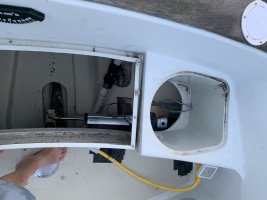
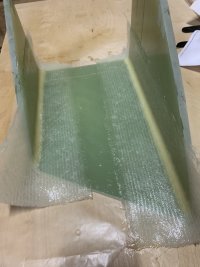
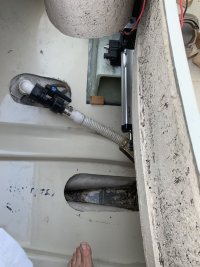
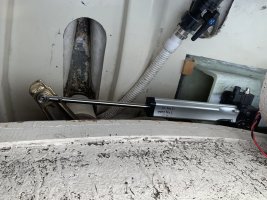
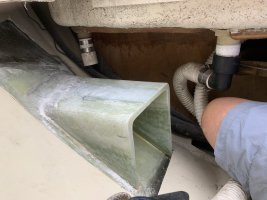
Here you can see my spacer off the rudder post with the sharpie mark for what needed to be removed. I installed the whole Raymarine linear drive unit by myself. I supported the rudder, disconnected the quadrant, lowerd the rudder to the ground, removed the spacer, cut the spacer, used a car jack and some cribbing to raise the rudder, installed quadrant, installed Edson arm and checked for clearance. Take your time its a big job for one person but not impossible. You'll really get to know and fall in love with your boat.

excellent, that is excatally what I was l@@king for ++....
 

rbonilla

"don't tread on me" member XVXIIIII
so, that is just a spacer..that can be adjusted for more room on the tiller arm?..that's great
2 know..++
 

David Grimm

E38-200
Yep, just a spacer. It would be a good idea to check the clearance between the top of the rudder and the bottom of the boat first. This way you know where you are when reassembled. Also while it's all apart grease the cables and sheaves. I
Use a sharpie to mark the threads on the eye bolts to the quadrant for proper cable tension.
 

rbonilla

"don't tread on me" member XVXIIIII
thanx David, that's great info for me and my project...question: what was the spacer/collar made of ? and, aprox how thick and tall was it ? a BIG thanx, from Colorado / Richard / 970.391.6365
 

David Grimm

E38-200
The collar is 3 1/2 HP schedule 40 PVC I believe. I wasn't able to locate any of it so I had to cut the original.
 

Attachments

  • Screenshot_20200409-195621_Gallery.jpg
    Screenshot_20200409-195621_Gallery.jpg
    49.4 KB · Views: 15

Doug177

Member III
Hi David...Hope all is well. When younger I sailed down the Hudson after doing the Erie Canal. Were not a lot of sailboats although it was mid November....something about Lange Rack sticks in my mind. I really appreciate your good photos of the autopilot project. I am doing the same right now on my 35-3. From what I can see, it looks like your ram is going to be parallel with the centerline of the boat on the port side of the lazarette. I am interested in why you picked this particular location as my initial thought was to have the Edson tiller arm facing aft with the ram running thwartships on the port side?
 

David Grimm

E38-200
Hey Doug, I have herd of other 38-200 owners positioning the pilot that way however my lazerette is jammed. I guess I could have burried it under there but it would have been very inaccessible with all my supplies, wires and hoses in the way. Where the drive unit is now I can swap it out without tools, asside from a screwdriver for the wire termials in less than 5 min. Also on the 38-200 the round stern compartments go deep into the hull. Most I saw had to cut and shorten the depth of the compartment for clearance. I use the starboard one for propane; the tank just barely fits now. Best of luck with your install.
 

Doug177

Member III
Hey Doug, I have herd of other 38-200 owners positioning the pilot that way however my lazerette is jammed. I guess I could have burried it under there but it would have been very inaccessible with all my supplies, wires and hoses in the way. Where the drive unit is now I can swap it out without tools, asside from a screwdriver for the wire termials in less than 5 min. Also on the 38-200 the round stern compartments go deep into the hull. Most I saw had to cut and shorten the depth of the compartment for clearance. I use the starboard one for propane; the tank just barely fits now. Best of luck with your install.
Thanks for the reply David. Do you have a photo showing your autopilot bolted in place? My stern propane compartments go kind of deep too, I will have to check the clearance. Does the 38 have a thin fiberglass liner over the hull in that area?
 

David Grimm

E38-200
Here is a photo of where it bolts to. In short I took a piece of 3/4 marine ply and drilled the pilot mount holes. Coated it with Total Boat epoxy let dry and then did double layer of mesh glass on both sides securing the AP carriage bolts in place. Then 80 grit flap disced the stringers to remove paint and wiped with acetone. Ran heavy bead of West Systems 6-10 on stringers, roughed bottom of board, acetoned and pressed board into place with a automotive scissor jack. Two days later removed jack and using Total Boat epoxy and chopped strand mat secured sides of wood to hull.

Check out the very amateur video here.
 

Attachments

  • 20200312_161247.jpg
    20200312_161247.jpg
    196.3 KB · Views: 14
Last edited:

David Grimm

E38-200
Another point I would like to bring up. My local boat yard worker in passing recommended screwing the board to the stringers. He said the fiber glass would come detached. I strongly disagree. Disrupting the stringers with a screw or bolt would eventually introduce mosture and weaken the structure. The glassed in board as it sits now is so secure the only way I could remove it would be with a saw and a grinder. There is absolutely zero flex or movement whatsoever!
 
Last edited:

Loren Beach

O34 - Portland, OR
Senior Moderator
Blogs Author
While adding some fasteners for a mechanical reinforcement would add some strength, the question is how much more and whether it's needed. As for the stringers, they are solid glass laminate so moisture would not be a concern. i.e. there is no coring to compromise.
If you have good overlap with the existing surface and have abraided those areas with some 40 grit, you should have sufficient bonding strength, Epoxy is a powerful adhesive, especially when you use bi-ax material for joining the parts.
 

Doug177

Member III
Here is a photo of where it bolts to. In short I took a piece of 3/4 marine ply and drilled the pilot mount holes. Coated it with Total Boat epoxy let dry and then did double layer of mesh glass on both sides securing the AP carriage bolts in place. Then 80 grit flap disced the stringers to remove paint and wiped with acetone. Ran heavy bead of West Systems 6-10 on stringers, roughed bottom of board, acetoned and pressed board into place with a automotive scissor jack. Two days later removed jack and using Total Boat epoxy and chopped strand mat secured sides of wood to hull.

Check out the very amateur video here.
The best amateur video anybody could ever hope for David. Thanks. Sorry it took so long to get back to you, I had to have a couple lower vertebrae in my neck fused as pinched nerves were weakening the shoulder muscles I need to get the autopilot upgrade done. As a TotalBoat epoxy fan, I agree that the correct grinding, bi-axial clothing, filleting and bonding should make that whole area strong as heck. I really like the embedded bolts. Now I have to decide which orientation will save me the most lazerette room and give me easy access to the ram while still giving me the ability to protect it from all the lines and fenders and boathooks that get tossed in there. Having the ram thwartship is much more work as one of those propane (beer) receptacles would have to be shortened by about 4 inches. I would cut it out right at the joint where it blends into the non-skid at the top, use that hole to work on the shelf through and then shorten and epoxy it back (TotalBoat) when all the mounting was done.Does anybody know how thick the hull is off to the sides at that area. I would certainly glass in 8 or so layers of biaxial cloth to take the stress. under the shelf.
 

lnill

Member III
auto pilot question: I want to mount a direct drive Garmin Auto Pilot, on my 1987 Ericson 38-200, I have used the belt drives, and I was not happy with the function and location...Has anyone installed direct drive ( to the rudder shaft/via installiation of a arm - on the rudder post ) ?
I installed the Raymarine unit on my '87 38-200 about 5 years ago. You will need to epoxy a block to the fiberglass to have something to attach the pushrod to. It is a good time to replace your steering cables etc too. It's cozy down there....
 

Doug177

Member III
I installed the Raymarine unit on my '87 38-200 about 5 years ago. You will need to epoxy a block to the fiberglass to have something to attach the pushrod to. It is a good time to replace your steering cables etc too. It's cozy down there....
It is cozy. I hadn't thought about new cables. I should probably check the sheave bushings too. Something Loren said. Will look at everything while quadrant and shaft are out. Probably will add another accessible Zerk while I am at it. New rudder from Finco is ready to go. If I mount ram sidewise, I will probably will stick a g10 wedge in there on top of biax buildup. Maybe with 316 stainless threaded inserts embedded in the G10 for the bolts. I have used the ones from McMaster Carr and they make for a very clean installation. Did you mount your ram off to the side?
 

Doug177

Member III
Well the B & G autopilot is in and has worked beautifully for a full summer. G-10 reinforced shelf bracket is like a rock against reinforced section of hull.

I have got a great deal for anybody who is looking to do the same. Pay the shipping ($15 or so) and you can have the plywood shelf template and shape of hull curve for an E35-3 autopilot ram shelf. Well worth the price as nothing back there is right angled, level or flat. A whole bunch of compound compounds.
 

Attachments

  • IMG_4308.jpg
    IMG_4308.jpg
    169 KB · Views: 20
  • IMG_4312.jpg
    IMG_4312.jpg
    109.5 KB · Views: 19
  • IMG_4319.jpg
    IMG_4319.jpg
    188.8 KB · Views: 21
  • IMG_4322.jpg
    IMG_4322.jpg
    142.1 KB · Views: 21
  • IMG_4332.jpg
    IMG_4332.jpg
    115.8 KB · Views: 21
  • IMG_4352.jpg
    IMG_4352.jpg
    136.8 KB · Views: 18
  • IMG_4354.jpg
    IMG_4354.jpg
    270.2 KB · Views: 19
  • IMG_4368.jpg
    IMG_4368.jpg
    209.4 KB · Views: 20
  • IMG_5133.jpg
    IMG_5133.jpg
    76.2 KB · Views: 20

Christian Williams

E381 - Los Angeles
Senior Moderator
Blogs Author
I would be interested in the real-world power draw of these autopilots, even though I know it's hard to say since conditions vary.
 

Doug177

Member III
I would be interested in the real-world power draw of these autopilots, even though I know it's hard to say since conditions vary.
I'll try that for an experiment next summer crossing the Lake Michigan Christian. It would be good to know. I will run for a couple of hours with instruments on and no auto p and then add the auto p and measure the difference.
 

goldenstate

Sustaining Member
Blogs Author
I take it you cut down that plastic bushing so you had space to bolt the drive arm to the rudder shaft?
 
Top