Back at it !! Resuming this project after a few days in the upper 30's here...Yesterday I removed the water heater so I can get access to the top of the fuel tank. It was a 6 gal Raritan manufacture date of Aug. 1983. It had to be dismantled to get it out the port laz. First had to disconnect the fresh water and heat exchanger water lines and installed a 90 degree 3/4" barb connector between the 2 engine coolant hoses to compete the loop and keep the coolant in the system. I had a plastic tray wedged under the hoses and lucky I did as about 1/2 gallon came out before I could complete the connection. I then removed the electric connection cover and all the wires. The top and bottom of the water heater outer shell were held on by 4 sheet metal screws, I removed those by spinning the WH as i went around. Once those are removed I could pop the top off with a little tapping with a screwdriver hammer combo. The seem of the shell had 4 or 5 spot welds that held it together, I used a chisel with hammer assist to break those welds, it's pretty thin material. I then spun it around to where the electrical connections are and used tin snips to cut the remaining 3-4" above and below the electrical cutout. Thought I had it licked at that point but one side of the shell was hung up on the heat exchanger fitting so made a couple of small cuts with the tin snips bent the shell around the fitting and pulled the 2 halves of the shell out and tossed them along with top and bottom onto the gravel below. Removed the insulation, just fiberglass bat type loosely adhered, and now to see if the inner tank would fit through the Laz....It was 12" in diameter x 13" tall so out it went with 1/2" to spare. It was pretty messy so be prepared if you take this on.
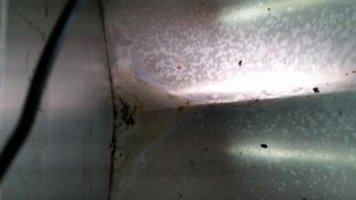
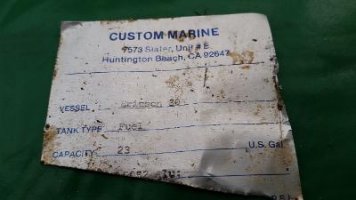
Today I cut a 6" x 10" access hole in the top of the tank to gain access for the hopeful repair. I was shocked at how much sludge and crud are in the tank ! In the lowest point where the fuel pick up tube is the sludge was almost an inch thick. The tank has a "v" shape to it and the crus goes about 4-5" up the sides of the v. The other interesting thing is there is no baffle in this tank, just wide open, weird. On this early version of the 30+ there is a 3/4" 15" wide piece of plywood that is glassed to the hull on both ends and sits directly above/on the tank. Not sure if it's at all structural but it of course held the WH and also the Adler Barbour Ref unit which I took out last spring. I had to cut a portion of that "deck" to get a a big enough port to do the repair and stuck between the aluminum and the board was a portion of the manufacturers sticker for the fuel tank. Almost like an old Corvette tank sticker, almost. I only got a portion because I cut right through it but did get the following info;
Custom Marine, Huntington Beach, CA
Vessel Ericson 30
Tank Type Fuel
Capacity 23 US Gal.
I'm going to try and extricate the remainder of the sticker but not sure I can. I know, long winded, but I do have a question which is what do I use to clean all the sludge and varnish with ? Keeping in mind that I am going to due a n epoxy repair. Thanks for listening and look forward to your expertise, I need it !!