• Untitled Document

    Join us on April 26th, 7pm EST

    for the CBEC Virtual Meeting

    All EYO members and followers are welcome to join the fun and get to know the guest speaker!

    See the link below for login credentials and join us!

    April Meeting Info

    (dismiss this notice by hitting 'X', upper right)

Ericson 30+ Rub Rail Replacement and Cost

mjsouleman

Sustaining Member
Moderator
The following discussion is relevant to Ericson 30+ owners:
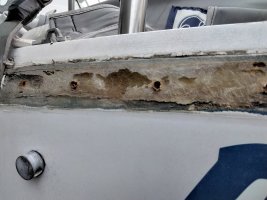
Image 1 - bow after metal cap is removed.
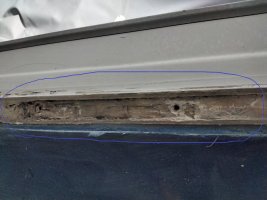
Image 2 - bow port side showing teak filler
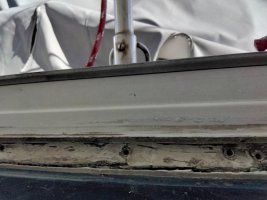
Image 3 - Stern after removing rub rail

Bow straight on .jpg

Port side bow with sealant and filler.jpg

Stern with epoxy fill.jpg

The LOA and Beam specs are taken from Sailboat data: https://sailboatdata.com/sailboat/ericson-30
LOA: 29.92 ft
Beam: 10.50 Ft

TACO rub rail Calculation
(Length *2) + (Beam*2)
(30 ft * 2) + (10.5 ft * 2) = 60ft + 21ft = 81 ft

Replacement parts and cost

1’’ X 1/2’’ FLEXIBLE VINYL INSERT
Rub Rail Store / Vinyl Inserts
V12-0303

Part Number Length Color Description
V12-0303BKA50-1 50 feet Black Flexible Vinyl, Black Rub Rail Insert, 1/2"W x 1"H x 50'L
Cost of 2x50 ft sections - 150 + 150 = $300

1-7/8’’ X 1’’ RIGID RUB RAIL
Rub Rail Store / Rigid Vinyl
V21-9602WHA20D
Part Number Length Color Insert Description
V21-9602WHA20D 20 feet Arctic White V12-0303 Rigid Vinyl, Arctic White Rub Rail Insert, 1"W x 1-7/8"H x 20'L
Cost of 5 20 ft sections plus $300 shipping charge - 5* 150 + 300(shipping Charge) = $1050

Total expense - $ 1350
 

Michael Edwards

Member II
Wow the cost has gone up! We did our 32 about 12 years ago. The track was easy enough, but the insert required a heat gun in places.
 

Mark F

Contributing Partner
Blogs Author
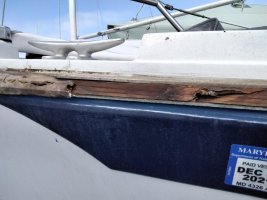
I am surprised to see wood between the deck and hull flanges. I remember reading that some 35-2's had the wood insert to give more headroom in the cabin. I could be wrong on that. It's hard to tell but the wood looks more like fir to me.
 

Christian Williams

E381 - Los Angeles
Senior Moderator
Blogs Author
Although my models were different, I suggest filling any hull-joint gaps with thickened epoxy. Although the structure is sound, there are reports of water getting in through such gaps.

Also, I went to a good deal of trouble to remove all the factory caulk under the old rail, so as to get a good seal with new Sikaflex. A good seal of rub rail to hull prevents dirt from steaking down the hull.

I'd seal the wood with Clear Penetrating Epoxy while I was at it.
 

mjsouleman

Sustaining Member
Moderator
Michael/Mark;

I was shocked myself at the cost not of the insert but of the rigid vinyl. The fact that it only comes in 20 foot sections makes sense and that the shipping cost is an additional $300, but holy cow that is expensive stuff. My current plan is to reuse the original rigid vinyl, currently stored under Discovery, and only replace the flexible vinyl.

Mark, you are most likely correct about the wood being fir. I am picking up some Penetrating Epoxy Sealer from thinking of using Totalboats two part marine epoxy to fill in the gap under the rigid vinyl but waiting on a response from Jamestown.
 

Stuphoto

Member III
Although my models were different, I suggest filling any hull-joint gaps with thickened epoxy. Although the structure is sound, there are reports of water getting in through such gaps.

I am truly surprised how rough it is, no wonder water finds it's way in through there.

My one rub rail should be replaced.
Just being a 25' I am hoping on finding something on a longer wrecked boat and cutting out the ugly section.
 

mjsouleman

Sustaining Member
Moderator
Note: This post is specific to 1983 Ericson 30+, as rub rails will differ year to year and model to model therefore your price will vary.
Note: I am reusing the original rigid vinyl for a saving of $1030 plus $300 shipping.

Recommended Vendor - TACO Marine


Rick Lyman
Ocean Marketing, Inc.
Direct line:203-453-3090 x136
Technical Service Representative for TACO Marine
support@tacomarine.com | P 800.653.8568
tacomarine.com
 

Michael Edwards

Member II
In home construction, we used to say: “Sheetrock hides a lot of sin”.
Not only is that fir, its early growth, the growth rings scream cheap crap at the lumber store.
“Rub Rails hiding a lot of sin”. Amazing what you can get away with for several decades.
 

Christian Williams

E381 - Los Angeles
Senior Moderator
Blogs Author
Regarding shipping of bulky or long items, this is often a case for West Marine, which delivers free to store.
 

Michael Edwards

Member II
Point is; if it has lasted four decades without rotting; you can assume it will outlive any interest you may have in the boat.
My mother would ask me if I thought I was smarter than the engineers who designed my car; after jacking it up in back and lowering in the front to gain wheelbarrow like steering.
 

Jerry VB

E32-3 / M-25XP
If the original rub rail vinyl extrusion is still serviceable, you should still be able to buy the rubber insert from Wefco. I replaced it on my E27 in 2015 for $280 (bought 40' IIRC). Installing the new rail was really easy - I put the lower lip into the extrusion and then used a plastic (dull) putty knife to compress the top lip to hook it into the top of the extrusion.

Wefco profile 4107

Wefco Rubber Mfg., Co., Inc.
21000 Osborne Street, Unit 2
Canoga Park, CA 91304

PH: 818-886-8872
FAX: 818-886-8875
www.wefcorubber.com
 

Dave G.

1984 E30+ Ludington, MI
Mark, I purchased rub rail from Wefco that fits in the original rigid vinyl. Unfortunately they discontinued white & only sell black in that profile now. I think I paid $6 per foot. So 60ish feet would be under $400 and the shipping will be a whole lot less as it can be rolled up.
 

mjsouleman

Sustaining Member
Moderator
Rub Rail Replacement Day 2 - Remove Rotten wood, Factory Caulk, and Clean
*Enjoy the pictures

Wood Spacers - Spent time poking at the wood spacers to find anything solid, ended up removing 90%.
Factory Caulk - Removed old hardened factory caulk from rub rails and deck to hull joint. This was mostly easy as it had hardened over the years and came off in strips.
Clean - Brushed the rub rails and deck to hull joint with an old long haired paint brush to remove loose dirt and grit.
Screw holes - most of the screw holes were in had cracks and were in bad shape. opened up the screw holes and cracks with a sharp chisel blade.
cracks and splits - cracks and splits were found mostly from mid-ship to stern areas on both sides of discovery, these were opened up with said chisel blade.
Vacuum - used a vacuum to get as must dirt and grit out of those pesky cracks as possible.

Day 3 - Because the penetrating epoxy to treat the remaining wood (needs temperatures above 65 and I'm in Mass) I am instead going to mix up some peanut butter like epoxy and fill in the screw holes, cracks, and spaces the wood fillers left.
Day 2 Clean up 3.jpgDay 2 Clean up 4.jpg
 

mjsouleman

Sustaining Member
Moderator
Learning Experience

Day 2 is not going as expected. Putting epoxy in the horizonal cavity of the removed rub rail is like herding cats, you put it in and it drools down the side of the hull making quite the mess. So maybe I need to make it thicker, sure! two attempts later and still learning.
Basically, I'm using Total boat 2 part fast epoxy, applying it and continually having to catch and push the drooling mess back up into the rub rail slot until it solidifies enough to stay, this is endless.

Needless to say, I put too much into the space and that most likely accounted for the long setup time.

Still learning
BTW, this will be a topic for the April meeting with before and after pictures, oh my!

Mark "Souleman" Soule
 

Christian Williams

E381 - Los Angeles
Senior Moderator
Blogs Author
Get some colloidal silica, thicken the epoxy to taste. Or you can use any of the various epoxy thickeners. "Peanut butter" consistency is generally recommended for fillets, but you can make it even thicker.
 

Loren Beach

O34 - Portland, OR
Senior Moderator
Blogs Author
I wonder if it might be good to poke a small wire into each screw hole to see if any go all the way thru? You would not want to have epoxy escaping into the interior somewhere you do not want it.
 
Last edited:

mjsouleman

Sustaining Member
Moderator
Thanks for the info, now I have to wait for a turn in New England weather before experimenting.

Christian,
I am using the colloidal silica, next try will add more, it is part of the learning process.

Loren,
I am going to post the April meeting tomorrow (Thursday) for April 22nd.

Mark
 

Loren Beach

O34 - Portland, OR
Senior Moderator
Blogs Author
I have used a lot of West System 406 thickener over the years. For best adhesion, I mix up a small batch of neat resin and apply it thinly to the surfaces. Then do a one or two-pump batch and thicken that up to a "peanut butter" consistency with the 406, and trowel it in. Works great for fillets, too.
 

Tin Kicker

Sustaining Member
Moderator
Learning Experience

Day 2 is not going as expected. Putting epoxy in the horizonal cavity of the removed rub rail is like herding cats, you put it in and it drools down the side of the hull making quite the mess. ...

Simply thickening the epoxy is NOT the way to go, as you lose penetration into the joint and thickened epoxy is not as strong.

The way to do this is to bring blue tape up from the bottom and do NOT press it to the deck above the joint. This way it creates an open trough. I ran out of 2" tape so never mind that you see two rows of tape here. Anyway and after the joint is both open & clean, pour the epoxy on the open top of the tape and then press the top of the tape to the deck above the joint. Every now & then I ran a vertical piece of tape just to make sure nothing came loose.

I used Total Boat Flex Poxy, as it has the best mechanical properties of the various (slightly) flexible epoxies. It seems to be hard when dry but it won't shatter like a hard epoxy if it has a shear or bending load.

20200324_173124-XL.jpg
 
Top