• Untitled Document

    Join us on April 26th, 7pm EST

    for the CBEC Virtual Meeting

    All EYO members and followers are welcome to join the fun and get to know the guest speaker!

    See the link below for login credentials and join us!

    April Meeting Info

    (dismiss this notice by hitting 'X', upper right)

Ericson 34 fixed port lexan replacement

TorMar

Member II
A year ago I had to postpone this project due to a catastrophic knee injurry. Well, the MCL is better than new, the ACL has been replaced, the cartilage trimmed, I'm rehabbed and got onto finally doing the project. The two fixed ports on the port side are out, the frames are apart, the glass shop is cutting lexan for all four ports to fit, and I will re-assemble the the two I took out and install them on the boat this weekend. I'll take out the starboard ports then and do them as well.
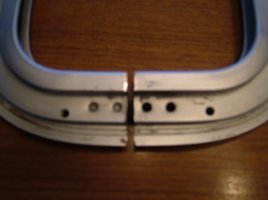
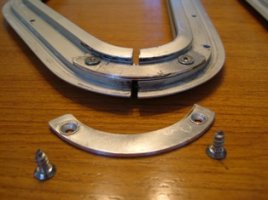
It wasn't that bad. The trick was getting the upper half of each port to separate from the lower half. They are held together by closely fitted pieces of plastic inside the aluminium window frame extending about an inch into the top and bottom half at the joint. The plastic is held in place inside the frame by four deep punch depressions forcing the aluminium frame material into recesses in the plastic fitting. Two punch marks on top, two on the bottom. I drilled these punch mark depressions out of the top half of the port with a drill bit big enough to remove the entire punch mark depression and very carefully took the ports apart. This is the only difficult part. I used two strong steel scrapers placed against the aluminium frame on either side of the little rubber spacer and then levered between the two scrapers with a big screwdriver. The straight sides of the frame came apart easily. On the curved ends, the spacer broke at the first punch mark. I solved that by making a fitting out of one-eighth inch flat aluminum that I screwed onto the flat inside of the curved end of the port. There is enough room.
So far, so good. I'll have my wife take pictures of the various steps involved as I do the last two ports.
 

Loren Beach

O34 - Portland, OR
Senior Moderator
Blogs Author
I too look forward to the project pictures. One quibble - lexan (i.e. polycarbonate) is mentioned. Since the original custom sized fixed ports are usually said to be from Lewmar, I am not aware of Lewmar using anything but acrylic for their lens material.
I had to do some plastics information gathering before we replaced our lexan external ports on the Olson and found that, while ours are stronger than acrylic, they are also far more prone to UV hazing. After a decade of service, they are indeed hazed over. All the factory Lewmar opening (acrylic) ports still are clear.

Lexan was specified for our boat's four large fixed ports due to the unsupported area and method of lens securing (un-framed).

The late-model Ericsons all have the alloy-framed Lewmar ports, AFAIK.
Not like it's any of my beeswax, but are you sure that you want to change lens material? :nerd:

BTW, another poster mentions "glass." I do know of other makes of boat with framed ports with safety glass. Wonderful stuff in that UV will not haze it over the years. Not so sure what happens when whacked with a winch handle, though... :(

Interesting topic.

Loren
 
Last edited:

Shadowfax

Member III
My point exactly. On my 34, the Lewmar fixed ports are safety glass, not plastic. I’m assuming that the ports in question are also Lewmar fixed safety glass and I can’t see why you would want to replace them with plastic
 

TorMar

Member II
Fixed ports badly crazed

The reason I'm replacing them is that you could no longer see out of them in any kind of light - they were so badly 'crazed'. I suspect you are right in that the original material was another type of polycarbonate - not lexan. I've selected lexan because it is tough, has some flexibility and ought to last at least a decade before the surface degrades to the point of no longer being clear. I was scared off glass as there were several posts by people who had used glass and cracked it as they tightened the screws for the internal fastening strip.
 

Shadowfax

Member III
TorMar

What year E34 is this? Those fixed ports should be Lewmar saftey glass if you are a mid to late 80's boat. That was standard in the 32, 34 & 38's of this vintage
 

TorMar

Member II
Port material

She's a 1989 E34, launched in 1991, hull number 281. The glass shop cutting the new lexan tells me that the old port material I brought to him to use as templates was plexiglass. I always thought it was lexan, and referred to it as that, but when he looked at it, he said it is only plexiglass.
 

TorMar

Member II
Pictures of fixed port acrylic replacement

Picked up the lexan from the glass shop today and put it in. It looks fabulous.
The only difficult part of the project was making the aluminium pieces to hold the curved ends together as I had broken the plastic retainer inside the port frames taking the two pieces apart. At the straight ends, the plastic retainer stayed intact, so I just added a screw into one of the drilled out indentations.
The glass shop advised me to re-use the original rubber moulding as it was in great shape, as pliable as a new one. I applied a slight bead of silicone inside the window frame track into which the moulding and lexan would seat. I used my 'workmate' stand to press the two pieces together, and attached the aluminium retainer plates with two 1/2 inch stainless screws, and locked the intact plastic retainer on the straight end with the same screw(s). I am very pleased with the finished result. You can see why we wanted to do this job on the picture with the assembled port and the old window on top of it.
 

Attachments

  • DSCF0340.JPG
    DSCF0340.JPG
    25.1 KB · Views: 362
  • DSCF0343.JPG
    DSCF0343.JPG
    28.7 KB · Views: 349
  • DSCF0345.JPG
    DSCF0345.JPG
    31.3 KB · Views: 354
  • DSCF0348.JPG
    DSCF0348.JPG
    29.1 KB · Views: 369

kevin81

Member II
TorMar
I also have a 1989 E34 and have the same problem with the fixed ports. This is a project we have been planning to do this year. Thanks for the detailed description and pictures. I feel much more comfortable doing the project with the info you have shared.
Kevin
 

Chris A.

Member III
Very nice

Very nice photos... Thank you.
Would love to see some of the bedding and installation process...:egrin:

Cheers,
 

TorMar

Member II
Windows are in - they look really good!

We went down to the boat again this weekend. The project is now complete. What a difference. Sorry, no pictures, we took the camera, but left the card in the laptop at home, 360 km away.
I installed the two windows I had taken home to 'retrofit'. I then took out the other two windows to refit them. To take them out, unscrew the inner retainer frame, use an exacto knife to cut through the bedding compound inside the cabin, (run the knife around the edge of the window cut out), then use a thin sharp, at least one inch wide scraper, to loosen the frame on the outside of the cabin. Take your time, it will come loose.Once out, take the frames apart. Details in previous post.
1. Once you have the two halves apart, remove all traces of Sikkaflex from the outer frame where it beds against the cabin. Also remove all the original silicone sealer inside the frame, (between the window frame and the neoprene gasket that provides the seal between the acrylic and the frame.)
2. I reused the neoprene seals - so I thoroughly cleaned them inside and out with methyl hydrate.
3.When the frames and seals were clean I drilled and pre-fitted the aluminium end pieces to ensure they would go on with no problems once the window was ready for final assembly. Take apart again.
4. Carefully fit the gasket onto the new lexan.
5. Run a bead of silicone along each inside edge of the aluminium frame to get a really good seal between the gasket and the window frame. I did not put any silicone into the gasket between it and the new lexan.
6. Put the frames back together. You will need something like a Workmate or shop clamps so you can apply the considerable pressure needed to make the two pieces of frame come together with the lexan and neoprene seal properly bedded.
7. Attach the aluminium end plate you made for the curved end, and secure the plastic shim inside the frame on the flat end with a screw. Let this sit for a while.
8.Clean off all remains of bedding compound from the cabin top window cut out.
9. Apply a very generous layer Sikkaflex 291 fast cure bedding and sealing compound to the outer flange of the aluminium window frame. This will form the seal between cabin and aluminium frame. I applied enough that there was an eighth of an inch on the outside edge moving up to almost a quarter of an inch on the inside first 'step' of the frame. I let that sit for at least 30 minutes.
10. I applied a thin bead of fresh Sikkaflex around the bedding edge of the window cut out.
11. Now place the prepared window into the cabin top window cut out and let it sit for an hour for the Sikkaflex to bond and solidify before attaching the inner (inside the cabin) window retainer. Leave the screws very loose until the next day so the Sikkaflex will actually form a gasket and not be forced out of the join between cabinside fiberglass and window frame.

You will need to fit the window carefully, as you may find, as I did, the person cutting the initial opening into the cabin top, cut a very generous opening. You will want to ensure that the window flange is on Fiberglass all the way around. Today they use robots to cut apertures - and they fit precisely. Ours don't. You do want window frame on fiberglass, not air....

12. The next day, I tightened the inner retainer just nice and snug, and carefully cut the excess Sikkaflex that had bulged out of the joint between cabintop and frame. By waiting until the next day, the Sikkaflex actually created a seal that varied from 1/32 of an inch, to 1/16 of an inch depending on the curvature of the frame and cabin top. It was also much easier to remove the excess with the very sharp chisel pushed along at the correct angle. I think the tendency is to get at it and tighten right away - a mistake, as it squeezes out the Sikkaflex leaving a very thin bond. Also trying to clean up wet Sikkaflex makes a huge mess. Let it set, then cut it away. It is really easy and no mess.

13. Stand back and admire.
 

Loren Beach

O34 - Portland, OR
Senior Moderator
Blogs Author
Great narrative. Thank you.
I might possibly add that, somewhere around step 11, or wherever you were making final prep for installing the framed window, one would want to do a "dry fit" and then tape up to the frame edge with 3M Blue or even FineLine.
Once you put in the sealant and squish it out with the port install, this tape border will catch the excess that oozes out. We did this step, inside and out, in '95 when we installed 4 new fixed ports in our boat. It saved a huge amount of cleanup time.
I learned this trick from a local boat builder many years ago, and use it for any hardware installations around the boat.

Thanks again for sharing,

Loren in PDX
 

CaptnNero

Accelerant
Cast Acrylic

I've been advised in the past by hatch refurb shops that there are two kinds of acrylic and to use only "cast acrylic" for hatches and portlights. I think they are stronger and take longer to craze, but they do craze. The cast stuff costs about $125 / sqft.

I'm planing to replace the hatch lenes this year. When our E34 was built in '88, they used butyl rubber to seal around the lens. Eventually water and dirt degrade the edge of the seal and you end up with leaks. For now we keep ours covered with elastic edged sumbrella, which prevents the leaks. A refurbishing professional told me that they use a product from GE as sealant now and it is much superior to the original butyl.

There is a hatch refurb shop in Annapolis which will duplicate your lens for the $125/sqft rate if you drop just the lens. For a few bucks more they will drill the mouting holes. I suppose they will also quote you on doing the assembly work too but I didn't ask. If you use one of the Lewmar authorized repair shops to do the whole refurb, they want several hundred per hatch and you send them the hatch.

-- neal
 
Last edited:

Tom Metzger

Sustaining Partner
CaptnNero said:
...There is a hatch refurb shop in Annapolis which will duplicate your lens for the $125/sqft rate if you drop it off. For a few bucks more they will drill the mouting holes. If you use one of the Lewmar authorized repair shops to do the refurb, they want several hundred per hatch.

Neal - Doing a quick calculation - 19" hatch x $125/ft2 = $313. Are they then installing the lens or do you have to do that?

Do you have the name of the place and/or their website?
 

TorMar

Member II
Cost of lexan for fixed windows

I did not mention the cost of having the four lexan windows cut - $82 Canadian.
 

Steve J

Member I
Copy of my earlier post that had before - after half done

Micro Mesh Scratch Removal Kit

--------------------------------------------------------------------------------

Have any cloudy or even crazed plastic boat windows.

I redid mine with the ultra fine wet/dry sandpaper kit.

The kit contains course to ultra fine grits of sandpaper
as well as some liquid very mild abrasive cleaner.
I was a little hesitant at first to use sandpaper so scrubbed
and scrubbed forever to remove the cloudy surface. The 6000
grit took less than 5 min even finishing up with the liquid.
Kit is about $22, but less trouble than new windows.
Read the instructions...sand only in one direction then use the
finer mesh in the other direction to take off the final marks.

The system works well. It is actually for airplane windows.

Micro-Mesh Scratch Remover kit: Varying grades of wet dry sandpaper
from 1200 to 6000 grit. Works best when used as wet sandpaper and
rince often.
http://www.sportys.com/acb/showdetl....product_id=343

Steve Jones
Olson 34
Edgewalker
 

Loren Beach

O34 - Portland, OR
Senior Moderator
Blogs Author
Thanks, Steve!
Our fixed ports are now 10 years old and have some sort of surface crud on them, that soap and water will not touch. They are getting opaque. I believe that I shall try your idea this season.

We moor under the glide path for PDX and have to put with a lotta jet exhaust and presumably fuel residue...

(It just seems scary to use anything labeled "sandpaper" on those windows!)
:scared:

Best,
Loren in Portland
 
I have replaced all four of my E29's small ports with Lewmar Standard opening ports, as well as two of my main cabin contoured ports with tinted safety glass.
My biggest headache was shaveing the openings with a hand rasp to accomodate the slightly larger Lewmars. My second headache developed when I realised the new glass in the old frames leaked worse than the original with water collecting in the trough. After they were removed again, I layed them flat on a table, filled them with water, & discovered that the leak was from the frame joints. Paul & Anne Marie E29
 

CaptnNero

Accelerant
drill + drum sander to adjust cabin portlight opennings

Last month we replaced the forward pair of angle shaped fixed portlights with Lewmar angled openning ports (4R and 4L). The shape of the old cabin opennings was correct but they had to be made about 1/8 inch larger most of the way around.

After some experimenting with a hand rasp file and various power tools I found that a drum sander attachment in an electric drill made short work of it. The adjustment was made in a few minutes :cool: .

On a previous boat the factory opennings were too tight and caused the frames to warp, which in turn compromised the seal. When installing these portlights the seal that matters is the one between outer cabin top and the inner edge of the portlight flange. The sealant put inside the openning edge is a waste, since the portlight inner flange has a bunch of holes in it anyway. The inner sealant may actually trap some water, but then it will start growing things and find it's way out somewhere anyway.

We also taped baggy plastic to the inside of the cabin around the hole and held it inwards while drum sanding. This kept the fine fiberglass dust from penetrating the interior. While I was at it I coated the edges of the finnished openning with epoxy.

Now we have nice long openning portlights in the middle of boat, which really helps in the galley area when cooking :egrin: .

Incidentally, though the Lewmar standard angled portlights 4R and 4L fit the old forward opennings fairly well, the rear pair of portlight opennings are a lot taller in the rear. To put a 4R or 4L in there, you need to add some fiberglass and gelcoat on an E34 :boohoo: .

Paul & AnneMari said:
I have replaced all four of my E29's small ports with Lewmar Standard opening ports, as well as two of my main cabin contoured ports with tinted safety glass.
My biggest headache was shaveing the openings with a hand rasp to accomodate the slightly larger Lewmars. My second headache developed when I realised the new glass in the old frames leaked worse than the original with water collecting in the trough. After they were removed again, I layed them flat on a table, filled them with water, & discovered that the leak was from the frame joints. Paul & Anne Marie E29
 
Last edited:
Top