• Untitled Document

    Join us on April 26th, 7pm EST

    for the CBEC Virtual Meeting

    All EYO members and followers are welcome to join the fun and get to know the guest speaker!

    See the link below for login credentials and join us!

    April Meeting Info

    (dismiss this notice by hitting 'X', upper right)

Fixing/Strengthening Companionway Ladder

adam

Member III
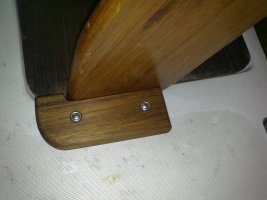
I was climbing the ladder yesterday, and the screws pulled out, sending me crashing to the floor. (photo 1)

Here's what I'm thinking to fix it, and I wanted 2nd opinions before I begin on the project.

1) Fill the screw holes and the gaps with gorilla glue, and clamp the entire ladder together until it dries.

2) Add 6 more screws on each side. (I'm not sure about this -- your thoughts?)

3) Would it help to add a support on the bottom so that the ladder doesn't move around? (I think I've seen photos of these on Ericson 30s)

After that, the ladder should hopefully be solid. But that's just the start of my problems.

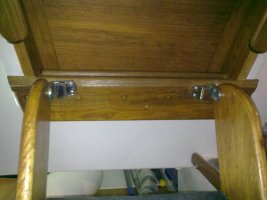
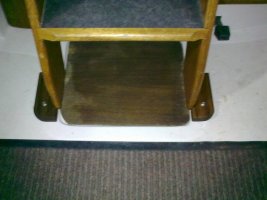
There have apparently been problems with the ladder in the past which a previous owner did a very half-assed fix on. For some reason, they rotated the brackets inward and added a bolt to catch the ladder (photo 2). And, with the ladder solidly put together (no gaps), it no longer fits on the brackets (photo 3).

How should I deal with moving the brackets? There are going to be adjacent holes which I need to fill? Is epoxy the right way to do that?

Also I'm pretty sure that the ladder no longer matches up flushly with the brackets, possibly because of the carpet. Maybe this is why the previous owner did the strange "fix". Though, even with the carpet removed I'm not sure it fits. So, what's the proper fix now? Should I rotate/move the part of the brackets on the ladder so that they fit solidly in the mounted brackets? The alternative seems it would be to leave those brackets as is, but shave off the bottom of the ladder. What should I do?

Thanks for any advice!
-Adam

Photo 1:

ladder5.jpg


Photo 2:

ladder2.jpg


Photo 3:

ladder4.jpg
 

Martin King

Sustaining Member
Blogs Author
1) Fill the screw holes and the gaps with gorilla glue, and clamp the entire ladder together until it dries.

Clamp it up using epoxy, not gorilla glue. Make sure the rungs are
square when you do, it's easy to rack it out of square, and if you
do, you'll never live that down.

2) Add 6 more screws on each side. (I'm not sure about this -- your thoughts?)

Overkill and not necessary.

Would it help to add a support on the bottom so that the ladder doesn't move around? (I think I've seen photos of these on Ericson 30s)

Yes, chocks are great for keeping the ladder from sliding around.

Also I'm pretty sure that the ladder no longer matches up flushly with the brackets, possibly because of the carpet. Maybe this is why the previous owner did the strange "fix". Though, even with the carpet removed I'm not sure it fits. So, what's the proper fix now? Should I rotate/move the part of the brackets on the ladder so that they fit solidly in the mounted brackets? The alternative seems it would be to leave those brackets as is, but shave off the bottom of the ladder. What should I do?

Take off the brackets that were rotated out of position and fill the old
holes with thickened epoxy. You may have to drill them oversize a little before
doing this. With the ladder sitting squarely on the cabin sole so that
most of the load will be carried by the feet, layout and install the chocks.
With the ladder feet now chocked, install the upper brackets in such a manner
that the ladder can only be removed by lifting straight up.

HTH,

Martin
 
Last edited:

mherrcat

Contributing Partner
You could also plug the old screw holes for the bracket with teak plugs. Drill out the old screw holes to match the plug size and glue them in, trim them flush and then re-mount the bracket in a better position. Use a brad-point wood bit or a Forstner bit to get a good clean hole for the teak plug. You won't need to drill all the way through, just enough to remove the old screw hole, maybe 3/8" to 1/2" at most.

Here is another thread on the brackets/chocks. Note that the tab on the ladder does not slide completely down into the bracket on the companionway frame. Mine is like that, too; not sure why, but it works.

http://www.ericsonyachts.org/infoexchange/showthread.php?t=8795
 
Last edited:

adam

Member III
More puzzled than ever

I ended up taking the ladder completely apart, filling the stripped holes with epoxy, and screwing it back together.

But here's a new mystery / problem which is puzzling me.

The mounting brackets (on the ladder) are 1mm wider at the bottom than the top. This means that if the ladder fits into the slots, there is going to be a 2mm empty space such that the ladder slides back and forth.

This seems _totally_ backward. The wider part should be at the top, right?

Did someone just put my ladder together totally wrong?

I hope that was clear enough to make sense. And, here's a photo.

Thanks for any help!

ladder6.jpg


P.S. FullAndBy, nice job with the supports. I might copy that.
 

Martin King

Sustaining Member
Blogs Author
Yep, the narrower part of the taper should be at the bottom. Looks
like somebody flopped them.
 

stuartm80127

Member II
Ladder support on E27

Thought I would pass along a few pics on related work for my E27. I had to completely replace the teak trim around the hatch and along with it I improved the support for the ladder. In my case, I was concerned with addressing lateral movement of the base while someone was traversing ladder while the boat was heeling. I re-used the previous hardware up top as it still looked nice. Added some teak trim cut with a jigsaw and routed with a 1/4 cove bit then sanded. When I want to remove the bilge access panel, I now need to remove the ladder.
 

Attachments

  • 09012010036.jpg
    09012010036.jpg
    82.8 KB · Views: 88
  • 09012010055.jpg
    09012010055.jpg
    70.4 KB · Views: 92
  • 09012010054.jpg
    09012010054.jpg
    78.3 KB · Views: 82
  • 09012010035.jpg
    09012010035.jpg
    75 KB · Views: 75

Glyn Judson

Moderator
Moderator
Companionway ladder.

Stuart, Good job beefing up your ladder, thanks for including the photos too. The teak stops you made recalled a related job I took on. Some years ago a friend asked me to help him make access easier aft of the ladder in his 1977, E27. I came up with a very simple, extremely affordable, yet effective fix that I thought appropriate to share with you and others here. I attached a length of 3/4" teak to the existing width of the lower lip on the inside of the companionway (where his, and your ladder hardware attach) using a stainless steel piano hinge. I don't remember the exact measurements of that teak but suffice it to say that it's the same size of the existing wood. I then reattached the ladder hardware to this new piece of wood. As well, I added a hook to the forward edge of the underside of the lowest step, the positioning of which coincides exactly with the forward end of interior trim around the sliding hatch. I placed a hook eye up there to accept the hook on the step. It's attached facing aft on the vertical wood in order to avoid the chance of someone snagging their head on it had it been installed on the underside of the sliding hatch trim, ouch!! Now, when he needs to get behind the ladder, he simply swings it up on the hinge and temporarily attaches it to the overhead. Does any of this make even a whit of sense? Happy New Year to all, Glyn Judson, E31 hull #55, Marina del Rey, CA
 

Tbacon

Junior Member
companion ladder

I had the same issues with my ladder. I was walking down it and took a pretty good fall. I attempted to remount it by filling the holes and re-drilling without success. the final solution that worked was to refinish the board the ladder mounts to and put another piece of mahogany between the rails at the top of the ladder. I then used a piano hinge to mount it. 8 screws in the ladder board and 8 in the wood the ladder mounts to. been very secure and no more falls even with liquor. the only issue was when i need to get into the engine compartment. My solution was to mount an I hook (2") under the bottom tread board with a small securing hook on the bottom to keep it from hanging when the steps are in place and one above on the hatch cover to hold it up when i need to get to the engine. looks good and you can barely see the hooks
 
Top