• Untitled Document

    Join us on April 26th, 7pm EST

    for the CBEC Virtual Meeting

    All EYO members and followers are welcome to join the fun and get to know the guest speaker!

    See the link below for login credentials and join us!

    April Meeting Info

    (dismiss this notice by hitting 'X', upper right)

Head Stay Replacment

Frank Langer

1984 Ericson 30+, Nanaimo, BC
Jamiem,
I have thought about this a bit, as you can see from my post above. I don't know what kind of furler you have, and how it's rigged. I have a Harken furler which, at the bottom, has toggles to connect it to the headstay at the bow. From there it attaches to several aluminum pieces (I forget what they're called--extrusions, maybe), and at the top there is a furler piece that sits on the aluminum furler section. The headsail halyard connects to the head of the sail and the top furler piece and is hauled up those extrusions (?) til it gets to the masthead. The whole furler--bottom drum, aluminum extrusion pieces and the top piece all rotate around the headstay. So on my boat if the headstay breaks, it would no longer support all of this, the furler would fall, the headstay would hang loose and the mast would fall backward into the cockpit. At least, that's how I picture it all. The only thing that I think could prevent that would be running an additional line from the masthead to the bow, but it would have to be done in such a way as to not get wound up in the furler/sail as it turns.
If someone has another suggestion for how to prevent the mast falling in event of headstay failure, I'd love to hear it.
Frank
 

Loren Beach

O34 - Portland, OR
Senior Moderator
Blogs Author
Hi Frank, On our prior boat, with NO furler, we always stored the end of the spinnaker halyard to an eye on the bow pulpit. This kept it from banging on the mast, and it was handy to rig for launch.

Once we put a furler on the Olson, we suddenly found that rolling in the jib was likely to foul on that halyard so close to the headstay. I always did like the "belt & suspenders" idea of having a spare halyard to the bow, but fate and rigging geometry intervened. I guess that if I got really concerned I could lead the topping lift to the foreguy shackle in the middle of the foredeck, but that would make tacking more tedious. (sigh)
 

Sean Engle

Your Friendly Administrator
Administrator
Founder
"By that logic you should probably replace the chain plate and all the bolts every ten years as well "
yes, chainplates should be replaced as a matter of course and preventative maintenance. Not every ten years, but every 20... and certainly 30. Or 40, as mine and most are. They as well as swage fittings suffer from fatigue and work hardening, and also invisible crevice corrosion where the chainplate passes through the deck.
I am doing bulkheads this Spring, I have been told the chainplates 'look fine' by two machine shops.... but it is only a cpl hundred dollars for piece of mind. When they go, there is no warning and they go catastrophically.

Yikes! :esad:
 

Baslin

Member III
Pulled the mast today. Was able to remove all the masthead sheaves with some heat and an air hammer. Ordered new ones today from Ed at Zephyrwerks today... Didn't see any damage or surprises so Ill be sending the mast off to get sugar blasted and painted. Once back, I'll replace all the standing rigging, new radar install, along with a new Schaefer 2100 Roller furler. Nothing but work and a little money I guess. Should be back up and sailing in a month or so....
 

Jamiem

Member II
Pulled the mast today. Was able to remove all the masthead sheaves with some heat and an air hammer. Ordered new ones today from Ed at Zephyrwerks today... Didn't see any damage or surprises so Ill be sending the mast off to get sugar blasted and painted. Once back, I'll replace all the standing rigging, new radar install, along with a new Schaefer 2100 Roller furler. Nothing but work and a little money I guess. Should be back up and sailing in a month or so....
Hope this is going well. I will be doing the same thing starting monday. I have 5 days of uninterrupted time on the boat with it in a yard safe and sound. I am starting with taking all the hardware off the mast and getting it ready for painting as there is a bunch of exposed aluminum. I was lucky she was in Portland when I bought her as the corrosion was minimal. Now that it is on the coast I need to deal with this quickly.

Planning on a 5 step approach of:
- Remove all hardware including the sheaves and instruments.
- Sanding with 120 grit to find all bubbled paint.
- Clean entire mast with Acitone.
- Acid etch the exposed aluminum then wash with soap and water.
- Zinc chromate the exposed aluminum.
- Hand sand primed locations with 180 grit.
- Prime with Inter-Kote - sand lightly with 220 grit
- Repeat
- Paint first coat of brightside (roll and tip) hand sand with 220 grit.
- Paint final coat of brightside.
- Oh yeah, install hardware back on mast after close inspection and replacement where required.

Wow, when you write it down it is a bit more than 5 steps.

If anyone has 2 cents they want to throw in I will be checking every night before I collapse in bed.

Jamie
 

Christian Williams

E381 - Los Angeles
Senior Moderator
Blogs Author
Apparently you have an E39. Please fill out your profile and add boat and engine to the signature line.

It if were me, being such a big boat, I'd explore the professional paints, which several members have used successfully (Awlgrip etc). Brightside is easy, but this job is so big I think for all the prep time involved the multi-part coatings are worth the learning curve.

Just an opinion.
 

NickSal

Junior Member
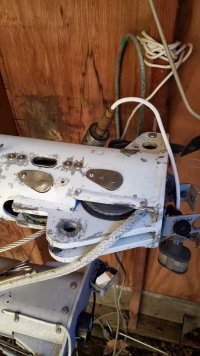
Just replaced all standing rigging, stripped and painted the mast on 38-200, headstay toggle was covered with a similar plate attached to the mast with 3 #10-32 screws.
Not a big deal, toggles are available from rigging only .com
 

Attachments

  • 20200309_174214 (1).jpg
    20200309_174214 (1).jpg
    121.4 KB · Views: 14

Jamiem

Member II
Apparently you have an E39. Please fill out your profile and add boat and engine to the signature line.

It if were me, being such a big boat, I'd explore the professional paints, which several members have used successfully (Awlgrip etc). Brightside is easy, but this job is so big I think for all the prep time involved the multi-part coatings are worth the learning curve.

Just an opinion.
This was one of the hard decisions. In my reading, Awlgrip did not appear friendly to "roll and tip" and my logic was that I will probably want to drop the mast to inspect the hardware at a frequency that will be friendly with sanding and repainting selected areas. We will see how smart that was in about 5 years ;)
 

oldfauser

Member III
Hope this is going well. I will be doing the same thing starting monday. I have 5 days of uninterrupted time on the boat with it in a yard safe and sound. I am starting with taking all the hardware off the mast and getting it ready for painting as there is a bunch of exposed aluminum. I was lucky she was in Portland when I bought her as the corrosion was minimal. Now that it is on the coast I need to deal with this quickly.

Planning on a 5 step approach of:
- Remove all hardware including the sheaves and instruments.
- Sanding with 120 grit to find all bubbled paint.
- Clean entire mast with Acitone.
- Acid etch the exposed aluminum then wash with soap and water.
- Zinc chromate the exposed aluminum.
- Hand sand primed locations with 180 grit.
- Prime with Inter-Kote - sand lightly with 220 grit
- Repeat
- Paint first coat of brightside (roll and tip) hand sand with 220 grit.
- Paint final coat of brightside.
- Oh yeah, install hardware back on mast after close inspection and replacement where required.

Wow, when you write it down it is a bit more than 5 steps.

If anyone has 2 cents they want to throw in I will be checking every night before I collapse in bed.

Jamie
we put a coat of Interlux 2000e primer on the sanded aluminum, then the two coats of the epoxy-primekote before three coats of interlux perfection...


Christian Williams

E381 - Los Angeles
Senior Moderator
Blogs Author
even if the forestay cable failed, wouldn't the sail take the load?

More likely a fitting would fail, bringing the rig down. Stainless wire itself is rarely the issue, it's usually the swages or hardware or chainplate.

We were once rammed by a 35-foot sloop in pre-race maneuvering, in which the other bow impacted our port side (rail in the water). The other boat rode dramatically up over our the cabin house, and since we were close-hauled the forestay struck our boom.

I watched with interest as the intruding forestay bent like the string of a bow. Then--crack!--the other mast busted in half and fell into the water.

So the forestay didn;t break, the mast did. These were wooden boats with wooden masts and big deck-sweeper genoas, era 1960s.

We were on starboard tack and I was at the helm. I thought to yell "starboard!" but it seemed impossible that the other boat didn't see us, given all the maneuvering necessary in the crowd off Atlantic Highlands.

I am less trusting 60 years later.
 

Jamiem

Member II
we put a coat of Interlux 2000e primer on the sanded aluminum, then the two coats of the epoxy-primekote before three coats of interlux perfection...

This was the subject of a long discussion between me, my wife and a couple of sailing friends. Because I am not stripping the mast, material compatability could be an issue. I was warned that there have been compatability issues in the past with 2000e but it could have been a one off. I am probably making a bit of work for myself in the future but we decided to go with the primer and Brightside.

We can talk some more on this in a couple of years;)
 
Top