• Untitled Document

    Join us on April 26th, 7pm EST

    for the CBEC Virtual Meeting

    All EYO members and followers are welcome to join the fun and get to know the guest speaker!

    See the link below for login credentials and join us!

    April Meeting Info

    (dismiss this notice by hitting 'X', upper right)

Inverter, charger, and other electrical gadget locations

Nick J

Sustaining Member
Moderator
Blogs Author
For all you 32-3, 35-3, 38, and 381 owners with the non aft cabin layouts, where have you installed your charger, inverters, DC to DC chargers, batteries, and other electrical system gadgets?

I'm finally getting ready to install my new electrical system and I thought I would do a sanity check before I drill more holes in my boat.
 

dhill

Member III
Hi @trickdhat ,

The electrical system on my 35-3 is pretty simple. I don't have an inverter, DC-to-DC charger, or a refrigerator. My Charles 30 amp battery charger is mounted on the aft bulkhead in the compartment underneath the galley sink. My starter battery is under the forward-center portion of the quarter berth. My house batteries (two 6V lead-acid batteries in series - 200Ah) live under the aft-center portion of the port-side salon U-shaped seating. The battery monitor shunt is mounted on the side of the house battery compartment. My Xantrex battery monitor is mounted near the electrical panel near the navigation table. I have two flexible 175w solar panels snapped into the bimini, which feeds into the lazarette and over to an MPPT solar battery charger, also near the navigation table along with the VHF radio. My MFD, anenometer, depth, and knotmeter are located at the helm. My stereo is located above the starboard salon settee, towards the aft end. My water heater is underneath the cockpit, aft of the engine and transmission. My pressurized water pump and auto-pilot computer are located in the starboard lazarette.

Hope that helps. I will be looking to do a detailed inventory and upgrade of my electrical system over the next couple of years, so I'll be interested to read about your upgrades. I will also be looking to add a small- to medium-sized inverter, AIS (perhaps a Vesper Cortex), dry bilge pump with Water Witch, updated battery monitor, accumulator tank, and likely a refrigerator.

Please let me know if you have any questions.

Thanks!
Dave
 
Last edited:

Nick J

Sustaining Member
Moderator
Blogs Author
Thanks Dave for the quick and detailed response. The start battery under the nav seat / quarter birth was one option I was thinking about. The standard plastic battery box doesn't seem to fit in there. Do you have a box around your battery?

I hadn't thought about the area under the sink, That's a good option. It's a little cramped in there and difficult to access, but I don't think I'm going to find an easy to access location.
 

Loren Beach

O34 - Portland, OR
Senior Moderator
Blogs Author
One thing about batteries, if you use a totally sealed type like an AGM, it has to sit in a tray, but only the exposed terminals have to have insulating covers over the connections. That can reduce the total height needed, some. That's how I made my spiral-cell AGM battery ABYC-legal where it's installed under our quarter berth.
Flooded batteries do need a lidded box.
 

dhill

Member III
Thanks Dave for the quick and detailed response. The start battery under the nav seat / quarter birth was one option I was thinking about. The standard plastic battery box doesn't seem to fit in there. Do you have a box around your battery?

I hadn't thought about the area under the sink, That's a good option. It's a little cramped in there and difficult to access, but I don't think I'm going to find an easy to access location.
Hi @trickdhat ,

I have the standard plastic battery box around my starter battery. As you look at the quarter berth from the salon, the battery is under the closest left corner of the berth.

Dave
 

Kenneth K

1985 32-3, Puget Sound
Blogs Author
I put my new charger under the Nav table for reasons discussed here: https://ericsonyachts.org/ie/ubs/battery-systems-upgrade.921/ Talks about battery monitor and solar charge controller installs as well.

The original charger was located under the stbd cockpit coaming outboard of the trash bin. This location caused a wiring mess.

My starter battery (non-deep-cycle) is mounted to stbd and aft of the engine, on the large flat panel that is accessible under the raisable cockpit seat. This causes a long run (~10ft) to the DC panel, but the battery is easy to access from the raisable cockpit seat.
 
Last edited:

Tin Kicker

Sustaining Member
Moderator
I put a 115VAC outlet beneath the nav station. The charger is tucked to the bottom side of the desk so it can plug into that outlet and the cables to the batteries run between the liner & hull. This way if I want to change or replace the charger it's not too hard and I have an outlet for whatever.

The solar controller is in the cubby aft of the circuit breaker panels and has a switch to go to either the start or house battery.
20200606_162112-XL.jpg
 

p.gazibara

Member III
I highly recommend you avoid putting electronic components in a compartment below the sink, or in any compartment with a thru-hull. Under the nav station is a good location, our house battery charger and DC-DC 48v-12v battery charger is there as well.
Our inverter is under the port side settee. The house batteries (2x group 31 fireflys) are aft of the inverter.
The house bank solar charge controller is below the nav desk seat.
Under the starboard settee we have the propulsion battery bank (4x fireflys) along with the motor controller and solar controller for that bank. I’m hoping to add a larger 220V inverter there as well to run kiwi/EU appliances and maybe even a hot water cylinder with a low wattage element.
-p
 

dhill

Member III
I highly recommend you avoid putting electronic components in a compartment below the sink, or in any compartment with a thru-hull. Under the nav station is a good location, our house battery charger and DC-DC 48v-12v battery charger is there as well.
Our inverter is under the port side settee. The house batteries (2x group 31 fireflys) are aft of the inverter.
The house bank solar charge controller is below the nav desk seat.
Under the starboard settee we have the propulsion battery bank (4x fireflys) along with the motor controller and solar controller for that bank. I’m hoping to add a larger 220V inverter there as well to run kiwi/EU appliances and maybe even a hot water cylinder with a low wattage element.
-p
I would have to agree on having my inverter in the compartment below the sink - too many potential sources of water there.

Thanks!
Dave
 

bsangs

E35-3 - New Jersey
How easy is the process of installing a dedicated inverter? I have a small one that plugs into the 12V outlets on board, but was thinking of getting a more powerful inverter before we set out later this summer. One note - I only have two batteries (regular, not lithium) and do not have a dedicated starter battery. Will that be a deal breaker?
 

Jerry VB

E32-3 / M-25XP
How easy is the process of installing a dedicated inverter?
Pretty easy except for the wire.
I have a small one that plugs into the 12V outlets on board, but was thinking of getting a more powerful inverter before we set out later this summer.

The plug in ones are less than 240W (or so). That is because power (watts) is voltage (V) times current (A). 240W requires 20A at 12v, which is about the maximum that you can pull through a "cigarette lighter plug." A 1000W inverter (pretty small for a hardwired inverter[1]) is 4x that, so you are looking at 80A. That is where the wiring gets hard - you need big wires, preferably short.

One note - I only have two batteries (regular, not lithium) and do not have a dedicated starter battery. Will that be a deal breaker?

Probably. It depends on how many amp-hours your batteries have, how heavily you load your inverter, and how long you use it. If you have 200 amp-hours (AH) of battery storage and you don't want to use more than half of it (e.g. 100AH), you can pull 240W through the inverter for about 5 hours. If you are pulling 1000W, you will use up your 100AH allocation in just over an hour.

[1] According to google, a drip coffee maker takes between 550 and 1200W. "Normal" household circuit plugs are rated at 15-20A, or 1800-2400W. Not coincidentally, that is a pretty popular hardwired inverter rating.
 

bsangs

E35-3 - New Jersey
Pretty easy except for the wire.


The plug in ones are less than 240W (or so). That is because power (watts) is voltage (V) times current (A). 240W requires 20A at 12v, which is about the maximum that you can pull through a "cigarette lighter plug." A 1000W inverter (pretty small for a hardwired inverter[1]) is 4x that, so you are looking at 80A. That is where the wiring gets hard - you need big wires, preferably short.


Probably. It depends on how many amp-hours your batteries have, how heavily you load your inverter, and how long you use it. If you have 200 amp-hours (AH) of battery storage and you don't want to use more than half of it (e.g. 100AH), you can pull 240W through the inverter for about 5 hours. If you are pulling 1000W, you will use up your 100AH allocation in just over an hour.

[1] According to google, a drip coffee maker takes between 550 and 1200W. "Normal" household circuit plugs are rated at 15-20A, or 1800-2400W. Not coincidentally, that is a pretty popular hardwired inverter rating.
thumb_no_math-9133728495.jpg

Thanks @Jerry VB. Appreciate the details. Been thinking of getting a dedicated starter battery, this might be the impetus for it.
 

Christian Williams

E381 - Los Angeles
Senior Moderator
Blogs Author
I have a portable inverter used occasionally only for a laptop with AC charger plug. No need for anything more.

The 381 is pretty obvious. Battery charger on factory lazarette shelf, next to the refrigerator condensing unit.

The factory put two Group 31 batteries under the quarterberth, easy access, and I added a third group 31 deep cycle starter battery under the nav table seat. The third battery is only for emergencies and not part of the house bank.

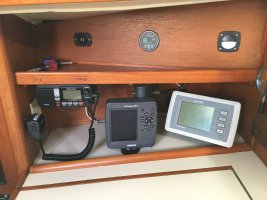
The nav station connections for radio, Vesper, wheel pilot, fit well on the shelf there, which I have covered with a removable panel.

2 veneerIMG_2399 - Copy.JPG...upper panel 1.JPG

As for cleaning up the cluttered circuit breaker board, I kept the original and simply moved the grounds to a separate buss bar.

I charge with a 100 amp alternator and rely on a Victron battery monitor. That means all appliances are wired to go through the Victron shunt, except the bilge pump, which is hard-wired to the batteries.

My Water Witch works fine after five years. The three-way switch that controls it is under the table. That means when you flip the switch to manual, you can see and reach the bilge--important because typically the manual option requires continued pressure.

My diaphragm bilge pump is located under a seat, and I have a pickup extension that allows sucking water out of multiple TAFG compartments. Kind of fun to do.

IMG_2571-001.JPG

Added: one thing I don't have on this boat is a galvanic isolator. For boats on shore power all the time when docked, it's probably a good idea, and I bought one today. WM price was $319, Amazon price was $266 w/free shipping. Installation video here.
 
Last edited:

Nick J

Sustaining Member
Moderator
Blogs Author
This is probably a good time to follow up on where I'm at now. I think I've mentioned it on a few other posts, but this is a good post to get everything together. Long story short, I'm not done yet, so this is a combination of what's been done so far and what I'm planning on doing.

Battery:
Engine start is a group 24 AGM located in the outside compartment of the port lazaratte.
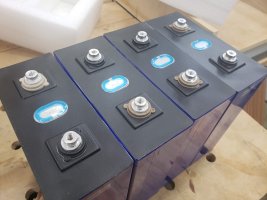
House is a custom built LiFEPO4 280 ah in a Sun Fun Solar Kits battery box located just forward of the engine start battery
I'm really liking this configuration. It has moved the rarely accessed batteries to a compartment that's difficult to access and opened up the more easily accessed compartment where they used to be for items like tools, wiring, and bilge pumps. I sold the idea to my wife by saying it would provide more accessible storage, she's not entirely happy I used it for tools.
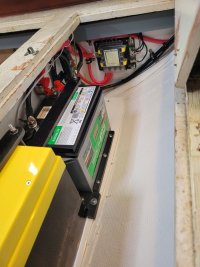
20220522_182020.jpg

20211119_113554.jpg
20211022_151638.jpg

Charger:
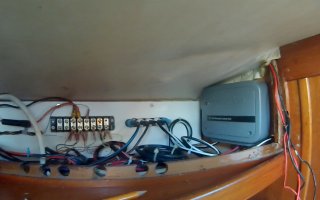
ProNautic 1220p (I think I incorrectly stated I had a 1230 or 1240 on other posts. I recently verified it is the 20 amp version). This is located behind the nav desk drawers. My drawers were falling apart, so I pulled them out to rebuild and noticed the space available for the charger. This will require shortening the drawers by a few inches and installing rails mounted to the outside of the cabinet instead of the back. The charger was previously mounted where your legs would go when you're sitting at the nav desk. I thought it would be out of the way, but I hit my knee on it one too many times.
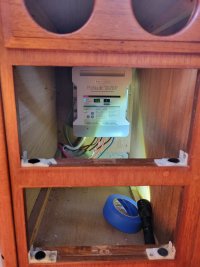
20220416_142706.jpg

The charger is mounted, but the drawers are not done yet. Once they are installed, I'll add a remote panel to the charger which will allow me to easily change settings and view the charger operation.

Inverter:
Renogy 1000W located upside down on the bottom of the nav desk chart table. This is the area where the two map tubes are located. my tubes were cracked, so I removed them and came to the conclusion that I don't use paper charts very often. I'm planning on putting a decorative grate behind the two holes to provide ventilation and clean it up a bit. I haven't completed this install yet.

The inverter will be used for small loads like laptops, tool battery charger, TV (to keep the kids and their friends happy), and maybe small kitchen appliances. I am limited on inverter size by the house battery BMS (120amp).

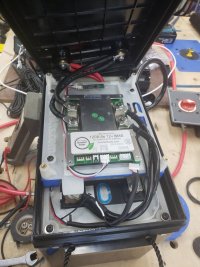
The inverter will be wired to the main cabin 120v outlets through a breaker panel with two dual pole 15 amp breakers using an interlock devise. this will allow switching between shore power and inverter power while ensure both are not connected at the same time. I'm planning on installing additional outlets wired only to the shore power panel to run tools, heaters, and anything else we wouldn't want to accidently run through the inverter. I've mocked it up and tested on my work bench, but haven't installed on the boat yet (it involves reconfiguring my electrical panel and some cabinetry work)
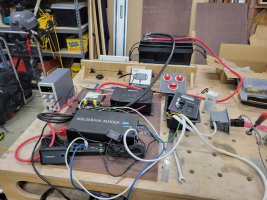
20220129_155812.jpg
DC to DC charger:
Renogy DCC40s (the new model is a 50 amp version) - located on the forward bulkhead of the compartment where the battery chargers are located. This has been critical in the LiFEPO4 battery install by allowing me to send all of my charging sources through the AGM battery and have a single source charging the house lithium battery. It also provides protection against BMS charge cut offs affecting the alternator or battery charger.
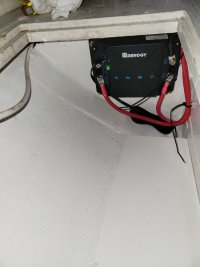

20220517_190309.jpg

Battery switch:
Blue Sea Systems 8280 battery switch panel with combiner. Located on the aft bulkhead inboard of the nav desk at the base of the stairs. This provides short wire runs, easy access, and the ability to independently switch the house and engine batteries while maintaining an emergency battery combine function. I really like this configuration. It allows me to leave the house battery on, charge both batteries, and have the piece of mind that my engine starter is not energized while the boat is in the slip.
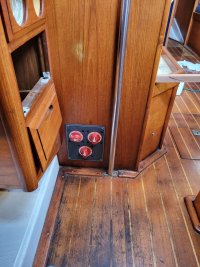
20220326_150455.jpg

Fresh water pumps:
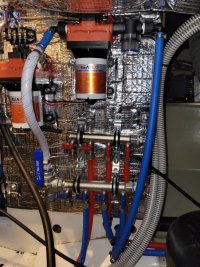
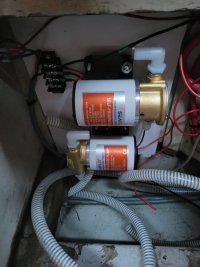
Seaflo variable speed dual pump - located behind the engine on the starboard side of teh engine compartment. In theory, these should work in unison. When the flow requirement is low, one pump should spin slowly. As the demand increases, the first pump should speed up to full speed, then the second pump should kick in. I plumed these incorrectly and have been slowly working on correcting it. I currently only have one pump plumbed in, but it's function very well with no pulsing and sufficient flow. All the pumps in the boat are seaflo and I've only had one DOA so far. They probably aren't as good as some other brands, but they are so much less than their competitors, you can tolerate some failure.
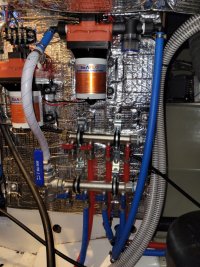

20230325_192907.jpg
Bilge Pumps:
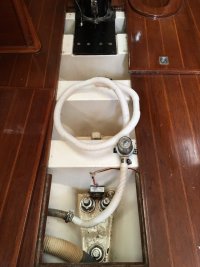
Seaflow flexible vane pumps for both shower and main bilge - located in the aft compartment of the port side lazzarette where the batteries used to be. So far, this is a great set up and my bilge is considerably dryer only leaving a small puddle that is easily cleaned up with a sponge.

20230325_185939.jpg
 

Attachments

  • 20230325_192907.jpg
    20230325_192907.jpg
    214 KB · Views: 2

Kenneth K

1985 32-3, Puget Sound
Blogs Author
The charger is mounted, but the drawers are not done yet.

Renogy 1000W located upside down on the bottom of the nav desk chart table.
Amazing work!

Check the charger & inverter manuals for airflow/open-space requirements around the vicinity of the units.

Good idea to use the old chart tubes as vents. With both a charger and inverter mounted under the chart table, that could be a lot of heat (won't they both be in use together at the dock?) I'd probably consider drilling a few large-ish holes in the side of the cabinet to provide for cooling air intake.
 

Nick J

Sustaining Member
Moderator
Blogs Author
Amazing work!

Check the charger & inverter manuals for airflow/open-space requirements around the vicinity of the units.

Good idea to use the old chart tubes as vents. With both a charger and inverter mounted under the chart table, that could be a lot of heat (won't they both be in use together at the dock?) I'd probably consider drilling a few large-ish holes in the side of the cabinet to provide for cooling air intake.
Thank you!

The bottom of the cabinet is open and the two holes at the top provide a path for hot air to leave the space. With the interlock circuit breaker panel, they should never be used at the same time. Of course, I will have to remeber to switch from inverter to shore power at the dock. Even if I forget, the ac loads at the dock while I'm away won't be too large.
 

bsangs

E35-3 - New Jersey
Thank you!

The bottom of the cabinet is open and the two holes at the top provide a path for hot air to leave the space. With the interlock circuit breaker panel, they should never be used at the same time. Of course, I will have to remeber to switch from inverter to shore power at the dock. Even if I forget, the ac loads at the dock while I'm away won't be too large.
That is damn impressive Nick.
 

bsangs

E35-3 - New Jersey
Added: one thing I don't have on this boat is a galvanic isolator. For boats on shore power all the time when docked, it's probably a good idea, and I bought one today. WM price was $319, Amazon price was $266 w/free shipping. I imagine these rates change frequently.

Good call Christian. Was one of the first things I added last year. Previous owner kept the boat on a mooring ball all the time, so he never needed one, but knowing I'd be on shore power pretty much 24/7 when not sailing - and having been warned by some marina tenants about stray current - I grabbed one that cost about $260, though it only cost me $11 after using my Amazon points.
 

Kenneth K

1985 32-3, Puget Sound
Blogs Author
The bottom of the cabinet is open
Yeah, perfect. I was thinking the cabinetry went all the way to the floor.

Of course, I will have to remember to switch from inverter to shore power at the dock.
Of course. I'm on a buoy so I forget that most people have AC shore power (it does help when running that battery charger!).
 
Top