• Untitled Document

    Join us on April 26th, 7pm EST

    for the CBEC Virtual Meeting

    All EYO members and followers are welcome to join the fun and get to know the guest speaker!

    See the link below for login credentials and join us!

    April Meeting Info

    (dismiss this notice by hitting 'X', upper right)

Last fix to my E25 centerboard controls/mast step = success!

klb67pgh

Member III
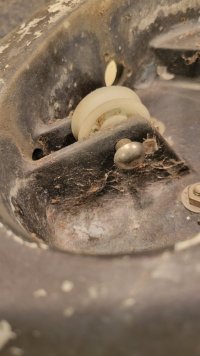
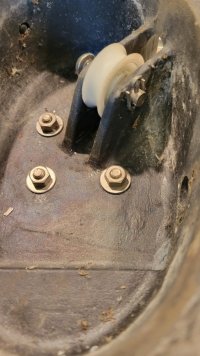
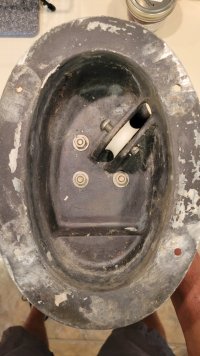
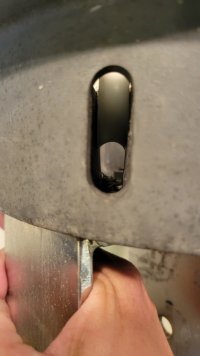
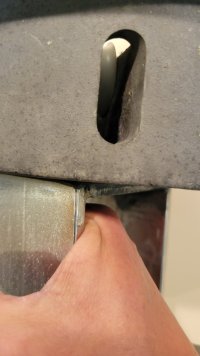
During the Spring of 2022, I redid the bottom of my E25 (sand, fair, barrier coat, bottom paint). I also pulled the centerboard out, repaired it, and replaced the pivot pin and centerboard bushings, and the pendant with dyneema. The centerboard movement was improved, but I thought could be better. Additional investigation had me suspecting the sheeve in the mast step - that project would have to wait until Spring of 2023. I wasn't sure what I was going to get into to remove the mast step, but I was very pleasantly surprised to discover the 2 machine screws and 2 wood screws came out easily, and the mast step popped off with little force. I expected a bed of sealant but found only a bit at each screw hole. When I removed the sheeve for the control line, it came out in 2 pieces. I suspect it was not rotating and I was dragging the line across it. I had difficulty finding a direct replacement - everything online was a bit too wide, or two tall. I found a source that machined a custom sheeve for the application. Apparently I did not take a picture of the new sheeve - I must have been anxious to install it. It was just a hair too wide, but I easily sanded the new sheeve on the belt sander for a perfect fit. I also took the opportunity to remove some old mast wiring and tidy up under the mast step.

The first test was after I launched Awela a few weeks ago. I am now able to winch the centerboard with one hand and not bracing myself against anything for leverage. I should have made this fix the first off season-I thought mast step removal was going to be a real pain. The force to raise the centerboard is probably still a bit more than winching the theoretical Yorkshire Terrier that Roscoe/Oystercatcher calculated on his blog, but I'm happy, and the crew will be happy.
 

Attachments

  • 20230220_191600[1].jpg
    20230220_191600[1].jpg
    81.5 KB · Views: 20
  • 20230220_192302[1].jpg
    20230220_192302[1].jpg
    90.7 KB · Views: 19
  • 20230226_075859[1].jpg
    20230226_075859[1].jpg
    52.7 KB · Views: 20
  • 20230404_195819[1].jpg
    20230404_195819[1].jpg
    220.1 KB · Views: 17
Last edited:
During the Spring of 2022, I redid the bottom of my E25 (sand, fair, barrier coat, bottom paint). I also pulled the centerboard out, repaired it, and replaced the pivot pin and centerboard bushings, and the pendant with dyneema. The centerboard movement was improved, but I thought could be better. Additional investigation had me suspecting the sheeve in the mast step - that project would have to wait until Spring of 2023. I wasn't sure what I was going to get into to remove the mast step, but I was very pleasantly surprised to discover the 2 machine screws and 2 wood screws came out easily, and the mast step popped off with little force. I expected a bed of sealant but found only a bit at each screw hole. When I removed the sheeve for the control line, it came out in 2 pieces. I suspect it was not rotating and I was dragging the line across it. I had difficulty finding a direct replacement - everything online was a bit too wide, or two tall. I found a source that machined a custom sheeve for the application. Apparently I did not take a picture of the new sheeve - I must have been anxious to install it. It was just a hair too wide, but I easily sanded the new sheeve on the belt sander for a perfect fit. I also took the opportunity to remove some old mast wiring and tidy up under the mast step.

The first test was after I launched Awela a few weeks ago. I am now able to winch the centerboard with one hand and not bracing myself against anything for leverage. I should have made this fix the first off season-I thought mast step removal was going to be a real pain. The force to raise the centerboard is probably still a bit more than winching the theoretical Yorkshire Terrier that Roscoe/Oystercatcher calculated on his blog, but I'm happy, and the crew will be happy.
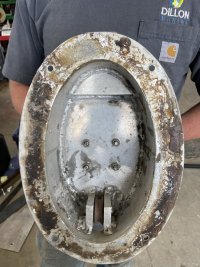
Wow, I am working on the same project, but yours look different than mine!
Notice the mind-blowingly stupid design, whereby it is impossible to replace the sheave.
IMG_1499.JPEG
 

Loren Beach

O34 - Portland, OR
Senior Moderator
Blogs Author
Perhaps a drilled 1/2" hole, at an angle, thru the side of the aluminum, lined up with the axel hole in those welded-in cheeks? Maybe even a larger diameter, so you can reach in and gently remove and reinstall the pin with needle nose pliers?
 
I thought about that, but isn't it important to have good alignment between the pin and the cheeks, in order to minimize friction?
The whole idea for me is to take full advantage of the centerboard, by making it easy to raise and lower at different points of sail.
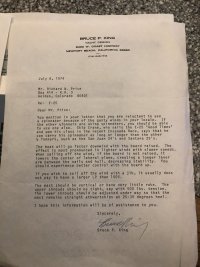
In fact, I have a letter from Bruce King to original owner, from whose daughter I purchased the boat, advising just that.

IMG_2714.JPEG
It would be worth it to make raising and lowering the centerboard much easier than it is, even if it costs a few hundred dollars to modify the mast step.

My boat is hull 112, and apparently they corrected the design flaw, so perhaps I should just give the new design to my welding shop to copy.
 
I would take it to a machine shop or a welding shop and see what they have to say about replacing the sheave.

I'd be surprised if they didn't find a simple (for them) solution.
My machine shop guy suggested drilling a hole in the side, big enough to remove the pin, replacing the pin and sheave, and then replacing it. But realistically, the angled exit would work better, both in terms of sending the line to where it needs to go and providing access to the sheave for service or replacement. But both are decent options.
For a couple of hundred dollars difference, what would you do? I am leaning toward the latter angled design.
When I showed it to him, he said,"Hell yes, that's what I would have done!"
 
Last edited:

gabriel

Live free or die hard
Wow, I am working on the same project, but yours look different than mine!
Notice the mind-blowingly stupid design, whereby it is impossible to replace the sheave.
View attachment 47521
Is that original or did someone at some point grind off the old sheave mount and move the sheave? And are those rivets where the original mount would have been?

user campuscab is parting out an Ericson 25, maybe inquire if he still has the original mast step If you haven’t done so already.
 
Last edited:
Is that original or did someone at some point grind off the old sheave mount and move the sheave? And are those rivets where the original mount would have been?
There are no rivets, and there is no sign of it having been situated at any other position. Mine is hull 112 (1974), so perhaps they corrected it very shortly thereafter. What does yours look like?
 

gabriel

Live free or die hard
There are no rivets, and there is no sign of it having been situated at any other position. Mine is hull 112 (1974), so perhaps they corrected it very shortly thereafter. What does yours look like?
Mine is exactly like KLB67’s. I edited my comment but I’ll reiterate, did you ask user campuscab if they still have the mast step to the e25 he/she is parting out?
 
Is that original or did someone at some point grind off the old sheave mount and move the sheave? And are those rivets where the original mount would have been?

user campuscab is parting out an Ericson 25, maybe inquire if he still has the original mast step If you haven’t done so already.
Yes I did. He thinks he might have already sold it, but he is looking. My shop estimates 3-5 hours @ $120. I would do it for the low end. Otherwise, I will just dremel out enough of the casting to remove the pin.
I want a new sheave in there.
 
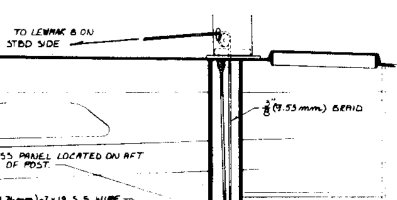
The plans in the 1977 owner's manual show your arrangement.
It also notes the upgrade to Lewmar from the earlier Barlow and Barient winches.

7-6-2023 7-42-24 PM.jpg
 

klb67pgh

Member III
Yes I did. He thinks he might have already sold it, but he is looking. My shop estimates 3-5 hours @ $120. I would do it for the low end. Otherwise, I will just dremel out enough of the casting to remove the pin.
I want a new sheave in there.
I bought numerous parts from Tony, including the mast step to have a spare. It is identical to mine.

Kevin
 

klb67pgh

Member III
I was glad to acquire a spare mast step and am not inclined to part with it, as I hope you can imagine. I can take some detailed measurements of the location of the sheave support tabs so you can have new ones welded in in the correct location if that would help.
 

klb67pgh

Member III
Yes that would help, along with some detailed photos.
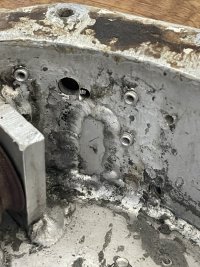
Fortunately, the welds show the old location of the port.
Blue streak - I have a few options for you. I happened to see this post on FB about an E25 for parts. I spoke with Charlie about his boat today. There's nothing that will work for me, but he may be able to work out something for you on your mast step.

E25 on FB for parts

If that does not work out, here are some pics of the spare mast step I have. It is a bit different than the one on my boat - I think there is more room around the CB line sheave in it. A key is that the cheeks inside the mast step through which the CB sheave pin go are on either side of the one bolt that attaches the upper "U" portion of the mast step to the lower cast aluminum part, and the line exits just aft of the rear starboard bolt that attaches the mast step to the deck. So that should help with your alignment. I think if your step is in otherwise good shape, you could get new tabs welded in and restore it to the factory alignment. I assume that CB line comes straight up through the deck to the sheave rather than at an angle that would chafe on the hole in the deck, so that will further help your alignment. The hole for the CB pin on the aft tab is about 1 3/4 inches from the inside of the cast mast step, measured on the aft side of that tab.

20230709_141816.jpg
20230709_141714.jpg
20230709_141734.jpg
20230709_141751.jpg
20230709_141806.jpg
 
Top