• Untitled Document

    Join us on April 26th, 7pm EST

    for the CBEC Virtual Meeting

    All EYO members and followers are welcome to join the fun and get to know the guest speaker!

    See the link below for login credentials and join us!

    April Meeting Info

    (dismiss this notice by hitting 'X', upper right)

Leaky Grab Rail

Milagros

Member II
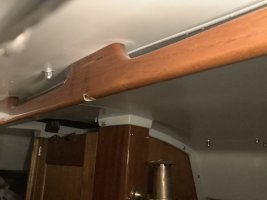
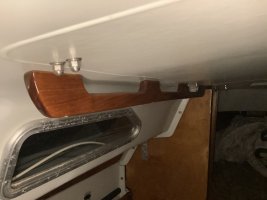
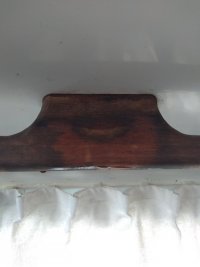
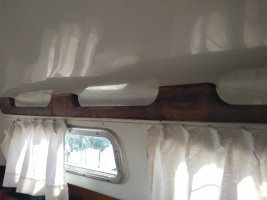
With the return of rain to the SF Bay Area--I've discovered that I get some pretty serious dripping from the port side grab rails. If you're not familar--these teak rails are mirrored on the top of the cabin and on the interior (shown). Have any of you dealt with this before?
 

Attachments

  • IMG_20201114_112957014.jpg
    IMG_20201114_112957014.jpg
    57.3 KB · Views: 19
  • IMG_20201114_113001117.jpg
    IMG_20201114_113001117.jpg
    118.3 KB · Views: 19

Kevin A Wright

Member III
Hi Ian,

Yep. Had the same problem on my E27 years ago. Truth be told I sidelined the project for about 10 years by just putting some silicone sealant around the base of the hand rails on the outside with my finger. Would keep the leak at bay for about 2 years and then I'd reapply it. Had too many other projects to get to first.

When you get around to it, if you want to do it right you need to remove both inside and outside handrails (they are through bolted together). To get to the bolt heads just grind the head off a wood screw and chuck it up in your drill. As you drill into the teak plug it will pop out (or break in half and pop out). Then unbolt and remove.

If you are lucky the deck core isn't soaked around the hole. If it is you should leave open to dry it out as best as you can (a summertime project around these parts) then chuck up an allen wrench in your drill and whizz out the old deck core for about and inch around the hole. Fill this with a thickened epoxy and once set redrill your holes. Now you can use regular caulk or sealant and even if it leaks after a few more decades your deck won't rot out.

Good Luck!

Kevin Wright
E35 Hydro Therapy
 

Milagros

Member II
"To get to the bolt heads just grind the head off a wood screw and chuck it up in your drill." Brilliant! I'm sure that's a well known piece of carpentry advice but somehow I've missed it.

Thanks for the advice. I bought the boat this year and had it surveyed in Sept and at that time there wasn't unusual moisture in the coach roof so hopefully the core is still dry. Will definitely get some silicone on the outside ASAP for this winter and dig into it next summer.
 

garryh

Member III
to remove core I have used a bent nail and ground the edges sharp... but a roofing nail with three cuts with a grinder or hacksaw, and the edges bent downwards on the leading edge is a really good idea and more easily controlled. No need to go back a full inch... if you are drilling for 1/4" bolts, overdrill to a 1/2" hole, then use the nail or whatever to remove core back another 1/4" or so, then clean out the hole and plug the bottom with tape and fill with thickened epoxy (in a perfect world, first wetting out with neat epoxy with a bent pipe cleaner or whatever), then redrill your 1/4" holes.
And- it will sound like a broken record... but never ever, as in EVER... use silicone on fiberglass surfaces. The silicone oil will contaminate the fiberglass and nothing will ever stick there again for the life of the boat. Use a polysulphide... many choices.
 

Attachments

  • roofing nail for core removal.jpg
    roofing nail for core removal.jpg
    44.7 KB · Views: 11

Christian Williams

E381 - Los Angeles
Senior Moderator
Blogs Author
If wood plugs were installed correctly they will pop out with a small screwdriver. Varnish, not glue, holds them in (plugs are intended to come out easily). If you do need to drill out plugs, use a forstner bit. New plugs will have to go into the old holes, and if you bugger up the holes the project piece is ruined.
 

garryh

Member III
agreed. This was the subject of a thread some time ago and there were differing opinions on the 'headless screw' method. Someone suggested it to me way back and I tried it and ended up taking out great chunks of perfectly varnished grab rails along with the plug. I think the answer lies in the finish of the material... if it is oiled teak, the plug will back out easily with no damage to the surrounding material. If the surface is heavily lacquered or varnished, you will risk tearing out chunks of material with the plug. So Christian's suggestion of a small Forstner bit , or perhaps brad point bits, works well.
I have found drilling a 3/16 hole in the centre and prying out the remains of the plug in two pieces with a small slot screwdriver along the grain lines works well.
 

Attachments

  • brad-pilot-point-bits.jpg
    brad-pilot-point-bits.jpg
    23.7 KB · Views: 0

Loren Beach

O34 - Portland, OR
Senior Moderator
Blogs Author
I wrote up some blog pages about epoxy and filling holes. If you have questions drop me a line.

Plan B for those old teak plugs - I have been using a very sharp pointed pocket knife blade to gently pry out the plug in bits. Works well and almost never damages the surrounding wood. Almost. This is, for sure, a situation where "haste makes waste". :(
 
Last edited:

Gaviate

Member III
And for those of you who advocate the use of silicone on your gelcoat (or anywheres else for that matter)......shame shame! IMO silicone should be forever banished...use instead a clear (or colored) acrylic latex sealant as temporary fix, same results without the 'good grief this crap won't come off' problems a year or three down the road.
 

gabriel

Live free or die hard
hi milagros,

I did this job on my boat last summer after refinishing the rails over last winter.

The brass (or bronze) bolts and nuts were corroded together so the only way I was able to remove them was to cut the backside of the interior rail with a die grinder and 3” cutoff wheel and fill it later (since it’s backside of rail it can’t really be seen).

Afterward I thru bolted everything with SS hardware and sealed topside with butyl. The front two mounting points on my topside rails where only screwed in place, so I redrilled and thru bolted those as well I enlarged inside rail holes to fit 1/4” socket driver.
 

Attachments

  • B43EB04A-4C8D-4187-B603-BB128F783476.jpeg
    B43EB04A-4C8D-4187-B603-BB128F783476.jpeg
    163.6 KB · Views: 13
  • A5F2AC10-B4B3-46F1-B902-2BF35619FCDC.jpeg
    A5F2AC10-B4B3-46F1-B902-2BF35619FCDC.jpeg
    157.9 KB · Views: 13

Kenneth K

1985 32-3, Puget Sound
Blogs Author
And for those of you who advocate the use of silicone on your gelcoat (or anywheres else for that matter)......shame shame! IMO silicone should be forever banished......
I get the cautions against using silicone on gelcoat--it soaks into the gelcoat, and the part that soaks in cannot be removed even when the solid silicone is scraped off of the surface. But silicone is fine on metals, glass and many plastics.

I use silicone to seal between my mast and mast boot. It can't harm the aluminum, and the rubber boot will be replaced if ever removed. In the mean time, it's durable and leak free. I like to use flowable silicone (used for automotive windshield repairs) for sealing between stanchion posts and railings if the post bottom is drilled-out to pass wiring. I don't know of many other flowable sealants, and silicone can't hurt stainless steel. I also wouldn't hesitate to use it between glass windows and rubber seals.

Just because silicone is a poor choice for gelcoat doesn't mean it doesn't have its uses on boats. Likewise, some sealants don't tolerate UV exposure well (though silicone does), that doesn't make them bad sealants, just poor choices for certain applications.
 
Last edited:

Gaviate

Member III
Just because silicone is a poor choice for gelcoat doesn't mean it doesn't have its uses on boats. Likewise, some sealants don't tolerate UV exposure well (though silicone does), that doesn't make them bad sealants, just poor choices for certain applications.
Tempered I am...I do agree that silicone is a great choice for glass and metals. Being in construction I have consistently found it used in all the wrong places and I find myself somewhat biased against its existence.
As you point out, one should seek out the best product for the specific task.
 

Christian Williams

E381 - Los Angeles
Senior Moderator
Blogs Author
I don't know, Ken. You get a tube of silicone on the boat, pretty soon you're using it because it's all you've got...

New owners should know that there are a great many caulks and adhesives and sealants and epoxies etc. and when approaching a job it is usually worthwhile to find the one recommended for that specific application. Give a person a tube of 5200 (permanent adhesive) and he'll use it. (5200 being the most loathed substance on the forum, since "permanent" is rarely desirable in routine maintenance).

I can't keep it all in my head. There's a WM chart, let me see if I can find it.

1608612426996.png
 

jtsai

Member III
A graphical representation and simplified version.
 

Attachments

  • IMG_1560.jpeg
    IMG_1560.jpeg
    223.5 KB · Views: 24

garryh

Member III
I notice in the diagram they recommend it for portlight fitting. Fine if glass to a metal frame etc, but should not be used for bedding the portlight frame to the cabin sides for the above-mentioned reasons. The default position shold be that it is not allowed on the boat, because as Christian rightly mentions... it will get used. If needed for a specific application, buy it, use it and take it home.
 

wynkoop

Member III
I just dealt with the 20 year old leaks I had in both grab rails on Silver Maiden. My outside rails are real worn down and skinny enough that I have to replace them.

On the port side I pulled both rails and filled the holes with silicone, then reinstalled while the silicone was wet and made sure to silicone the top end of the bolts so that the threads were filled so nothing could travel down the threads. This seemed to work, but after a few weeks I started to get leaks around the middle bolt and the forward bolt.

I backed both the forward and middle bolt out and shot some expanding foam into the holes and as it started to expand out I reinstalled the bolts and tightened them down. I thin did the threads on top with silicone again. I went to the boat today and checked. No leaks and it has been raining.

On the starboard side I did not remove the rails, instead I made them tight and sealed the bolt threads with silicone on the top. Both sides have been leak free for about 4 weeks.

In the spring I plan to make and install new outside grab rails at which time I will install new wooden plugs. I also plan to do the expanding foam thing when I do the new rails in the spring. It is such a joy to not have the rails leaking.
 

Milagros

Member II
Thanks to the input here--I sealed up the grab rails with some 3M 4000UV. Seems to be helping after the next bit of rain on xmas day. The bad news is that some water that I thought was getting in through the grab rails must be coming from somewhere else! Guess I need to pick up one of @Christian Williams' books and make myself comfortable on the next rainy day to track the source.
 

wynkoop

Member III
On the 27 the headliner and the hull liner are 2 different pieces. They have an overlap at the back of the book shelves port and starboard. That overlap actually runs nearly the full length of the boat. Any water that gets into the space between the hull or the deck and the inner liners will drip down and run along to the stern (according to Ericson Docs).

In Practice I have found that it will get out where the two liners meet. Previous owner put some sort of putty up there to seal the two of them, but on Silver Maiden that has started to leak badly. I have been fighting how to get it sealed for months now. Using normal marine sealer is an almost impossible job because it wants to drip right back out. Forward on the port side from the vberth to about the divider between the 2 port side shelves I foamed the gap with locktite foam. (denser than great stuff). It looks like hell because I got too much in and it came out the bottom, but the water has stopped. I did the same thing along the quarter berth with limited success. Water is still creeping out around the foam in some places, and the starboard book shelves in spite of getting hit along the seam with more caulk still have some leaks.

I wish I knew where on deck these leaks were, but when I took all the trim off while in the middle of a day long downpour a couple of months ago it looked like the water was just seeping in through the fiberglass of the deck. My theory is micro cracks in the gelcoat. I also have some water coming in around the chainplates. This is odd because during the summer I re-bedded ALL THE DECK HARDWARE.

I am getting close to my wits end with the water ingress. My quarter berth area looks like hell too due to the mass of foam sticking out. I am seriously thinking of laying some fiberglass along that area between the headliner and the hull-liner, then painting it white and making a drain at the stern to the bilge.

BTW on Silver Maiden the water running aft on the port side started to rot the bulkhead at the forward end of the lazerette. When I had a few weeks of dry weather this summer I hit the compromised areas with penetrating epoxy, which seems to have arrested the issue, but I can feel through the finger sized hole that there is water behind that bulkhead when it rains and the bottom of it seems to be stained if one looks at it under the sink.

I am sure any ideas would be appreciated by both of us if the rest of the crew has any insights.
 
Top