• Untitled Document

    Join us on April 26th, 7pm EST

    for the CBEC Virtual Meeting

    All EYO members and followers are welcome to join the fun and get to know the guest speaker!

    See the link below for login credentials and join us!

    April Meeting Info

    (dismiss this notice by hitting 'X', upper right)

M-25 Exhaust Riser--choice of metals

Kenneth K

1985 32-3, Puget Sound
Blogs Author
After weeks or pulling things apart, it's time to start re-assembly. I have been mulling over whether to replace this:
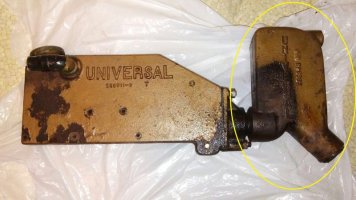
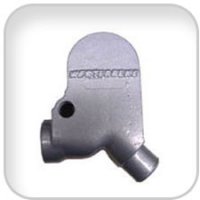
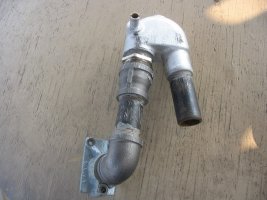
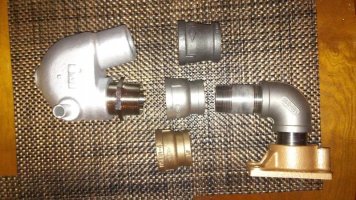
20170125_223148.jpg with this..... UNV-200372.jpgor with this..... riser.JPG.

In the end, I decided on the latter Yanmar-type elbow. Like anything boat related, there are trade offs, but for me it came down to remove-ablity. The Westerbeke unit, like my original Universal elbow, twists on to a 1 1/4" threaded nipple at the exhaust flange. Since there's not room in the engine compartment to rotate the unit 360 degrees to remove it, you have to take off the exhaust flange to get it out. Not a huge deal, but it does mean having to drain the coolant, replace the flange gasket, etc. The Yanmar elbow, however, twists off from a 1 1/2" stainless nipple at the top of the riser. Something that should be easy to do in place. The 1 1/2" stainless nipple is a Yanmar designed part that is reverse-threaded on the top side, so turning the nipple in one direction removes it from both the elbow above and the 1.5"-to-1.25" pipe reducer below.

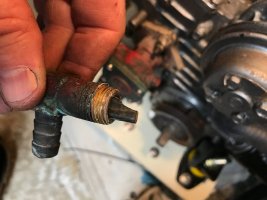
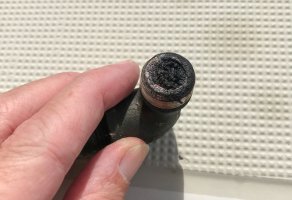
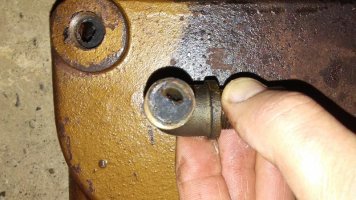
From what I've read, exhaust elbows should be cleaned out every 3-5 years to prevent this.... 20170203_213828.jpg which would have readily led to an over-heated engine.
So, I have all the parts to make the Yanmar elbow. The plumbing guys, of course, recommended 316 stainless when I told them it's for a high-temp, high vibration, salt-water marine exhaust application. But, back to the trade-offs, stainless steel it turns out, is one of the worst metals for galling, or cold-welding, in threaded connections. Cold-welding my fittings together kind of kills my whole argument for remove-ability.

To prevent galling, they made two recommendations:

(1) using a high quality anti-seize paste on stainless-to-stainless fittings, or

(2) using dissimilar metals for the threaded connections: Plain-iron threaded pipe, according to my plumbing supplier, will not gall against stainless pipe. It will, however, lead to corrosion of the stainless fitting. He claimed a Bronze fitting would be the best match for the stainless nipple. Bronze-to-stainless apparently won't corrode or gall.

I see bronze in all kind of cold-water marine plumbing applications (water-line fittings, thru-hulls, etc), but i have no idea if bronze will hold up to the high heat, high vibration, and high stress (having stronger, stainless fittings inserted both above and below) in this application.

So much for the plumber's opinion.....thought I'd ask the boating experts: Stainless with anti-seize, bronze, or plain iron for the reducer fitting?
20170406_011712.jpg

Thanks.
 

footrope

Contributing Partner
Blogs Author
I can't speak to bronze, but I do have 12 years experience with a stainless exhaust elbow in the flange. Neither the stainless nor the flange are damaged or corroding away as far as I can tell when I had it all apart last summer. The stainless threads have not galled at all.

On reassembly I used red RTV high temp sealant to add a little confidence to the fit and tightness of the threaded joint. RTV lubricates the threads and may cause orientation issues by the way. It did for me as explained in my next post. I'd try it dry at first and see how it feels for tightness at the correct orientation.
 
Last edited:

Kenneth K

1985 32-3, Puget Sound
Blogs Author
Thanks Craig,

RTV, huh? I've used it before on cars.

Always a catch 22 on this marine stuff. I've read other posts where guys said they had to "block" their fittings in place for a few months before corrosion finally helped the parts "set" enough not to vibrate loose. I suppose with stainless+anti-seize, that may never happen, leading to loose fittings.

So you used RTV on stainless, achieved a tight fit, and were still able to disassemble and re-assemble?
 

footrope

Contributing Partner
Blogs Author
I do not necessarily recommend the use of red RTV in an exhaust system. I will edit my previous post to clarify.

The hi-temp red RTV application on my exhaust elbow to flange threads has been fine with limited running time (less than 20 hours) since last summer. It doesn't help with tightness but the joint doesn't leak. It actually lubricated the threads but not enough to make another 360 turn to orient the elbow properly. I don't know why RTV would be a problem in a marine environment.

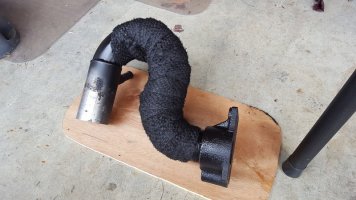
Backstory: Prior to last summer, my exhaust system hadn't been disassembled since installation in 2004. The elbow was tight in the flange with no plumbers tape or thread sealer. Keep in mind that I have a custom elbow, shown below. When taking the cylinder head off and getting the parts ready for cleaning, I took the elbow off the flange.

20160906_133735-small.jpg

On re-assembly dry, the elbow spun past the previous "tight" position about 1/4 turn. So that got me to thinking about thread sealer. When I tried the RTV, the very tight - "can't turn it without possibly cracking the flange" position was only 1/2 turn past the unlubricated point. Thus, I backed it off and am using the RTV to provide some confidence for the less tight position. Fortunately, the configuration of the raw water fitting and the hose attached are working against the exhaust hose going to the muffler. So, the elbow can't rotate and the RTV can cure.

I haven't tried too hard yet, but I am looking for a solution that keeps both parts. I don't know of a way to add a jam nut, for instance, to a pipe joint. Perhaps I could get a machine shop to "adjust" the threads to get the "tight" point right. I just don't know. Meanwhile, the CO detector is powered up.
 

Kenneth K

1985 32-3, Puget Sound
Blogs Author
Thanks Craig. That's all useful info. I did my first dry-fit yesterday. The heights and clearances are all okay, now I just need need to see how tight I can get the fittings and still get the alignment I need. I may have the same problem you did.

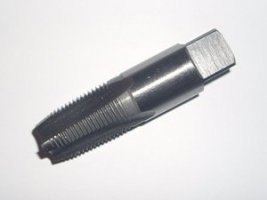
I suppose this might help if I can't get the alignment: $29.00 on Amazon:
tap.jpg CMT 1-1/4" - 11.5 NPT PIPE TAP 88-0114

I wouldn't want to tap out something this large from scratch, but when the threads are already cut, I'm betting it would be easy to get cut an extra 1/2-3/4 turn in the flange to get things to line up.

I'll know by next week if I need one....

Ken
 

cruis-n

Member II
Going with the flow (not)

Ken, great post. Looks intimidating to say the least.

We have been having high temps 180-190 (it's normally been 165) when motoring beginning this season. Checked the impeller, and heat exchanger. It's down to the elbow now. Hate to take the route you did and lose the rest of the summer season.
A couple of questions...

1) From the photos, it looks like the elbow either has very shallow threads or that the elbow broke off when you unscrewed it. How difficult it it to unscrew the elbow. I'm reluctant to try to unscrew it for fear that it break off and I'll be out lots of boat bucks or lose the rest of the season doing what you did.

2) How hard (as is soft, not difficult) were the deposits in the clogged elbow? I was thinking that if I could use a wire to break up the deposits with a stiff wire can I get the rest of the weekends of this season, then jump into a more permanent solution. I thought I saw that someone was talking about using a screwdriver to break up the 'gunk' to get more life out of the system

Thoughts, comments?
Paul
 

Kenneth K

1985 32-3, Puget Sound
Blogs Author
Paul,

The elbow is a regular bronze threaded elbow. Probably 5 or 6 turns to get it off. It will be very tight if it hasn't been removed for many years. Try PB Blaster first. Once it's off, you can clean it out with a small screwdriver. Chipping the gunk away. If you're able to increase water flow enough, you're probably fine to use it for a while until you can do a replacement. The hard part is telling how much clogging there is inside the riser.

If the water flow increases, you should see a lot more water coming out of your exhaust thru-hull when you run the engine.
 
Last edited:

supersailor

Contributing Partner
Also check other things. One of the 45' boats on the dock was having overheating problems and we eventually traced it to a fouled prop. The intake was good, the water flow to the riser was good, the fresh water system was good. The prop was totally fouled. A diver cleaned the prop and no more overheating. He didn't run the engine very often. A good argument for running it once a week or so.
 

cruis-n

Member II
Prop is in good shape

Good point Bob -
Checked it this past weekend. Prop is clean and when in neutral (engine off of course), the drive train spins freely.
Locking it in reverse, it's solid.

One other point, maybe 10 years back I upgraded the heat exchanger to a larger diameter and until just recently, the temps have been fine.

Seeing Ken's pictures, I'm 80% certain I have blockage at the elbow. I did notice, but it never registered at the time that there was a steady dribble of water at the exhaust through hull and once in a while the 'whoosh' of exhausted water. The 'whoosh' was lots less vigorous than I recall in the past. I think the steady dribble is the back-pressure at the elbow forcing water out of the vented loop hose that connects to the bronze fitting at the stern through hull.

At least that's my working assumption. Will know more when I get back to the boat this weekend.

Wish me luck,
Paul
 

supersailor

Contributing Partner
I also have the larger diameter. So far no problems. The other cause can be the sea water impeller. I change every year. Not necessary but I feel good. You are probably on the right track but the fouling seems a bit quick. Good luck with the problem!

Bob
 

cruis-n

Member II
Great write-up

Ken -
Great write-up. I'll be studying it carefully.

One additional question, when you say, "...you can clean it out with a small screwdriver. Chipping the gunk away.", is the gunk hard? Your term 'chipping' has me a bit worried. Is it likely to be something that a stiff wire will dislodge or is it more like concrete? I get that YMMV, just trying to anticipate what tools I'm gonna need.

Thanks in advance,
Paul
 

Kenneth K

1985 32-3, Puget Sound
Blogs Author
Definitely a small, flat blade screwdriver and a small hammer. It's more like mortar or hard calcium deposits. You basically have to chisel it out of the elbow.
 

bigd14

Contributing Partner
Blogs Author
Exhaust and impeller

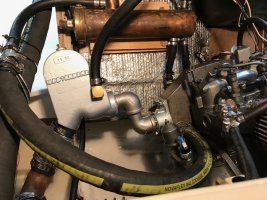
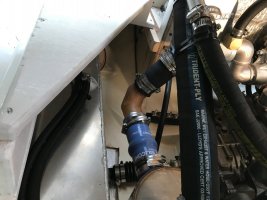
I found a chunk of impeller in an elbow, since replaced with straight hose barb. I was wondering why the engine was running at 180, so it may be worth a check if you have any sharp bends in the pipe run. Or you could check the HX. The first thing I did when I bought the boat was change the impeller which was in perfect condition so a previous owner likely didn't bother to chase down the broken bits from a yet earlier impeller. A couple pics of my new exhaust too.

Impeller.jpg

Elbow.jpg

Exhaust.jpg

Water Lift.jpg
 
Last edited:

toddster

Curator of Broken Parts
Blogs Author
Those "square" elbows seem to have a hollow that's really good at catching impeller pieces. I just think of it as a sort of filter that protects the rest of the system. Though I wonder if that means that it also introduces unnecessary turbulence into the system.
 

cruis-n

Member II
Arteriosclerosis - The patient made a full recovery

Ken, et.al. -
Just returned from the boat with good news. the cause of my running hot problem was the clogged injection elbow.
I took the hose off the fitting and found that I had plenty of flow. A little PB Blaster and a pipe wrench, the fitting came out easily.
A little later with some poking around in the exhaust elbow with a screwdriver and some cleaning on the elbow with a screwdriver and some dental tools did the trick.
Reassembled and gave it a test. Plenty of water at the exhaust and she runs 165 now, just like before. Now I need to start the assembling parts for the long term fix. :0

Looks like another item to add to the maintenance list.

Thanks again for everyone's help. Turns out I had way more tools than I needed to solve this issue.

Regards,
Paul
IMG_1641.jpg
 

Kenneth K

1985 32-3, Puget Sound
Blogs Author
Paul, congratulations! You just saved yourself $$thousands on an engine rebuild from not overheating your engine. Two of the boats that I looked at buying did exactly just that.

Doug, nice exhaust system. I can see you went through all the same gyrations that I did this spring.
I like the remote heat exchanger. Mine sits over the tranny and blocks access to the dipstick. Funny, I never thought about relocating it when I had it off.
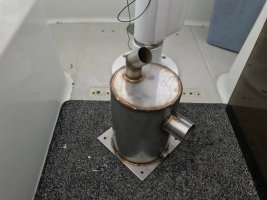
Nice lift muffler. Who did the work? Centek just didn't have anything off the shelf that would work?
 

bigd14

Contributing Partner
Blogs Author
Hi Ken- The Centek muffler did not fit the original configuration- the height of the inlet was different than the original, and the base was too large, which interfered with access to the shaft seal and back of the engine. So I had to have a stainless steel muffler made by a local sheet metal outfit that would fit. It was a bit expensive, but hopefully will be worth it in the long run. I was also able to have a 45 angle put on the outlet, thus avoiding an elbow and bits of hose. I decided to add the elbows to the exhaust after the muffler debacle, so I probably could have go the Centek to work, but still would have had the problem with the base.

The remote heat exchanger was originally part of a water heater installation. I am not hooking that up right now. The unfortunate part is that the hose barbs on the HX are smaller than their counterparts on the engine, so I have had to cobble together reducers on some hose runs. The whole system is a strange mix of about 5 different hose sizes. It has been quite frustrating to source and install all these.

Paul, good job chasing down the clogged elbow! Its very satisfying when you can find and fix a problem like this.
 
Last edited:
Top