I'm planning to attach my new masthead anchor light and mid-mast-mounted steaming and deck light tomorrow and wondering if anyone has any good wiring tips/tricks I should be aware of. The mast is down now and easy to work on, but it will be a huge pain if I get a bad connection or some issue once the stick is back in the hull/keel.
Both fixtures have wire pigtails at present. I have my new tinned replacement wire.
My hypothetical process will be:
1. Run the new wires to appropriate locations.
2. Slide on larger heatshrink wrap for entire outer insulation casing.
3. Slide on small heatshrink tubes for individual wires.
4. Flux and solder wire connection.
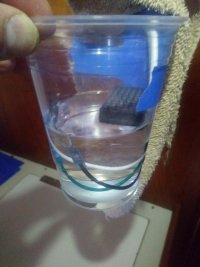
5. Test with plug-in 12V tester unit. If working ->
6. Heatshrink wrap the individual conductor wires. (Test lights)
7. Heatshrink wrap the outer insulation, (test lights)
8. Electrical tape over the outer heatshrink.
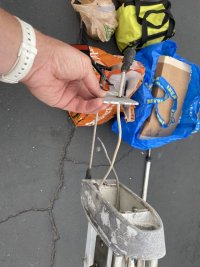
My anchor light connection will occur inside of the mast. I have a mounting plate that can be unscrewed from the masthead (held in my left hand below). I should add some sort of wire hanger, I think, so that the weight of the 40' of conductor wire is not straining on my solder connection. Does anyone have an elegant way of doing this? I was thinking a small inverted SS eye from which the wire would be supported in the mast, before terminating in the anchor light fixture.

The Steaming/Deck Combo Light solder connection will have to happen outside the mast, under the mounted fixture itself. In my old removed Perko fixtures, I had spade connectors screwed into integral terminals on the fixture. My new fixture has wire stubs (pigtails) so I'll be soldering and heat-shrink wrapping them. The weight of the wire of this lower fixture will be arrested by the turn the wire makes while exiting the front of the mast.
Any other suggestions or tips? I plan to test everything multiple times while working.
Both fixtures have wire pigtails at present. I have my new tinned replacement wire.
My hypothetical process will be:
1. Run the new wires to appropriate locations.
2. Slide on larger heatshrink wrap for entire outer insulation casing.
3. Slide on small heatshrink tubes for individual wires.
4. Flux and solder wire connection.
5. Test with plug-in 12V tester unit. If working ->
6. Heatshrink wrap the individual conductor wires. (Test lights)
7. Heatshrink wrap the outer insulation, (test lights)
8. Electrical tape over the outer heatshrink.
My anchor light connection will occur inside of the mast. I have a mounting plate that can be unscrewed from the masthead (held in my left hand below). I should add some sort of wire hanger, I think, so that the weight of the 40' of conductor wire is not straining on my solder connection. Does anyone have an elegant way of doing this? I was thinking a small inverted SS eye from which the wire would be supported in the mast, before terminating in the anchor light fixture.

The Steaming/Deck Combo Light solder connection will have to happen outside the mast, under the mounted fixture itself. In my old removed Perko fixtures, I had spade connectors screwed into integral terminals on the fixture. My new fixture has wire stubs (pigtails) so I'll be soldering and heat-shrink wrapping them. The weight of the wire of this lower fixture will be arrested by the turn the wire makes while exiting the front of the mast.
Any other suggestions or tips? I plan to test everything multiple times while working.


