Teranodon
Member III
<style type="text/css">p.p1 {margin: 0.0px 0.0px 0.0px 0.0px; font: 12.0px 'Helvetica Neue'; color: #454545}p.p2 {margin: 0.0px 0.0px 0.0px 0.0px; font: 12.0px 'Helvetica Neue'; color: #454545; min-height: 14.0px}</style>I replaced the Universal 25XP with a new Beta Marine 25.
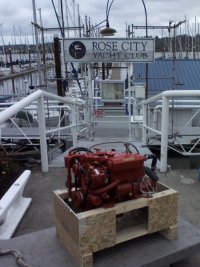
The Beta is manufactured in Quedgeley, near Gloucester, UK. Like the Universal, it is based on a Kubota block, made in Osaka, Japan. The block is “marinized” (or is it “marinated”?) by the Brits. The Beta is very user-friendly: the oil and fuel filters, the oil and transmission dipsticks, the heat exchanger, the raw water pump- are all easier to reach. There is a handy built-in pump for removing the oil. There is a modern flat (ribbed) drive belt. The old engine was painted an ugly blue, the new one - ugly red.

There is a dealer/technician in nearby Deer Harbor on Orcas Island, and he was willing to come over to my island to perform the installation in the boatyard that is next to my marina. He came over four times over two weeks, and I acted as his assistant, also carrying out numerous tasks while he was away. I highly recommend this kind of arrangement. I had neither the expertise or tools to do the job entirely on my own. Now that the work is done, I feel that I am in a good position to deal with future maintenance and repairs. And I saved about 50% on labor costs.
Using the boatyard’s crane, there were no problems in getting the engines in and out, just some gentle guidance in the companionway.
The Beta has four flexible mounts, versus three on the Universal. The mounts are vertically adjustable but the Beta sits relatively low. So we put down a 1-inch mahogany plank and a 1/4-inch piece of stainless steel (both 25 x 4). The forward sections are supported by 4 x 4 x 8 blocks of mahogany (why mahogany? I happened to have some in my shop). The blocks are fixed to the fiberglass with machine screws (there is access underneath for nuts/washers). The engine mounts are attached to 3/8” tapped holes in the steel. On each side, three lag bolts go through the steel, plank, and underlying fiberglass. One lag bolt for attaching the steel to the block.
To get the Beta in place, we had to destroy the old center mount, and the fiberglass underneath. I hated doing this, but it does now allow good access to the space under the engine (from which I removed decades of oil-infused sludge).

The engine must be positioned longitudinally in a way that allows space for a flexible nylon coupling between the propellor shaft and the transmission (which was replaced along with the engine). If the propellor gets badly fouled, the coupling is designed to break, sparing the gears.

Aligning the engine with the propellor shaft in five dimensions (six, really) calls for serious experience/expertise. I’m not sure that I would try doing this by myself, even after seeing it done by a professional. There are numerous references, videos, etc. Still, I hope I never have to do it.
The new stainless elbow that mixes exhaust gases with raw water just would not fit. I did not want to cut into the aft bulkhead, so I sliced the elbow in two, rotated the pieces by 45 degrees and had them re-welded at a local machine shop. Incidentally, when we removed the exhaust hose, a section of it was found to be very beat-up. It made me glad that I put in a CO detector when I switched from CNG to propane last year. Every boat needs one of these. Not expensive, and easy to install.
I removed the 15” Max-Prop and took it apart. The pitch had been set to 22 degrees. I changed it to 18 degrees after consulting with the helpful people at PYI Inc. I cleaned the salty crud off the blades with a wire brush, and lubricated the complicated innards. New zincs, of course.
I used the wire brush on the the shaft as well, took it to Anacortes on the ferry, and had it tested at Olympic Propellors. It passed.
The hardest part of the installation (and the one that produced the most violations of the Second Commandment) was replacing the exhaust connection to the muffler, which is awkwardly buried next to the water heater and the holding tank. To get access, I had to move the holding tank and, Laocoön-like in the lazarette, disconnect some of the horrible stiff Trident sanitation hoses that I had wrestled with last year when I rebuilt that system. Somewhere along the way, I broke a piece of the Groco bubbler that now has to be fished out of the (nearly empty!) tank. I’m really looking forward to that.
I chose the “deluxe” model C control panel, which has real gauges for oil pressure (nice!) coolant temperature and voltage (there are idiot lights and a beeper as well). The panel is a bit bigger than the old one, requiring two passes through the fiberglass with a 2.5-inch hole saw. I gave up on removing all of the old wiring harness - it is just too deeply buried under the exhaust hose and a few other things. So I hacked off the ends, and left the rest in place. Not very elegant, I know, but there will probably be a use for these wires some day. I plan to sell the old engine, and the new owner is going to have to do some splicing.

A nice feature of the Beta is that the STOP cable is replaced with a pushbutton/solenoid arrangement.
The Morse cables for the throttle and gear box did not need to be changed or modified.
The Beta weighs less than the XP, so my boat no longer floats on her lines. According to the specs, it’s only a 35lb difference, but the effect is very noticeable and I don’t understand it. It’s true that I removed several hundred hose clamps, but I put most of them back. It looks like I will have to add some ballast. Not sure how to do this.
We noted excessive vibrations during our first sea trial, so the alignment was repeated, and now the engine and shaft are very steady. I can’t quite get up to the nominal 3600 max RPM, so I may have over-pitched the prop. I don’t feel like paying for a haul out to fix that, so I will live with it. They say that a good diver can do the job, but I don’t believe it.
So that’s my report on re-powering. It is something I had wanted to do for a long time, but I had put off for the usual reasons. In retrospect, it’s not such a huge deal. You just disconnect all of the wires and hoses, unbolt the old, drop in the new, reconnect, clean up the giant mess, and write a check. Trouble is, if you are an “average” Ericson owner like me, you don’t really know what you’re doing until you have seen it done, and then the knowledge is a little bit pointless because you will never be doing it again. Still, there are the rewards - peace of mind (knock on teak), less vibration, improved cruising speed, higher resale value. And then there is the intangible. Whenever I removed the engine cover, I used to feel that I was contemplating a slightly foreign, sinister object, one that was apart from, and incompatible with, the essential character of my boat, my sailboat.Now I no longer feel that way. The shiny new engine has a special sheen of sweat (and even a little blood) that somehow makes it mine.
The Beta is manufactured in Quedgeley, near Gloucester, UK. Like the Universal, it is based on a Kubota block, made in Osaka, Japan. The block is “marinized” (or is it “marinated”?) by the Brits. The Beta is very user-friendly: the oil and fuel filters, the oil and transmission dipsticks, the heat exchanger, the raw water pump- are all easier to reach. There is a handy built-in pump for removing the oil. There is a modern flat (ribbed) drive belt. The old engine was painted an ugly blue, the new one - ugly red.
There is a dealer/technician in nearby Deer Harbor on Orcas Island, and he was willing to come over to my island to perform the installation in the boatyard that is next to my marina. He came over four times over two weeks, and I acted as his assistant, also carrying out numerous tasks while he was away. I highly recommend this kind of arrangement. I had neither the expertise or tools to do the job entirely on my own. Now that the work is done, I feel that I am in a good position to deal with future maintenance and repairs. And I saved about 50% on labor costs.
Using the boatyard’s crane, there were no problems in getting the engines in and out, just some gentle guidance in the companionway.
The Beta has four flexible mounts, versus three on the Universal. The mounts are vertically adjustable but the Beta sits relatively low. So we put down a 1-inch mahogany plank and a 1/4-inch piece of stainless steel (both 25 x 4). The forward sections are supported by 4 x 4 x 8 blocks of mahogany (why mahogany? I happened to have some in my shop). The blocks are fixed to the fiberglass with machine screws (there is access underneath for nuts/washers). The engine mounts are attached to 3/8” tapped holes in the steel. On each side, three lag bolts go through the steel, plank, and underlying fiberglass. One lag bolt for attaching the steel to the block.
To get the Beta in place, we had to destroy the old center mount, and the fiberglass underneath. I hated doing this, but it does now allow good access to the space under the engine (from which I removed decades of oil-infused sludge).
The engine must be positioned longitudinally in a way that allows space for a flexible nylon coupling between the propellor shaft and the transmission (which was replaced along with the engine). If the propellor gets badly fouled, the coupling is designed to break, sparing the gears.
Aligning the engine with the propellor shaft in five dimensions (six, really) calls for serious experience/expertise. I’m not sure that I would try doing this by myself, even after seeing it done by a professional. There are numerous references, videos, etc. Still, I hope I never have to do it.
The new stainless elbow that mixes exhaust gases with raw water just would not fit. I did not want to cut into the aft bulkhead, so I sliced the elbow in two, rotated the pieces by 45 degrees and had them re-welded at a local machine shop. Incidentally, when we removed the exhaust hose, a section of it was found to be very beat-up. It made me glad that I put in a CO detector when I switched from CNG to propane last year. Every boat needs one of these. Not expensive, and easy to install.
I removed the 15” Max-Prop and took it apart. The pitch had been set to 22 degrees. I changed it to 18 degrees after consulting with the helpful people at PYI Inc. I cleaned the salty crud off the blades with a wire brush, and lubricated the complicated innards. New zincs, of course.
I used the wire brush on the the shaft as well, took it to Anacortes on the ferry, and had it tested at Olympic Propellors. It passed.
The hardest part of the installation (and the one that produced the most violations of the Second Commandment) was replacing the exhaust connection to the muffler, which is awkwardly buried next to the water heater and the holding tank. To get access, I had to move the holding tank and, Laocoön-like in the lazarette, disconnect some of the horrible stiff Trident sanitation hoses that I had wrestled with last year when I rebuilt that system. Somewhere along the way, I broke a piece of the Groco bubbler that now has to be fished out of the (nearly empty!) tank. I’m really looking forward to that.
I chose the “deluxe” model C control panel, which has real gauges for oil pressure (nice!) coolant temperature and voltage (there are idiot lights and a beeper as well). The panel is a bit bigger than the old one, requiring two passes through the fiberglass with a 2.5-inch hole saw. I gave up on removing all of the old wiring harness - it is just too deeply buried under the exhaust hose and a few other things. So I hacked off the ends, and left the rest in place. Not very elegant, I know, but there will probably be a use for these wires some day. I plan to sell the old engine, and the new owner is going to have to do some splicing.
A nice feature of the Beta is that the STOP cable is replaced with a pushbutton/solenoid arrangement.
The Morse cables for the throttle and gear box did not need to be changed or modified.
The Beta weighs less than the XP, so my boat no longer floats on her lines. According to the specs, it’s only a 35lb difference, but the effect is very noticeable and I don’t understand it. It’s true that I removed several hundred hose clamps, but I put most of them back. It looks like I will have to add some ballast. Not sure how to do this.
We noted excessive vibrations during our first sea trial, so the alignment was repeated, and now the engine and shaft are very steady. I can’t quite get up to the nominal 3600 max RPM, so I may have over-pitched the prop. I don’t feel like paying for a haul out to fix that, so I will live with it. They say that a good diver can do the job, but I don’t believe it.
So that’s my report on re-powering. It is something I had wanted to do for a long time, but I had put off for the usual reasons. In retrospect, it’s not such a huge deal. You just disconnect all of the wires and hoses, unbolt the old, drop in the new, reconnect, clean up the giant mess, and write a check. Trouble is, if you are an “average” Ericson owner like me, you don’t really know what you’re doing until you have seen it done, and then the knowledge is a little bit pointless because you will never be doing it again. Still, there are the rewards - peace of mind (knock on teak), less vibration, improved cruising speed, higher resale value. And then there is the intangible. Whenever I removed the engine cover, I used to feel that I was contemplating a slightly foreign, sinister object, one that was apart from, and incompatible with, the essential character of my boat, my sailboat.Now I no longer feel that way. The shiny new engine has a special sheen of sweat (and even a little blood) that somehow makes it mine.
")