• Untitled Document

    Join us on April 26th, 7pm EST

    for the CBEC Virtual Meeting

    All EYO members and followers are welcome to join the fun and get to know the guest speaker!

    See the link below for login credentials and join us!

    April Meeting Info

    (dismiss this notice by hitting 'X', upper right)

Removing EMS knot meter housing

klb67pgh

Member III
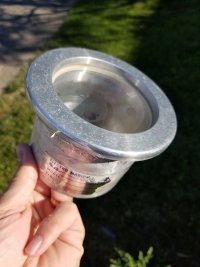
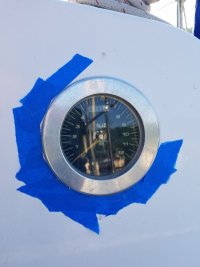
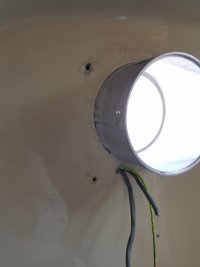
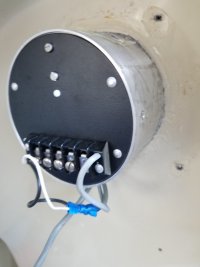
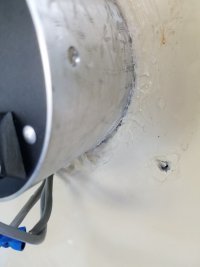
My E25 has a period Electro Marine Systems knot meter and log, but no transducers. I want to remove it and install a Raymarine ST60 tridata that I picked up lightly used. I discovered 2 screws in the side of the housing that enabled me to remove the knot meter from the rear of the housing. What is left is a metal housing w a glass lense that is now more or less a tiny portlight.

I tried a razor blade between the outer metal flange and the outside bulkhead. I couldn't get the blade in very far. I tried a dead blow hammer on the inside edge of the metal housing. I did not detect movement. I used a heat gun and was able to loosen some of the clear adhesive, even some alongside the housing and the inner bulkhead. I tried hitting a wooden wedge (half a clothespin) between the side of the housing against the back of the outside flange. No movement.

More heat is my next step, but a storm cut short my work session. Assuming that doesn't work, I plan to go back to a brand new razor blade. But I'm looking for other ideas, especially if someone has successfully removed such a housing. The adhesive feels like silicone, but it may be something else w more adhesive capabilities.

I really don't want to make the bulkhead hole any bigger, as I might be able to get away w the existing housing w the ST60 and not add a blank out plate.

Thanks for any suggestions you can offer.

Kevin
 

Attachments

  • 20210606_070439.jpg
    20210606_070439.jpg
    79.3 KB · Views: 13
  • 20210606_072504.jpg
    20210606_072504.jpg
    42.1 KB · Views: 12
  • 20210606_070449.jpg
    20210606_070449.jpg
    66.6 KB · Views: 11
  • 20210606_070453.jpg
    20210606_070453.jpg
    62.2 KB · Views: 13
Last edited:

Loren Beach

O34 - Portland, OR
Senior Moderator
Blogs Author
I have had great luck with a heat gun, for softening old sealant. I would apply steady pressure against the rear of the housing, since it looks like it was originally pushed in from the outside. Then heat it around the whole flange, round n round... and round n round. With enough steady push, it looks like it should move out.
 

Kenneth K

1985 32-3, Puget Sound
Blogs Author
If heat doesn't work, I'd try the pry-cut, pry-cut, repeat..... method. Even with a flexible sealant like silicone, you are basically working against a strong suction cup to get that thing to move. I'd put the blue tape all the way around the metal flange. Then work a narrow blade between the flange and the gelcoat. Try to slice small bits of sealant out with the blade. Keep working the sealant out until you can get the corner of a thin putty knife under the flange. Then try slicing out more with the small blade. Then move up to a thicker putty knife, then a screwdriver, etc. Pry-cut, pry-cut....

Also, cut/scrape away what sealant you can from inside the cabin, so you don't have to squeeze that interior sealant out through the exterior hole.
 

Mr. Scarlett

Member III
Is the new opening large enough to pass an unopened canned beverage through? Or a handful of pepperoni?;)

Kidding aside, perhaps a clamp (or two) going from inside the cabin on the edge of the housing to blocks on the outside of the bulkhead, outside the flange's perimeter? Keep applying steady, even pressure - kind of like pressing out a cutlass bearing.

Edit: I see now it's been said already!
 

Bolo

Contributing Partner
I’ve used Debond MF12 Marine Formula to dissolve adhesives on my boat and I think it works on silicon. Found it on Amazon For about $44. Expensive but works.


Martin King

Sustaining Member
Blogs Author
I don't know if you have the room to swing a wrench on the backside, but if you do I would try grabbing the tin can with either an oil filter wrench, or oil filter pliers and twisting it to break the seal.
 

klb67pgh

Member III
A strap wrench just might help the process. I'll have to try that. After more heat and some better prying wedges.

I wish I could fix my typo in the subject line. :( [fixed]

Thanks for the suggestions. I'll report back with success, hopefully, when I can manage another work session at the boat.
 

Second Star

Member III
A dremel with an abrasive wheel might be able to cut into the can from the inside right where it goes the bulkhead (including the depth of the bulkhead) all around. With the can off you might be able to pry the outer ring off from the inside and outside
 

klb67pgh

Member III
New razor blade and careful prodding to separate the back of the housing flange from the outer bulkhead, more heat, constant pressure, a few good whacks, and clothes pin wedges = success!

There was barely enough meat on the bulkhead to drill the 2 mounting stud holes for the ST60. We shall see if it leaks. I'd like to track down new gaskets for the tridata and wind units. I need to track down a power cable and mock up everything and see if I can get the 2 units to work and talk to each other. The wind display and transducer install will wait until the offseason. I need to order an airmar dst800 and hope to pull the boat over a weekend and get that thruhull and transducer installed.

A new mystery - the hull underneath the knot meter flange was a decidedly light grey color, and there are definitely more layers of white applied to the hull after the knot meter was installed. I had assumed I had original 1978 gel coat, not paint. Could the factory have applied additional gel coat layers after the knot meter flange install? Or does this mean my boat has been painted (at least the topsides)?
 

Attachments

  • 20210618_084514.jpg
    20210618_084514.jpg
    91.9 KB · Views: 1

Loren Beach

O34 - Portland, OR
Senior Moderator
Blogs Author
About the install your newer KM readout-- I replaced our boat's OEM Datamarine instruments with a set of Raymarine ST-60 instruments many many years ago. The round cutouts for the old Datamarine instrument faces in the cabin bulkhead were a half inch wider diameter than the newer Raymarine's.
My solution was to utilize a piece of frp laminate I had sitting around that was about the same thickness as our cabin bulkhead -- it was slightly less actually. (If I did not have that piece on hand, I would have probably bought a piece of quarter inch G10.)

I used a large hole saw to cut out the outer diameter, and then a slightly smaller one to cut out the inside diameter. This left a ring of frp material with 1/4" sides. Glassed into place with some thickened epoxy, this provided a nice snug fit for the new Raymarine's, and -- "bonus" -- the bezel of the new instrument face covered the modification completely with a gnat's eyelash to spare. :)
This worked out great for all three: KM, DS, and Wind.

And, congratulations on the removal of the older part. IMHO such things seem to often invoke the method of "starfish vs the oyster", where constant unrelenting effort will overcome great strength!

Edit: link to the install drawings of these products . http://www.moorelectronics.com/installation_diagrams.html
 
Last edited:
Top