• Untitled Document

    Join us on April 26th, 7pm EST

    for the CBEC Virtual Meeting

    All EYO members and followers are welcome to join the fun and get to know the guest speaker!

    See the link below for login credentials and join us!

    April Meeting Info

    (dismiss this notice by hitting 'X', upper right)

rotten core repair

wolly bugger

Member II
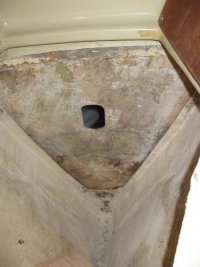
I just finished removing all the rotten core I had at the bow. Since the damaged area was within the anchor locker, and the bottom skin as been damaged by the smallish fender washer used, I decided to attack it from the bottom. Here is my first question; I left a lip of the old bottom skin of about 1 1/2"-2" from the hull all around and scraped all the rotten core out. My thought was to fill the void between that and the top skin with thickened epoxy, fill the repair area with the new core and use that lip to attach the fiberglass to as I build the bottom skin back. I'm wondering if I might be better off removing that lip and bringing the fiberglass down on to the hull. What will be best?

I also have some 3/8" marine plywood on hand that I wanted to use. I don't think it's flexible enough to use only one piece so will divide the area in about 3 or 4 or 5 pieces to follow the curve of the deck. Do those pieces need to be tight together or is a little gap, let's say no more then 1/4", acceptable? Or should I make just enough grooves in one full piece to make it flex to follow my deck shape?

This will be my first structural repair so any help will be appreciated.
 

Attachments

  • IMG_4595.jpg
    IMG_4595.jpg
    52.5 KB · Views: 136
Last edited:

davisr

Member III
Stephan,

As a fellow E25 owner, I know that's a tight spot you are working in. Looks like you cleaned it out very well. I'm surprised you were able to get up in there and do that. I see the lip that you are talking about. I haven't done this type of repair before, but my first thought is that with a strip of cloth you could glass the repaired area to the lip and to the hull. Seems that would tie it all together well.

As far as cutting up the 3/8 plywood into different pieces goes, I would think that you would want to avoid this, since it would compromise the strength/integrity of the deck, which, perhaps, would again result in delamination. Just my speculation.

Good luck with this project. I'm dealing with a separate issue right now - the companionway hatch.

Best,
Roscoe
 

tenders

Innocent Bystander
I haven't done this myself (yet) but from what I understand, cutting grooves along the length of the core material is exactly the way to get it to conform to curves. You coat it with epoxy, fit it in place along the curve, and fill the grooves with epoxy as best as you can.
 

Loren Beach

O34 - Portland, OR
Senior Moderator
Blogs Author
Plywood does not like to bend, albeit easier with scoring. Be sure to do a final "dry fit" before mixing epoxy. I have installed many plates (smaller in size I admit) of G10 under bow pulpits and stanchions bases. Holding up the plate against a layer of epoxy mush was interesting.
I used precut lengths of 1 X 2 as props, achieving the final pressure by either adding wedges, blocks of various thickness, or both.
Also, occasionally you can use a "bar clamp/spreader" in the spreader configuration. I bought several cheap versions from Harbor Freight. They come in many lengths.
Use your C Clamps to lock two upright pieces of wood together to get the exact length you need.
Gravity is not your friend when glassing overhead... :rolleyes:

Wear safety glasses or a face shield!
;)

Loren
 

Attachments

  • 46805.gif
    46805.gif
    30.8 KB · Views: 113
Last edited:

wolly bugger

Member II
Thanks. Using one piece will make it easier to hold in place. I do have the deck pipe opening where I can fit a few clamp. The lip follow the curve of the hull which make it harder to have a tight fit. How snug is the plywood need to be against that lip?
 

HughHarv

Hugh
I'd cut the plywood to fit the opening, score it on one side with a circular saw. Fill the scores and the lip with colloidal silica thickened epoxy, install the old inner skin to the plywood and prop it up with plastic between the prop and the work. When it cures, you can glass tape the perimeter, it will be plenty strong even without taping to the hull. If you think the colloidal silica will cook off you can use some finely chopped strand mat in a slow cure epoxy in order to keep the temperature down. Slow cure is stronger.
 
Last edited:

wolly bugger

Member II
Thanks, it look like the scoring will work just fine. Next step will be to make a template. I'm planing to tackle this project this weekend. Still have a few more project to do and the spring is coming fast.

Roscoe, have you install your bow roller? I need to install one and I'm thinking it might be smart to combine those two projects since it might be helpful to move the deck pipe.
 

davisr

Member III
Stephan,

No, I haven't gotten beyond the prototype stage with the bow roller. I got side-tracked by companionway hatch. All of this, though, is related to the overall deck rehab project.

I seem to remember you saying that you were thinking you would mount an anchor roller at an angle, rather than straight forward. I re-thought my plan to mount the roller straight forward because there is simply not enough room. Mounting at an angle also allows give the chain a fairlead into the pipe. I believe you said this.

I built a small anchor platform, one that will allow for two separate rollers at an angle, one port, one starboard. Can post some pictures of the prototype if you'd like. It took a lot of thinking and cutting to figure out.

Roscoe
 

wolly bugger

Member II
Roscoe,
If you have some picture of your prototype I will like to see them. I was saving the anchor roller project for later but it might be helpful to move the pipe deck aft. What a better time then now.
 
Top