• Untitled Document

    Join us on April 26th, 7pm EST

    for the CBEC Virtual Meeting

    All EYO members and followers are welcome to join the fun and get to know the guest speaker!

    See the link below for login credentials and join us!

    April Meeting Info

    (dismiss this notice by hitting 'X', upper right)

Seacock Install, "Traditional"

Loren Beach

O34 - Portland, OR
Senior Moderator
Blogs Author
After all the discussion here on seacocks, materials, backing plates, etc, and etc.
First, note that this IS a real "seacock," and not a valve screwed onto a threaded thruhull pipe.

So, while browsing the still-up PSC web site I found this diagram in the sample docs for the PSC Crealock 37. As regular readers know, this would not be my personal first choice, but since the diagram is clear and well labeled, it seems fair to make it available here. And, make no mistake, this is representative of what many experts recommend.

Note that the diagram would be more logical (IMHO) if inverted 180 degrees... but then the printing would be hard to read...
;)

Loren
 

Attachments

  • PSC-Seacock_Installation_C-.jpg
    PSC-Seacock_Installation_C-.jpg
    36.7 KB · Views: 2,917

Glyn Judson

Moderator
Moderator
Seacock install, continued.

Loren and all, Thanks for posting that drawing, it inspires me to offer a thought about that specific method of through-bolting that's bugged me for years as opposed to securing a lag screw into just the plywood pad as I have done throughout my boat. I might add here that both methods are approved as being good at the Groco web site seen here: http://www.groco.net/SVC-MAN-07/Sec4/PDF/IBV-FBV-TB.pdf Most of the seacock locations in our boat are hard to access if not inaccessible especially when it comes to getting a hand drill in there to drill three holes through the seacock base, plywood and the hull. How in the Sam Hill do you guys do it? In most cases, I'm lucky just to get the lag screws started and torqued down, much less using a drill in those cramped spaces. Inquiring minds want to know. Regards, Glyn
 

rwthomas1

Sustaining Partner
Loren and all, Thanks for posting that drawing, it inspires me to offer a thought about that specific method of through-bolting that's bugged me for years as opposed to securing a lag screw into just the plywood pad as I have done throughout my boat. I might add here that both methods are approved as being good at the Groco web site seen here: http://www.groco.net/SVC-MAN-07/Sec4/PDF/IBV-FBV-TB.pdf Most of the seacock locations in our boat are hard to access if not inaccessible especially when it comes to getting a hand drill in there to drill three holes through the seacock base, plywood and the hull. How in the Sam Hill do you guys do it? In most cases, I'm lucky just to get the lag screws started and torqued down, much less using a drill in those cramped spaces. Inquiring minds want to know. Regards, Glyn

Glyn,
It is actually easier to attach the plywood backers to the seacocks directly with bronze machine screws and nuts on the bilge side then just apply bedding compound, position and thread in the thru-hull to hold it all together. RT
 

Mike.Gritten

Member III
Rob,

I have to differ with you here. As I understand it, the reason for the backer block is two fold. First, to spread any point loading over a wider area than if the seacock was mounted directly to the interior of the hull. Second, with the backer block securely epoxied to the inside of the hull, and the mounting flange of the seacock through-bolted (preferred) or lag bolted to the backing block, torsional loading will not allow the assembly to work itself loose thereby compromising the integrity of the seacock/hull union. This could lead to leaks or even potentially catastrophic failure of the through hull itself. I thought about this long and hard before putting out the almost $200 each for those big bronze, Groco 1.5" seacocks. But after the first one was in, it's obvious why you want these babies. It makes for a VERY safe, secure and if I do say so myself, beautiful installation!
 

Maine Sail

Member III
I still...

I still, for the life of me, can't understand why more folks don't take the time to make solid fiberglass backing blocks? It took me a total of maybe 40 minutes to laminate a piece big enough for every thru-hull on my boat..

Easy permanent and it will never rot or deteriorate. Plus you glass it to the hull so you can tap it for machine screws if you don't want to through-bolt..

All you need is some resin, cloth, mat or roving, wax and a piece of glass... Easy!!

89237495.jpg

80568227.jpg
 

Dave Hussey

Member III
Maine, (if that is who you really are) ( :egrin:
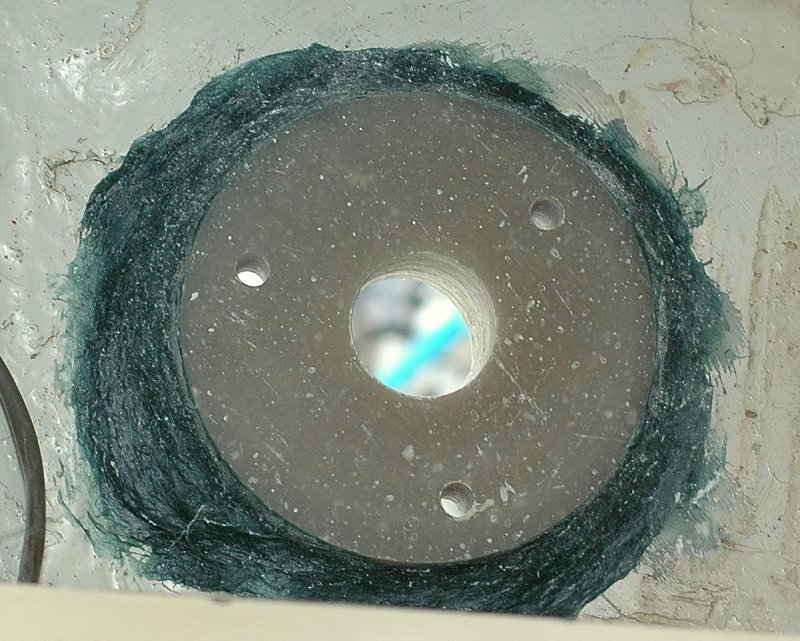
) so you have drilled holes through the hull to install bolts to secure the seacocks? Is that safe? Why would that be recommended? I recently replaced all of my seacocks, but they are only secured by the threads of the thru hill fittings... I want the best installation possible. But I dont want unneccessary expanses. (I know...its a boat)
 

Maine Sail

Member III
Yes is is the preferred method however many owners get weak knee'd about this. I really don't understand why? I've installed many in this fashion and never once had a leak. Hinckley, Morris and many, many other high end builders also do it this way. Production builders generally do not because of the added cost.

An alternative is to screw the flange to the backing block. I'm a through-bolter though..

If you want some more info you can read these articles:

Seacock & Thru-Hull Primer/Pre Information

Replacing Thru-Hulls and Seacocks
 

Loren Beach

O34 - Portland, OR
Senior Moderator
Blogs Author
An Ericson with bolts...

http://www.ericsonyachts.org/infoexchange/showthread.php?t=2705&referrerid=28

Nice photos in reply #8 in the above thread. Further links to discussions of this general topic are referenced with the other replies in that thread, as well.

Having gone with the composite seacock, epoxied in, and no bolts thru the hull beside the opening, I still prefer that method. But, it's just *one* of several correct answers to the question...
:cool:
If my present boat were heavier and/or slower, I could have installed the heavy bronze fittings with no particular misgivings. Heck, I went with all bronze fittings when I upgraded the thruhulls in my prior boat, a Niagara-26.

Regards,
Loren
 
Last edited:

gareth harris

Sustaining Member
A genuine question

A thought - if you were to glass the backing plywood to the hull, and screw the lockring into the plywood, would that not acheive the best of both worlds? It is hard to see the through hull turning if the lockring is unable to turn.

Gareth
Freyja E35 #241 1972
 

Mike.Gritten

Member III
Gareth,

that's what we did. Soaked the playwood backer in thinned expoxy and then expoxied that to the hull and lag screwed the seacock flange plate into the plywood/expoxy backer. It ain't movin"!
 

rgraham

Member II
When boats were made of wood...

I think a lot of the confusion is from the hold over of seacock design and when boat hulls were made of wood. Look at Loren's provided diagram and then picture the seacock hole dead center between where two boards meet then the through hull bolting and backing plates make a lot more sense. Just my 2 cents worth.

Robert
 

mherrcat

Contributing Partner
...if you were to glass the backing plywood to the hull, and screw the lockring into the plywood, would that not acheive the best of both worlds?

I checked all the "seacocks" on my 30+ and found they have this construction - backing block, through-hull fitting through the backing block, lock nut/ring, Marelon ball valve attached to end of through-hull. It would have been nice to have found the flanged style seacocks attached to the backing blocks, but the fittings as they are seem to be pretty solid.
 
Last edited:

rwthomas1

Sustaining Partner
Rob,

I have to differ with you here. As I understand it, the reason for the backer block is two fold. First, to spread any point loading over a wider area than if the seacock was mounted directly to the interior of the hull. Second, with the backer block securely epoxied to the inside of the hull, and the mounting flange of the seacock through-bolted (preferred) or lag bolted to the backing block, torsional loading will not allow the assembly to work itself loose thereby compromising the integrity of the seacock/hull union. This could lead to leaks or even potentially catastrophic failure of the through hull itself. I thought about this long and hard before putting out the almost $200 each for those big bronze, Groco 1.5" seacocks. But after the first one was in, it's obvious why you want these babies. It makes for a VERY safe, secure and if I do say so myself, beautiful installation!

With all due respect Mike, I don't see any difference in the way I did it to the way you did.... You epoxy a backer to the hull, allow it to cure, install the seacock and then lag/screw the seacock flange to the backer? Correct? I assemble the backer to the seacock with bronze machine screws, lock washers, nuts, etc. and then install the whole thing by threading the thru-hull into it and tightening it up. The only difference is I use 5200 to bond the backer to the hull and you use epoxy. Or am I missing something? Either way, they aren't going anywhere.

FWIW, after giving it some thought the next time I do a seacock I am going to go the "Maine Sail" method. I will just buy G10 for backers and epoxy it all to the hull, then through-bolt as well. When I did mine I went with one of the conventional methods and used wood backers. FG makes more sense, and through-bolting is not a big deal, likely just a bit more secure.

RT
 

Rocinante33

Contributing Partner
If solid fiberglass or G-10 is used for the backers, how do you account for hull curvature? Do you have to sand that base down to the proper arc?
 

Maine Sail

Member III
If solid fiberglass or G-10 is used for the backers, how do you account for hull curvature? Do you have to sand that base down to the proper arc?

Quite easy! Thickened epoxy or polyester "kitty hair". I simply rough the hull and the backer with a drill and heavy duty Scotch Brite then slather a peanut butter consistency mixture of thickened epoxy or kitty hair then through bolt the whole thing tight with a threaded rod to make the two surfaces parallel.. You could also use an old thru-hull (waxed of course) with the small locking nut to pull everything parallel and tight. Once it's tightened down make a nice fillet with your "gloved" finger around the backer block with what squeezed out and let it dry!!

Simple, permanent, as strong as the hull, expands and contracts the same as the hull, won't rot or absorb water, you can actually "tap" them with machine screws (if you're not comfortable through bolting) and you will never need to replace your backing blocks again..
 
Last edited:

stuartm80127

Member II
Through hulls

I completed my last two through-hulls in the head on my E27. I used the beefy Groco 1.25" and the 3/4" types with the mushroom heads. Had to re-glass the exterior holes with biaxial cloth and West epoxy. On the interior I cut away a 6*6" and a 5*5 square of the fiberglass liner around each of the openings to get to the hull. I then added five layers of biaxial cloth and then a 3/8" bed of epoxy filled with their structural thickener I then drilled three 3/8" deep holes per seacock using a drill bit that doesn't leave a small deeper hole in the middle of the primary hole. I set 1" SS316 1/4" bolt heads into the holes and backfiled with West epoxy and thickener. Around the liner, I jammed in copious amounts of epoxy with a peanut butter consistency to make a firm base around the seacock. Sanded my mount smooth and then bedded the seacock with 5200. Followed sealinng instructions per Groco's web site (see previous posts) and then adding three nuts per seacock, hand tightened down the fittings after a day of curing (7 day 5200) and I will do a final tightening after five days. I don't expect them to go anywhere or leak in the next 10 years. Last year I installed the same type of seacocks in the rest of the boat and I made a stupid mistake of not putting enough sealant around the flange of the seacock where the thru-hull connects with it and had a trickle all year. Replaced all this Spring. If you use plywood, I recommend using Marine grade (less voids), cutting it and then soaking it with several layers of West epoxy and curing overnight before using.
 

Maine Sail

Member III
Followed sealinng instructions per Groco's web site (see previous posts) and then adding three nuts per seacock, hand tightened down the fittings after a day of curing (7 day 5200) and I will do a final tightening after five days. I don't expect them to go anywhere or leak in the next 10 years. Last year I installed the same type of seacocks in the rest of the boat and I made a stupid mistake of not putting enough sealant around the flange of the seacock where the thru-hull connects with it and had a trickle all year. Replaced all this Spring. If you use plywood, I recommend using Marine grade (less voids), cutting it and then soaking it with several layers of West epoxy and curing overnight before using.

Stuart,

You most likely had a leak that was due to your installation and bedding methodology than to little compound.

The concept of creating a "gasket" (allowing to cure for a few days then tightening again) is not a good one above the waterline and even worse bellow! If you let the bedding "cure", then tighten, it will, in most cases, "break the seal" especially with seacock assembly.

I made a stupid mistake of not putting enough sealant around the flange of the seacock where the thru-hull connects with it and had a trickle all year.

If the water had reached the inside of the boat, or the flange side as you describe, then you had TWO leaks both internal and external. The internal seal around the flange is a secondary seal in the un-likely event that water permeates the seal between the mushroom head and the hull. If you used "flush head" thru-hulls the importance of tightening once is even more important because the sealing layer is thinner and will definitely sheer when tightening. Furthermore, if you did not turn the thru-hull, after the cure, and only tightened the "nuts" you just forced the thru-hull out and away from the hull thus compromising that seal and causing a likely failure point.

A thru-hull and seacock can, and should, be tightened all the way down upon after applying copious am amounts of sealant. They are designed to do this!

I have replaced well over 60-70 seacock assemblies using the full tighten method and never once had a leak...

In this photo you can clearly see the concave head of the thru-hull. It is designed to catch the sealant and create a nice thick bead between the hull and head of the thru-hull.
97812317.jpg


You also must use a properly sized hole saw.

Correct:
97812318.jpg

Incorrect:
97812319.jpg
 
Last edited:

tenders

Innocent Bystander
This is a stellar thread. For the record I'm replacing a 5/8" raw water intake with a 3/4" intake because the 5/8" parts aren't widely available.

Throughhull and seacock: Jamestown Distributors. Much better bronze selection than Defender or West. They also sell the Groco straight-to-tapered thread adapters which according to Groco are patented. But I didn't need them because I bought a straight-to-tapered seacock.

G10 backing material: McMaster-Carr. (This is useful stuff to have around!)

Silicon bronze fasteners: -- geez, these things are hard to find in lots of less than 50 -- thank goodness for boltdepot.com. I love the story of their adapting to become an online specialized fastener supplier in response to the competitive threat from Lowe's. I can see how they make money at this and I'm glad to pay them for it!

Question 1: why does the backing plate have to be round? What if it's rectangular, with a round cutout for the throughhull?

Question 2: bronze plumbing adapters like nipples, tees, reducers, and barbs are REALLY hard to find; impossible, even. West doesn't sell a single one. Is a bit of brass really so bad?
 

Emerald

Moderator
The round backing plate is so you don't have a corner creating a stress point

A little brass on some of the fittings seems inevitable. See if you can find "red" brass. Also, check Hamilton Marine. I've been able to get my barbs in bronze from them:

http://store.hamiltonmarine.com/browse.cfm/2,100.html

Here's a metal compatibility chart from Jamestown:

http://www.boatbuilding.net/article.pl?sid=06/03/14/2016224&mode=thread

Finally, just a reminder that Groco did issue a recall on some of their seacocks etc. Check here for details:

http://www.groco.net/svc-bltn/cat-svc-bltn-2-08.htm

I was bit by this and had one that was actually weeping rust from around the stem. Took it to Groco in person and got a factory tour. Was interesting. Turns out the only thing being made offshore was the "economy" line of stuff. The rest is made here. Wish I had known that up front, as I would have gone up a notch and bought the US made ones. Of note, the strainers and other stuff are all made here.
 
Last edited:

tenders

Innocent Bystander
Wow, thanks. I have the Groco seacock model that's being recalled although I don't know if mine is actually part of the recall.

Groco sure doesn't make a very good case for why, aside from the bronze handle instead of stainless, the next notch up is worth triple the price--in the case of the 3/4" seacock, $120 vs. $40. The descriptions are otherwise exactly the same.

https://www.jamestowndistributors.c...yName=Groco+Bronze+Seacocks+-+Tri-Flange+Base

https://www.jamestowndistributors.c...0&familyName=Groco+Seacocks+-+Tri-Flange+Base
 
Top