You are using an out of date browser. It may not display this or other websites correctly.
You should upgrade or use an alternative browser.
You should upgrade or use an alternative browser.
Taz-
I'm in the process of building a new companionway hatch for my E-29. In short, a lot of work has gone into this project, but most of it (so far) has been in building the jigs to cut a smooth radius on the bandsaw and bevels to the frame, and in building a curved mold to vacuum press the teak laminate that fits inside the teak frame. The building of the actual frame has gone fairly fast, and I'm getting ready to press the laminate, then trim it to fit inside the frame. I'll then glue and fasten the whole thing, then finish it. I'll Post photos. If you like it, perhaps we can work something out. I could be interested in building another one given all the prep work already invested. It will probably be a few more weeks before it's ready to photograph.
I'm in the process of building a new companionway hatch for my E-29. In short, a lot of work has gone into this project, but most of it (so far) has been in building the jigs to cut a smooth radius on the bandsaw and bevels to the frame, and in building a curved mold to vacuum press the teak laminate that fits inside the teak frame. The building of the actual frame has gone fairly fast, and I'm getting ready to press the laminate, then trim it to fit inside the frame. I'll then glue and fasten the whole thing, then finish it. I'll Post photos. If you like it, perhaps we can work something out. I could be interested in building another one given all the prep work already invested. It will probably be a few more weeks before it's ready to photograph.
Dave Hussey
Member III
Any update on progress?
How is the progress on the hatch construction ? I am very interested in seeing the building process and the finished product!
How is the progress on the hatch construction ? I am very interested in seeing the building process and the finished product!
E29 Hatch
John,
I bought my boat 2 years ago, E-29, and tried to save the existing hatch. The previous owner had purchased a new one but then did not take care of it and it started to delaminate. I sanded it down and varnished it but the hatch was just too far gone. It has gotten soft in a few spots and I'm going to have to replace it. How is it going with the construction of you new hatch? You mentioned that you would post pictures, have you and where are they? I would like to look at them and maybe order a new hatch from you. Let me know.
Bob, E-29 Pegasus, Port Angeles, WA
Wow... I definitely sense a market opportunity...
Bear in mind I'm a technical/production guy living in the publishing world who is taking on carpentry head-on to serve his passion for fixing up his boat, making it an even more sought-after haven for his wife, daughter, and himself. I'm interested in building some hatches, but I won't be setting any speed records doing it, and they won't be as nice as Martin's (although he's my inspiration, seriously) but I'll try my best.
This is the basic design: 1.75 inch (+/-) teak frame consisting of a 7/8" exterior frame dado/rabet joined, fastened and glued to a smaller 7/8" interior frame. 15-degree beveled sides, dado & rabet joined, fastened, and glued (not as pretty as Martin's dovetail, but every bit as structurally strong), with 104" radius curve on frame top. Curve on frame bottom varies based on hatchboard and coachroof - these may be different on your boat from mine). Inset frame top supports 3/4 inch laminated cover while bottom provides additional rail support. May add plastic slide inserts to facilitate smooth operation (any suggestions?). Laminated top will be two layers of 1/4 baltic birch or Okhueme sandwiched between two 1/8" bookmatched sheets of teak veneer, vacuum pressed against a curved mold. Top edges and side edges to be rounded over - thinking 1/4 inch but may go up to 1/2 inch if it feels right. Will also add a handhold on top aft glued and fastened, radiused same as hatch. Fastener holes to be plugged. No ribs or other treatment planned. Finishing will be 8 coats of Epiphanes varnish, then 2 coats of Bristol.
Here is the hold-up: My furniture-maker friend whose bandsaw I use for resawing has been up in NY helping one of his colleagues rebuild his shop after it burned down, and I don't want to attempt to resaw teak veneer on my 10-inch craftsman, so until he gets back (or I get a bigger saw), I can't move forward. Should move quickly once I can get going again, hopefully soon.
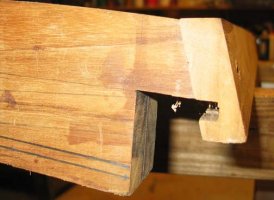
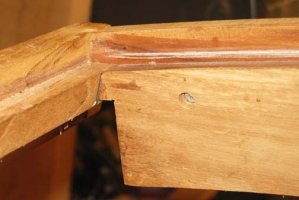
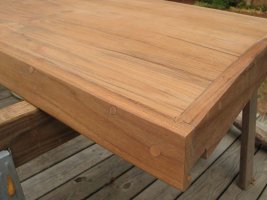
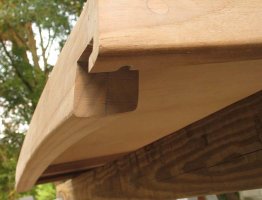
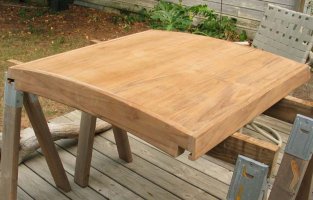
Photos attached of unfinished frame so far show:
-Dado joinery, bevels, and curves of frame sides (to cut clean, even curves, I have a pivoting jig to control workpiece as it moves through saw)
-Inset frame
-Grooves for runners
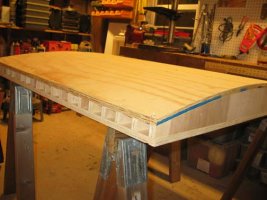
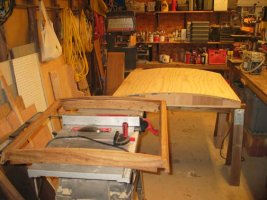
-Mold to vacuum bag laminate (48" x 48", so it must support over 33,000 lbs of pressure while under vacuum!)
Bear in mind frame is unfinished, and some glue and excess material is shown that will be removed in finishing.
Will post again once laminate is built and whole assembly is glued up & cleaned up prior to finishing.
Bear in mind I'm a technical/production guy living in the publishing world who is taking on carpentry head-on to serve his passion for fixing up his boat, making it an even more sought-after haven for his wife, daughter, and himself. I'm interested in building some hatches, but I won't be setting any speed records doing it, and they won't be as nice as Martin's (although he's my inspiration, seriously) but I'll try my best.
This is the basic design: 1.75 inch (+/-) teak frame consisting of a 7/8" exterior frame dado/rabet joined, fastened and glued to a smaller 7/8" interior frame. 15-degree beveled sides, dado & rabet joined, fastened, and glued (not as pretty as Martin's dovetail, but every bit as structurally strong), with 104" radius curve on frame top. Curve on frame bottom varies based on hatchboard and coachroof - these may be different on your boat from mine). Inset frame top supports 3/4 inch laminated cover while bottom provides additional rail support. May add plastic slide inserts to facilitate smooth operation (any suggestions?). Laminated top will be two layers of 1/4 baltic birch or Okhueme sandwiched between two 1/8" bookmatched sheets of teak veneer, vacuum pressed against a curved mold. Top edges and side edges to be rounded over - thinking 1/4 inch but may go up to 1/2 inch if it feels right. Will also add a handhold on top aft glued and fastened, radiused same as hatch. Fastener holes to be plugged. No ribs or other treatment planned. Finishing will be 8 coats of Epiphanes varnish, then 2 coats of Bristol.
Here is the hold-up: My furniture-maker friend whose bandsaw I use for resawing has been up in NY helping one of his colleagues rebuild his shop after it burned down, and I don't want to attempt to resaw teak veneer on my 10-inch craftsman, so until he gets back (or I get a bigger saw), I can't move forward. Should move quickly once I can get going again, hopefully soon.
Photos attached of unfinished frame so far show:
-Dado joinery, bevels, and curves of frame sides (to cut clean, even curves, I have a pivoting jig to control workpiece as it moves through saw)
-Inset frame
-Grooves for runners
-Mold to vacuum bag laminate (48" x 48", so it must support over 33,000 lbs of pressure while under vacuum!)
Bear in mind frame is unfinished, and some glue and excess material is shown that will be removed in finishing.
Will post again once laminate is built and whole assembly is glued up & cleaned up prior to finishing.
Attachments
-
 IMG_3835.jpg54.5 KB · Views: 115
 -
 IMG_3833.jpg63.9 KB · Views: 113
 -
 IMG_3836.jpg57 KB · Views: 126
 -
 IMG_3842.jpg69.3 KB · Views: 142
 -
 IMG_3844.jpg75.7 KB · Views: 139
I realize you are still waiting to see the finished product. I expect to be finally cutting the veneer next week, and then will be laminating, trimming, assembling, sanding, and finishing. Hope to show something more complete soon (will post progressive photos of project).
In the meantime, I've analyzed the costs to build a companionway hatch. Here is the basis:
One hatch will require about 15BF of teak for the exterior frame, interior frame, veneer, and spray guard/handle. This includes some margin for waste, since boards must be planed down, trimmed, and can't be ordered exactly to size, so you must allow for some excess material that cannot be used with each board. I'm factoring 15% excess required. The only places to get teak in NC charge $16-20/BF which is too much, so I will be ordering Plantation Teak from a distributor in Florida for $9/BF, and shipping to NC costs about 25% more. So cost/BF is factored at $11.25. Then there is the Baltic Birch plywood which is sandwiched between the veneer, and a 1/4" sheet locally is $45. One sheet cut in half and stacked is required for the laminate (it will be sandwiched between the teak veneer). Add the HDMW sliders which are $25, and the cost of varnish and Bristol for the finish, which is another $35. Finally, supplies including a resaw blade (at least one will be used in each construction) at $35, and then the little things like epoxy glue, fasteners, brushes, sandpaper, etc...
Total Itemized Costs:
15 BF TEAK @ $11.25/BF = $169
4x8 sheet 1/4" Baltic Birch = $45
Sliders = $25
Finish = $35
Supplies = ~$100
So total materials cost into each hatch is hovering around $375.
Then factor in my time and effort to produce this, and then stand behind it for one year with a limited warranty, which I'm going to call $500.
So total cost for each hatch will be $875, fully finished, ready to use, 1 year warranty against delamination or breakage (limitations will apply on certain types of breakage due to slamming it open or closed, accidents, misuse, etc), and a 30-day money back guarantee if you don't like it . Also, please bear in mind there will be some required maintenance on your part to keep it solid for the long term. Shipping and insurance will be additional.
I don't think I'll be interested in doing this for anything less, because it is a lot of work. But it's fun, I care about these boats, I am interested, so I'm willing. Like I said earlier though, it won't be a fast turnaround. Expect 3 mos from order (maybe sooner), as I am doing this on evenings after my daughter goes to bed when my wife lets me (she's claiming $150 from each hatch just for putting up with me ), and weekends (when we're not sailing ).
Please let me know if you are still interested by contacting me at jkenan@nc.rr.com, and we can take the next step on verifying your absolute measurements. No obligation until I'm ready to actually ship out a hatch, and then it will be PayPal.
Stay tuned for updates.
In the meantime, I've analyzed the costs to build a companionway hatch. Here is the basis:
One hatch will require about 15BF of teak for the exterior frame, interior frame, veneer, and spray guard/handle. This includes some margin for waste, since boards must be planed down, trimmed, and can't be ordered exactly to size, so you must allow for some excess material that cannot be used with each board. I'm factoring 15% excess required. The only places to get teak in NC charge $16-20/BF which is too much, so I will be ordering Plantation Teak from a distributor in Florida for $9/BF, and shipping to NC costs about 25% more. So cost/BF is factored at $11.25. Then there is the Baltic Birch plywood which is sandwiched between the veneer, and a 1/4" sheet locally is $45. One sheet cut in half and stacked is required for the laminate (it will be sandwiched between the teak veneer). Add the HDMW sliders which are $25, and the cost of varnish and Bristol for the finish, which is another $35. Finally, supplies including a resaw blade (at least one will be used in each construction) at $35, and then the little things like epoxy glue, fasteners, brushes, sandpaper, etc...
Total Itemized Costs:
15 BF TEAK @ $11.25/BF = $169
4x8 sheet 1/4" Baltic Birch = $45
Sliders = $25
Finish = $35
Supplies = ~$100
So total materials cost into each hatch is hovering around $375.
Then factor in my time and effort to produce this, and then stand behind it for one year with a limited warranty, which I'm going to call $500.
So total cost for each hatch will be $875, fully finished, ready to use, 1 year warranty against delamination or breakage (limitations will apply on certain types of breakage due to slamming it open or closed, accidents, misuse, etc), and a 30-day money back guarantee if you don't like it . Also, please bear in mind there will be some required maintenance on your part to keep it solid for the long term. Shipping and insurance will be additional.
I don't think I'll be interested in doing this for anything less, because it is a lot of work. But it's fun, I care about these boats, I am interested, so I'm willing. Like I said earlier though, it won't be a fast turnaround. Expect 3 mos from order (maybe sooner), as I am doing this on evenings after my daughter goes to bed when my wife lets me (she's claiming $150 from each hatch just for putting up with me
), and weekends (when we're not sailing ).Please let me know if you are still interested by contacting me at jkenan@nc.rr.com, and we can take the next step on verifying your absolute measurements. No obligation until I'm ready to actually ship out a hatch, and then it will be PayPal.
Stay tuned for updates.
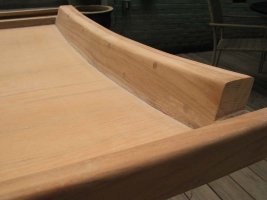
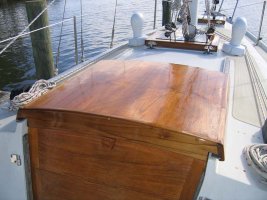
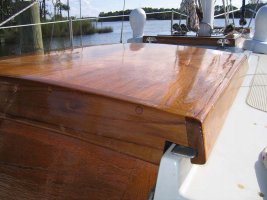
Here is the latest progress...
I Still want to treat the the outside top edges, but havn't decided what profile I want. Once that is done, all that is left is 220 grit sanding, and then the varnish and Bristol - which will take about a week to apply the varnish, that must cure for about 10 days, then the Bristol can be applied which will go pretty quick, but ideally that will cure for a week before it goes on a boat. So it's at least 3 weeks away from use at this point.
Overall, I'm pleased with the results. I learned a thing or two along the way, this being my first hatch, but no major mistakes, thank goodness.
Will post more as finishing finishes!
Attachments
-
 IMG_0306.jpg80.9 KB · Views: 122
 -
 IMG_0311.jpg75.9 KB · Views: 116
 -
 IMG_0301.jpg101.4 KB · Views: 114
 -
 IMG_0312.jpg64.7 KB · Views: 116
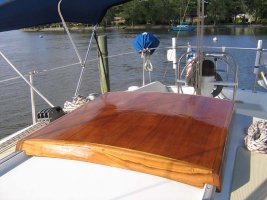
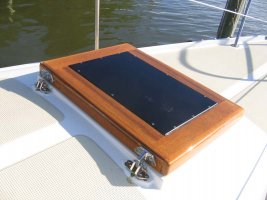
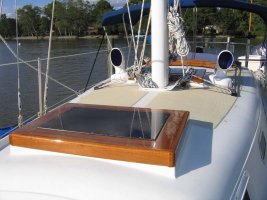
Here is the latest progress on the new Ericson 29 companionway hatch. It still needs the UHMW plastic slides to facilitate smooth operation, and a couple of touch ups, but it is taking it's final form.
As a first timer at this, I must say I am pleased with the results, and encourage anyone interested in tackling this sort of project to do so. It does require some mission critical tools, and an absolute interest in wood joinery, laminating, and finishing. This has been a lot of fun, rewarding, and a great learning experience for me. I hope to build more! If there are any takers on this hatch (as well as the salon hatches), I am interested in selling them, so I can justify the investment in time and materials to build the next set. I've stated my price in a previous post (not including salon hatches), but would be receptive to offers, this being my first set and all. If anyone wants to build their own, or offer comments for improvements, I would be very happy to offer or receive advice.
Bottom line - these boats deserve to be taken care of, used, and appreciated. Any way I can facilitate that goal gives me a sense of satisfaction.
Best,
Attachments
-
 IMG_2083.jpg109.9 KB · Views: 184
 -
 IMG_2087.jpg97.2 KB · Views: 160
 -
 IMG_2095.jpg110.8 KB · Views: 160
 -
 IMG_2089.jpg95.4 KB · Views: 202
 -
 IMG_2092.jpg107.8 KB · Views: 191
Wow that woodwork is lovely!
There is just one tiny detail that has not been mentioned up to this point...
While the deck mold probably never changed during the long production run, it would still seem a good idea to take some careful measurements of the old hatch and the rails, opening, etc, just be sure that the replacement will fit.
I am very likely worrying for nothing, but all these boats were produced before CAD, CAM, laser guided saws and cutters, etc were around...
And, I know from experience that boats have few or no right angles to their wouldwork. Cabinetry work is always "interesting" on a boat!
Cheers,
LB
Kevin Johnston
Member III
Nice work
Beautiful work! I am in need of rebuilding my hatches as well and yours are exceptional.
I most likely will do my own work and thought either molding a peice of Lexan for the hatch covering for the companioin way to allow more light into the cabin below and because it would be less maintenance or go the teak as you did.
I would make the rails most likely out of teak forming the Lexan on to the rails. The wood is beautiful and much more traditional. Thoughts any one?
John, Extremely Fine, Excellent work!!!! You deserve to be proud!!!!
Loren, Good call, in my architectural work I do alot of rehab and am a firm believer in "measure twice, cut once"
Kevin, Sounds like a plan!!! I'm going a little techier, the E23-2 has a molded fiberglass hatch cover, not very yachty(downright Cloroxy). The side rails are going to be solid aluminum bar stock(clear anodized) w/ a groove machined in for the slider & Lexan(smoked)hatch light. On 23's the wood siderails would be too hard to maintain.
I have to salvage the curved forward portion of the existing hatch to match the coaming, haven't decided yet if it will be a fixed cover or part of the hatch.The rest is going aft for a gas tank cover.
The aft portion(above weather boards) is going to be Teak, anchored to the aluminum, w/ a nice handrail routed into the top portion above the Lexan. I'm anticipating some interest from my crowd
Last edited:
Dave Hussey
Member III
Question for John
John,
first, I am not worthy
Your work is inspirational. Is the finish in varnish? epoxy? unobtanium? It's gorgeous.
My real question is: are the aluminum rails on your boat straight and true? On my E27, they have a very pronounced arc in them, in the vertical plane...in other words, a straight edge laid fore and aft would touch at the front and rear, but have a 5/16ths (or more) gap in the middle.:headb:
(I love these little faces)
Please advise. Anyone can chime in if they have advice.
Thanks all.
Thanks for the feedback! Inspiration is contagious... I caught it from another fellow on this board, and feel unworthy myself. Best any of us can do is... well, our best.
To Loren's point: Agreed the precise fit WILL vary from boat to boat. The biggest concern would be the molded deck, with the rails being a very close second, and the curve radius not even appearing on the radar (a 104" radius is close enough for government work for any E27-E29, and fits my boat beautifully). The rails could be tweaked by any owner with the proper direction (as a last resort), but the deck is pretty much non-negotiable. The process I had in mind would be to have the owner take a series of measurements of critical points (with an illustration to provide guidance for each measurement), then I would create an inexpensive jig/template to send along for verification. It would be built to slide along the rails given the measurements provided, be full width but only about 12" deep, no curves or cover, and incorporate a thin board hanging down aft so the hatchboard profile could be marked. The owner would test the 'prototype' and note (again with documented direction) tolerances at different junctures along the rail for both rail and deck. Sent UPS ground, round trip could probably be less than $25, and materials would be next to nothing. With careful attention to detail from both owner and builder, there is no reason this could not be done successfully remotely. As far as liabilities go in a worst case scenario (ie, rejection), that is a risk I'm willing to take, and I would also be prepared to decline the job if the feeling just wasn't right after the initial efforts.
To Daves Questions: I havn't completed the finish yet (just enough for marketing photos), but it will be 8 coats of Epiphanes Wood Finish Gloss Varnish on the outside and 4 on the inside (though I may switch to Clear all around and Matte on the inside for future projects), followed by 2 coats of Bristol 2-part finish on the outside. Varnish must cure for 10 days or so after last coat before Bristol is applied, and Bristol emits Isocyanate, so wear a respirator!! As far as the rails go, are they fastend firmly against the fiberglass? In other words, does the fiberglass carry the same vertical curve? To find out, remove the rails, and place a straight edge against the fiberglass where the rails were. If it lays flush with no gaps along the run, then it is straight. If not, that does present a design challenge I hadn't considered before. Thanks for the revelation, but how to address it...