
Sometimes I wish I could retire now and spend all my time working on restoring my boat, and then take it on trips to Michigan, Florida, and the NC coast. It can be disheartening when weeks go by without any progress, I do love working on her. But I have a great job, and it funds our project so we must continue on in my spare time. Although very few days go by without at least a trip up to the workshop with my sweet dog Bella. She does her usual security inspection of the building and boat, then encourages me to get on with our walk! Boat progress can come another day she says, right now we have a walk to do! I have tried explaining how much she will enjoy sailing it some day, but she just looks at me puzzled, more interested in the here and now of an exciting walk through the woods.
In the meantime we have been sailing our Starwind 19 in the winter regattas. The winter ones are the best as there are very few powerboats on the lake and the clubs virtually have the whole lake to ourselves for the regattas. Granted it can be cold sailing, but it is all relative as my brother in Traverse City is sitting in ice and snow, and nobody is sailing on Gran Traverse Bay. Of course we just
have to share with you that we came in second place in the PHRF Non-Spin division in the Icicle Series Regatta!!!!! The Icicle Regatta is a series of six races through January and February with total points added up. We were quite thrilled with our place and look forward to racing with our Ericson 25 when she is finished.
But you are not here in our blog to hear about us racing in a Non-Ericson boat. So let's get to the sharing what we have done on the Ericson 25.
After a lot of work and even more thinking, we have completed the second phase of repairing the cabin top around the companionway entrance. So far this has been the most difficult task of the resurrection of our little yacht "Nordic Thunder". Not physically or emotionally difficult, but intellectually challenging due to the complexity of curves and transitions and not having drawings of the original top and curves. I would say this portion of the rebuild is not for the faint of heart, or those lacking confidence and will to dive and and risk a major blunder. Although clearly it can be done by amateurs, as we have done it.
Reestablishing Cabin Top Shape
The most difficult part was reestablishing the curves of the cabin top. We did save the forward portion of the companionway frame as a reference and used that to careful construct a set of sweeps that we believed would represent the top curve of the cabin. Once we had those in hand, we went through an iterative process to establish what we believed was the correct cabin top shape:
- Supported the top of the cabin from below with posts and reversed bar clamps pushing up on wooden pads. The reversed clamps allowed us to push up just a little bit at a time under control. Just an 1/8 of a turn on the clamp handle can be more than enough.
- Laid long boards on edge where the old companionway hatch runners would have been. Clamped them to the old frame lip that remained. Purpose was to get a true forward and aft flat surface to work with.
- Laid the cutout sweeps on the cabin top between the long boards.
- Adjusted the clamps up and down until we had the best sweep fit and chose that sweep.
- Adjusted all the clamps and fit over and over again until everything looked level side to side, front and back, and fit the sweep true. Lot's of eyeballing here too. And yes, the boat was leveled first.
It took a LOT of trial and error and starting over. But once we had settled on the right shape we took it detailed measurements, and then made the final hatch frame / companionway rails and put it on the boat. Making the final frame is much more complicated that you would think as the rails had to have a bevel cut in the bottom of them and the finger joint slots had to be beveled to match the curve of the cross member. The other thing we found was the the original hatch rails are NOT parallel. They are closer at the bow end by about 1" then at the cockpit end. We don't know why and are guessing it helps the hatch open more smoothly. We duplicated the original design as exactly as we could. Just because we didn't understand it was no reason not to put it back as designed originally.
Of course once the frame was made we went through the whole process all over again to get it perfect, then drew a pencil outline around the frame on the subsurface where everything had to go. This helped us quickly get everything back into the right place when we epoxied it all down with thickened epoxy. We used a combination of wood flour and milled fiberglass for the thickened epoxy. Since the lower fiberglass layer seemed a little weaker than we liked, we also added a layer of 12oz. fiberglass cloth to the top that went up onto the sides of the hatch frame.
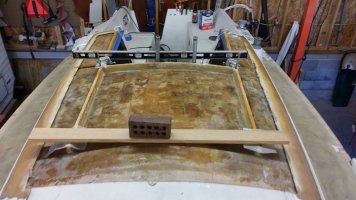
You can see in the picture below some of the clamps we used, but you can't see the supports inside the cabin. The brick and wood across the front of the rails was to ensure a nice snug fit of the frame rails to the lower layer of fiberglass. No matter how much we adjusted everything, they always seemed to want to lift up about 1/8" at the front end. The brick was enough to hold them down.
Balsa Core:
Once the frame had cured and was firmly in place we removed all of the clamps but left the main wooden support post in place under the companionway frame cross member just to ensure there was no sag. Next we laid the balsa core, same as we have detailed in several previous blogs. Nothing hard there, by now we are quite familiar with cutting and epoxying the balsa core in place without incident.
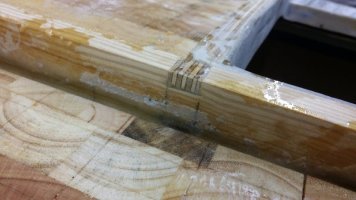
Below is a nice detail shot of how we put the frame sections together with finger joints. You can also see the balsa core in the foreground.
Sanding and Fairing
The last part before in this stage is to fair the surface and add the radius to the bottom of the rails so there is a nice smooth curved transition from the rail to the deck. We filled the gaps between the balsa core with coarse sawdust, milled wood flour, and milled fiberglass to give us a nice thick strong structural paste. In the picture above you can see the gap, it varied from 1/4" to 3/8" along side the companionway frame. The resulting mixture when hardened is stiffer and stronger than the wood rails themselves and should add considerable strength to the structure.
Once that was cured, we sanded it smooth and then filled low spots on the balsa core and created a radius at the base of the rails with the System Three fairing compound called "Silvertip QuickFair". It was the first time we had used this product and were quite pleased with it. It goes on smoothly, doesn't sag, and is easy to sand. All as advertised by System Three. Nice when a product actually works as advertised...
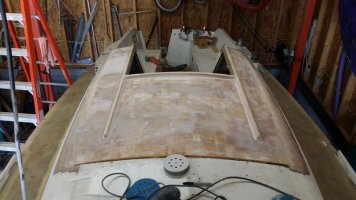
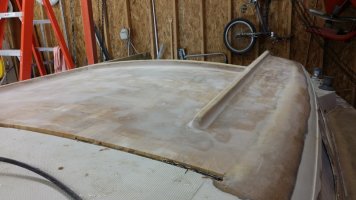
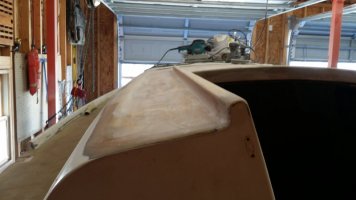
Once again we took even more time smoothing and fairing the top of the cabin than any other part we had done so far. Each time we take more time in this step, and we are becoming convinced that the fairing before the fiberglass skin is the most important part for a nice looking finished product. Here are a few pictures of her just about ready to lay the fiberglass skin. Getting just a little bit closer every week to having her resurrected!
John Olsen
Ericson 25CB "Nordic Thunder"