Retired from newspapers and television, currently sailing Thelonious II, a 1984 Ericson 381.
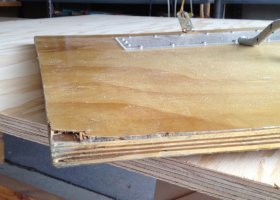
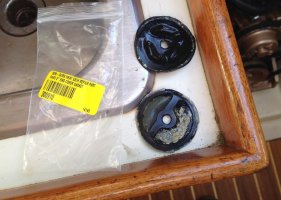
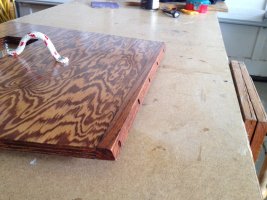
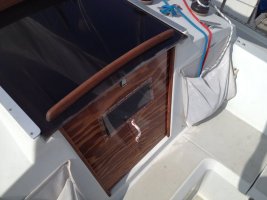
Hatch boards have been around a long time. Arriving means pulling them out and putting them somewhere; departing the boat means stacking them back in, which I tend to do in the wrong order 30 percent of the time. What hatch boards have going for them is that they can store in a small, inconvenient place. What they have going against them is that they store in a small, inconvenient place. Rain squalls seem to know this, and entertain themselves watching me dig them out, then remove them, then dig them out again. And you do have to put them away, because otherwise they slide and clatter all over the cockpit.
Last summer I tried out a one-piece hatch board made of exterior grade 3/4 ply. At the last minute I jig-sawed a hole in it and screwed on a piece of Home Depot acrylic, thinking it might be nice to see out after being driven below. Construction took about an hour, total.
It was the best and simplest thing I ever did to a boat. The one-piece board has a rope handle on either side, placed so it can be inserted or removed with one hand. It goes right in. It comes right out. And it's lighter than teak. What a revelation! To store it, just drop into the seat locker. The handles are rope so they won't mar anything and they allow the board to lie flat.
After a few months, however, the exterior plywood showed its weak point. The bottom edge delaminated from being slammed into place. Otherwise, the down and dirty job might have been good for years.
That seemed to be the only weak spot, so in the redo with 3/4" marine ply I installed a piece of oak along the lower edge. Oak can take a beating.
I kept the same size "portlight", but this time went to a plastics house for a professional lens in 3/16ths acrylic instead of 1/8th. But when I picked up their job it wasn't any neater than my own effort, and the thicker plexiglass looked odd. So I stuck with my own original. Cutting and drilling acrylic isn't hard, but I wish I had Googled it first and purchased a plastics bit for my drill. Acrylic is tough. I believe even my 1/8" port, with it's small surface area, could take quite a hit from a breaking sea.
You'll smile when I report that an attractive guest to my garage was awestruck by the beauty of the fine wood I had just put six coats of Schooner varnish on (after Minwood conditioner). Where does wood like that come from? Well, far away. Some land of steamy waterfalls and bathing virgins. Yes, that is a marvelous pattern of grain and gently undulating surface. Consider, my dear, the loveliness of the cut ends. There you can count the exotic layers which this particular tree utilizes to make itself hard and flat in 4x8 sheets. But, this is what we woodworkers do: aggrandize the soul by a hands-on embrace of nature. Shall I show you more of this embrace, here in the garage? What's that? Wait, don't go....
Yeah, I know how ugly varnished plywood is, and I sort of hate the way it came out. After the wood conditioner, which does help keep the plywood grain from rising, I wiped on some red mahogany stain. Ah, a pig with lipstick. But since I'm currently using a rather dark oil on the boat, the stained marine ply actually blends in pretty well with the teak of the sliding hatch and grab rails. I guess I could have made it out of real wood, but what wood is three feet wide? And at my supplier, 6" teak is an astonishing $27 per linear foot. The companionway is usually covered with Sunbrella anyway, so you can't even see the new one-piece hatchboard.
[After a few weeks I can't bear to look at the varnished ply. So I'll paint the outside Interlux Brightside white, leaving a varnish border to prevent paint transfer. If starting over (again), I'd now use 3/8th" acrylic for the whole job.]
However you do it, this much is true: removing and replacing a hatch with one hand is a real tickle.
[Update: a much better solution is a one-piece acrylic hatch board ]
I wish I could say as much for the Tides Marine SailTrack system I installed over Christmas. My mainsail always went up pretty well until the last ten feet. Then I need the winch. It never dropped easily, and I usually had to go to the cabin house to haul it down, an annoyance in harbor and inconvenient when reefing in a breeze.
The SailTrack is an easy installation and it does look pretty yar. Enlargement of the luff gate is usually necessary, but easy enough to do. The new external track mounts in the original and looks like it has always been there. The kit comes with new luff slides, which may require a sailmaker to install.
I'd say the sail goes up easier--but I still need the winch for the last few feet. It does drop like a piano, which is nice. Overall, a necessary improvement. But not a life-changing necessary improvement.
[Oh yes it is. Years later and another 5,000 miles I am here to report that this simple upgrade is one of the best changes I've ever made to a sailboat.]
We're supposed to change the heat exchanger end gaskets occasionally. They're three bucks each. On my boat, ahem, we do it once every 30 years. Good time to clean out any bits of zinc, or at least confirm that the exchanger tubes look clean and seaworthy.
Love having baby diapers on board. They fit naturally over the ends of anything--heat exchanger, fuel bleed, oil drip, and I'll bet if you put one on your chin at night, no more complaints about drooling. Every man's crib ought to have some.