klb67pgh
Member III
This is not a how to-post. This is an I did this, and so can you post.
When I bought our E-25 in August 2020 it came with most of the parts of the original teak sliding companionway hatch, which were useful to have as a reference as to what the hatch used to look like, but nothing more. My prior owner built a temporary flat top sliding hatch with 2x4s and plywood that served the boat well until the plywood rotted through at the end of last year. I salvaged another teak sliding hatch from an E-25 last year that I hoped would work after making some repairs. But I discovered the angle of the sliders was fairly different on this hatch from 1972 or 73 versus my 1978 boat, so I concluded building a new hatch was the only option.
I spent hours examining other companionway sliding hatch builds on this forum and elsewhere, and saw many beautiful teak and mahogany varnished examples. Those were above my skill and tool level, and frankly a bit intimidating, and left me wondering if I could create something good enough in paint with a bit of varnished wood. Ultimately I had no choice - I had to try.
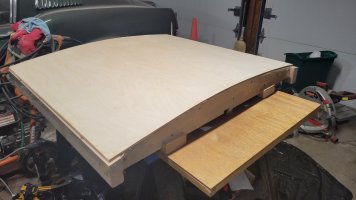
One of the repairs to the salvaged hatch included building a form and trying to steam the plywood back into its proper arc using hot towels. I decided to use that form and make it bigger to laminate 3 sheets of plywood for the new hatch top
I should add my tool selection included a craftsman table saw, a jig saw, and a newly purchased Wen jointer. A band saw with a tilting top would have made things easier, but I didn't have that. I didn't have a thickness planer, or a router, either.
In terms of design, I decided I would need to paint the hatch rather than leave the wood natural or varnish given my likely less than ideal joinery I could produce with my tools and skills. So I did not need to use teak, etc. I wanted the hatch to have a factory arched top, but be as high as possible and still clear the traveler, to maximize headroom in the galley area. I also wanted all frame pieces to be angled for a better appearance. Overall I wanted it to look like it could be a factory hatch to the uneducated.
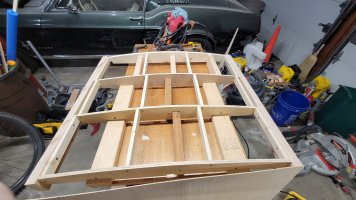
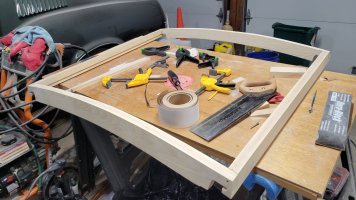
I spent an inordinate amount of time trying to figure out the correct angles and cuts to connect the frame pieces. I made plywood templates, then a pine model, and finally cut the ash I used for the frame pieces. My boat is stored about 15 minutes away from home, so thankfully I was able to go back and forth to check my work and fit.
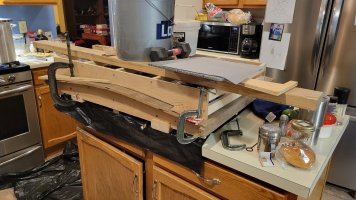
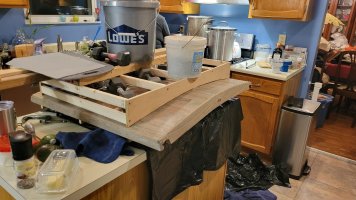
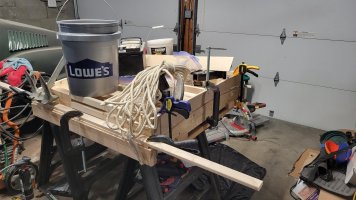
The laminated top was much easier to produce than I thought it might be. I left it a bit big to then fit to the final frame. I used everything heavy I could gather, plus clamps, to epoxy the first 2 sheets together. I made another form using scraps to go on top and press evenly across the arc with the plywood sandwiched in between.
When I was ready to do a final glue up of the frame, I installed it on the boat w temporary screws, and did make a few final tweaks with sand paper and a chisel. After I epoxed the frame joints, I installed it again just to make sure it still fit. The opening is not quite square, so I had to account for that issue.
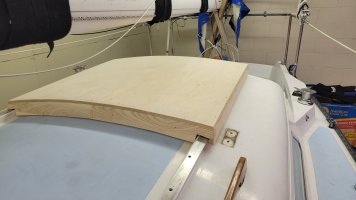
I had to cut the arcs in the fore and aft frame pieces using a jig saw-not ideal, but I got it close and sanded it to a good enough fit for thickened epoxy. The arched top went on smoothly using temporary screws for holding and alignment. I used a relatively inexpensive hand miter saw to trim the excess plywood and frame ends flush and on their angles.
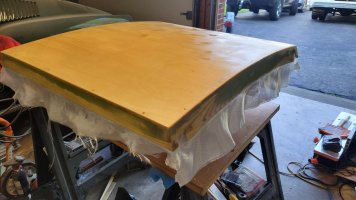
I used Total Fair to fair the joints and hatch. I put 1 sheet of 6 oz. fiberglass cloth on the top and down the sides. I used 4 inch tape to tab the underside to the frame, then added 6 oz. cloth to the underside. I was working early mornings and nights to get the hatch done enough so I could temporarily install the hatch and traveler to launch the boat for my wife and kids to sleep in during our club's week long youth sail camp for which my wife is the Director, and I instruct for part of the week. I was able to get epoxy on all of the wood and an epoxy based primer on the outside and get it installed in time to launch. Final paint had to wait a few weeks.
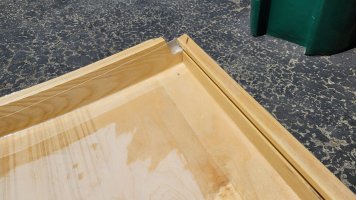
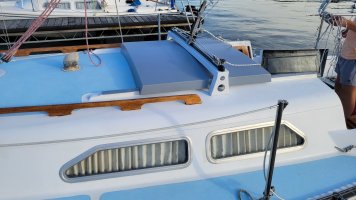
The hatch slid smoothly when the boat was on her trailer. Interestingly, after launching, the hatch bound just a bit when closing the last 8 inches or so. After tensioning the rig, the hatch still bound up a bit, so I took the traveler and the hatch back off the boat and did some sanding where the sliders ride to widen it just a bit until it slid better. I also discovered one of the screws that mounts the port side metal slider was misaligned and pulling the slider out just a bit, contributing to the binding. I filled and redrilled that screw to get it back in line.
Today I managed to apply a second coat of white paint, and that will remain its status until the off season. I have a hasp and lock to install as well at some point.
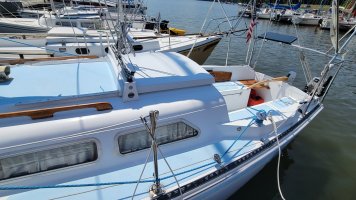
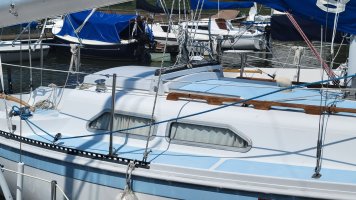
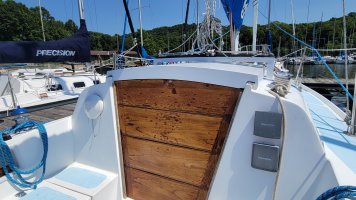
I decided I am going to use one of the original teak frame pieces to make a varnished teak pull mounted to the top of the new hatch. It will work well since it is already arched close to the new hatch arch. I am also contemplating putting a teak piece on the aft end of the hatch so the teak is continuous from the hatch boards up. I'd appreciate your thoughts on that look. I may try to tint additional coats of paint in the off-season to tone down the white just a hint.
It was a lot of work, but necessary, and doable. Not using very expensive wood reduced the stress level quite a bit. Also deciding to step away for a few hours or a day when things were not quite working or making sense also helped. This was a big to-do on the project list and I'm pleased how it turned out. I'm also looking forward to getting the teak pull finished and installed.
When I bought our E-25 in August 2020 it came with most of the parts of the original teak sliding companionway hatch, which were useful to have as a reference as to what the hatch used to look like, but nothing more. My prior owner built a temporary flat top sliding hatch with 2x4s and plywood that served the boat well until the plywood rotted through at the end of last year. I salvaged another teak sliding hatch from an E-25 last year that I hoped would work after making some repairs. But I discovered the angle of the sliders was fairly different on this hatch from 1972 or 73 versus my 1978 boat, so I concluded building a new hatch was the only option.
I spent hours examining other companionway sliding hatch builds on this forum and elsewhere, and saw many beautiful teak and mahogany varnished examples. Those were above my skill and tool level, and frankly a bit intimidating, and left me wondering if I could create something good enough in paint with a bit of varnished wood. Ultimately I had no choice - I had to try.
One of the repairs to the salvaged hatch included building a form and trying to steam the plywood back into its proper arc using hot towels. I decided to use that form and make it bigger to laminate 3 sheets of plywood for the new hatch top
I should add my tool selection included a craftsman table saw, a jig saw, and a newly purchased Wen jointer. A band saw with a tilting top would have made things easier, but I didn't have that. I didn't have a thickness planer, or a router, either.
In terms of design, I decided I would need to paint the hatch rather than leave the wood natural or varnish given my likely less than ideal joinery I could produce with my tools and skills. So I did not need to use teak, etc. I wanted the hatch to have a factory arched top, but be as high as possible and still clear the traveler, to maximize headroom in the galley area. I also wanted all frame pieces to be angled for a better appearance. Overall I wanted it to look like it could be a factory hatch to the uneducated.
I spent an inordinate amount of time trying to figure out the correct angles and cuts to connect the frame pieces. I made plywood templates, then a pine model, and finally cut the ash I used for the frame pieces. My boat is stored about 15 minutes away from home, so thankfully I was able to go back and forth to check my work and fit.

The laminated top was much easier to produce than I thought it might be. I left it a bit big to then fit to the final frame. I used everything heavy I could gather, plus clamps, to epoxy the first 2 sheets together. I made another form using scraps to go on top and press evenly across the arc with the plywood sandwiched in between.
When I was ready to do a final glue up of the frame, I installed it on the boat w temporary screws, and did make a few final tweaks with sand paper and a chisel. After I epoxed the frame joints, I installed it again just to make sure it still fit. The opening is not quite square, so I had to account for that issue.

I had to cut the arcs in the fore and aft frame pieces using a jig saw-not ideal, but I got it close and sanded it to a good enough fit for thickened epoxy. The arched top went on smoothly using temporary screws for holding and alignment. I used a relatively inexpensive hand miter saw to trim the excess plywood and frame ends flush and on their angles.
I used Total Fair to fair the joints and hatch. I put 1 sheet of 6 oz. fiberglass cloth on the top and down the sides. I used 4 inch tape to tab the underside to the frame, then added 6 oz. cloth to the underside. I was working early mornings and nights to get the hatch done enough so I could temporarily install the hatch and traveler to launch the boat for my wife and kids to sleep in during our club's week long youth sail camp for which my wife is the Director, and I instruct for part of the week. I was able to get epoxy on all of the wood and an epoxy based primer on the outside and get it installed in time to launch. Final paint had to wait a few weeks.


The hatch slid smoothly when the boat was on her trailer. Interestingly, after launching, the hatch bound just a bit when closing the last 8 inches or so. After tensioning the rig, the hatch still bound up a bit, so I took the traveler and the hatch back off the boat and did some sanding where the sliders ride to widen it just a bit until it slid better. I also discovered one of the screws that mounts the port side metal slider was misaligned and pulling the slider out just a bit, contributing to the binding. I filled and redrilled that screw to get it back in line.
Today I managed to apply a second coat of white paint, and that will remain its status until the off season. I have a hasp and lock to install as well at some point.


I decided I am going to use one of the original teak frame pieces to make a varnished teak pull mounted to the top of the new hatch. It will work well since it is already arched close to the new hatch arch. I am also contemplating putting a teak piece on the aft end of the hatch so the teak is continuous from the hatch boards up. I'd appreciate your thoughts on that look. I may try to tint additional coats of paint in the off-season to tone down the white just a hint.
It was a lot of work, but necessary, and doable. Not using very expensive wood reduced the stress level quite a bit. Also deciding to step away for a few hours or a day when things were not quite working or making sense also helped. This was a big to-do on the project list and I'm pleased how it turned out. I'm also looking forward to getting the teak pull finished and installed.


