Ericson 28+ Refurb Project

Razz

Member I
After owning this boat for 21 years, it's time to apply some major TLC and this is such a wonderful place to learn from your experiences. I'd appreciate any comments and advise you all may offer.

My boat is the 31st hull built in May of 1981. She has been sailed in the Great Lakes and the Chesapeake. Mechanically, the rigging is in tip top shape and the engine works fine. That's where the good news ends. Thankfully there is nothing wrong with the hull, deck and keel that can't be addressed.

Deck: Oxydizing gelcoat and some hairline cracks in the gelcoat. Question: What have you used to seal or refinish the deck?

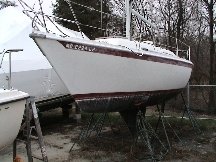
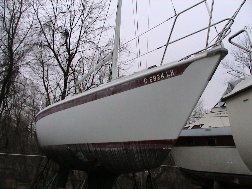
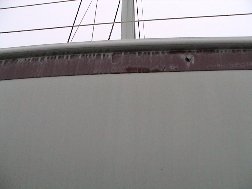
Rubrail: This is the source of my major complaint about the materials used on this boat. This rubrail oxydizes and chalks excessively. I want to replace it with something that doesn't make such a mess by virtue of it's mere existence. My current thoughts are to replace it with teak or some other ready-made rail. Suggestions?

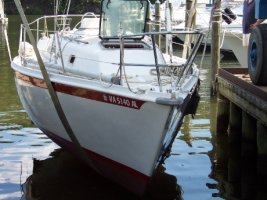
Hull: Gelcoat is oxydizing and chalky (exaserbated by above rubrail). Burgandy sheer and waterline stripes are virtually pink. I've considered repainting the hull with linear polyurethane paint but I am afraid to make the plunge before consulting with others who have done this. What should this job cost to have a marina do it? Is there any secret to doing a good job except to prepare prepare prepare, follow instructions, take your time and do it right? (Your reading the notes of someone who wet-sanded this boat, put on a VC TAR prepcoat with an airless sprayer that made the bottom look as smooth as an 8-ball, then finished it up with VC-17....now this was a fast bottom!)

Keel: No problems

Rudder: There is a hairline crack that is semi-circular in shape (open towards the leading edge) that has been there since the second year I owned the boat. It doesn't seem to have lessened the strength of the rudder so I believe it to be merely cosmetic and easily repaired. Opinions?

Interior: Ugh....this is the real problem. The scupper in my cockpit plugged with leaves, filled and leaked into the boat around the instrument panel. The bilge filled to 4 inches over the cabin sole. By the time I got there, the damage was done.

Starting at the top, the headliner staples, which were made of iron, all rusted and are in the process of releasing their hold. Ericson materials gripe #2: Why was this "fold-over" plastic trim used to cover the staples which in turn were used to attach the headliner to the teak trim? Why not put up the headliner then the teak trim? I digress....anyway, the whole headliner has to go and I am thinking of putting up teak battens or vinyl again.

The teak plywood along the inside of the deckhouse is delaminating so that has to be replaced...no big deal. The teak plywood used to mate the rosewood & holly sole to the bulkheads and verticals has to be replaced. The rosewood & holly sole might be saved if I sand it and bleach it and, and, and....wouldn't it be easier to just replace it? How do I get it out from under the teak beam that goes from the maststep to the TFG? Take down the mast?

The anchor locker scupper drain hose has disconnected and provides another source of water to the bilge. I've reattached this hose in the past and don't want to do it again because you have to pull the anchor locker. I am going to go through the forwardmost bulkhead by putting a teak door in the bulkhead to gain access to the area under the anchor locker.

Amazingly, the cushions are in reasonably good shape and should come clean. I haven't been into the electrical system but I'll be willing to wager that there are surprises there. BTW, where do I get replacement breakers these days? I'll bet at least one is corroded and no longer functions.

Well, if you have read down to this point, I thank you and hope to hear from you with your ideas and suggestions. I am planning to spend the winter pulling staples and rotten wood while shopping around for replacement parts.

Happy Holidays!

Nick Handres
Ericson 28+ "Rascal"
38 40 06N
77 15 06W
 

escapade

Inactive Member
Wow, I thought I was a glutton for punishment! Sounds like you have lot's to keep you busy for the winter.
To try to help out on some of your questions. a) If the deck can't be cleaned up to your satisifaction w/Soft Scrub or similar product you'll probably need to paint. b) The rub rail on my previous Ericson (1980 30+) did the same thing. Was able to stop the worst of it by applying Starbrite polish w/teflon. This lasted for a season but if applied every spring while cleaning & polishing the hull would stop the chalking till fall. Not a fix but a stop gap measure. I believe there is a source for new rub rails somewhere in this web site. Use the search engine to find it. It works really well. c) I would try rubbing the hull out w/machine rubbing compound (fairly aggressive) and waxing before I would repaint. Unless you have some major damage to the gel coat, rubbing it out and waxing is more cost effective. The 30+ I owned looked pretty sad when we bought her but "wheeling" her out w/3M heavy duty rubbing compound & the Starbrite w/Teflon made her look like new in about a day. The cost of a GOOD power buffer w/lambs wool pad is MUCH cheaper & easier than preping & painting. d) Crack in rudder (crazing?) should be ground out, reglassed and faired smooth. The steps for that are also laid out elsewhere in this website. Note: I just bought 2 sheets of 3/4 X 4 X 8 teak & holly plywood to replace the cabin sole in my E34. Cost for ply was $445.00 w/tax.
Well I hope this helps you out a little. I'm sure you'll get lots of other responces with their ideas.
Good luck & sail fast
Bud E34 "Escapade"
 

Jim Baldwin

Member II
Noah

Sounds like you have big plans...

I replaced the old rub-rail with a TACO product on my E27. It looks great and so does the new paint job. (We are talking major work here).

A little advice, (since you asked). I recently completed a two and a half-year restoration on this little boat. I did all the work myself and I am very proud of it. It was a lot of fun and a real education.

Now...The rest of the story.

I spent over $16,000 in parts including a new engine. I am sure I also have thousands of hours of labor. I didn't go sailing during this time because the boat was dry-docked and my wife... (well, never mind).

I now have a very, very pretty $10,000 boat.

So, Here is my advice...

Do one item at a time. Focus on one part of your project and work it through to completion. Don't take anything apart that you don't plan to replace or repair right away. Don't take anything else apart until you have completed that item.

Get (proffessional) help on major work. No matter how much spare time you think you have, it won't be enough. People start calling you "Noah" and other cute comments long before you're finished.

Pay attention to the money... Every new stainless steel nut and bolt costs money and it adds up quick.

Be willing to except less that perfection on some parts of the project. Perfection is very expensive and elusive. It will drive you crazy tring to achieve it. Every little thing does not need to be re-placed, re-plated or polished.

Hairline gel-coat cracks always come back through the new paint no matter what kind of epoxy filler you used or how much grinding and or sanding you did. A little resin and fiberglass matt is the only way to say goodbye to them. (Arguements to follow, I am sure).

Do maintenance work all the time, not once every twenty years.

Most important... Keep sailing

Sorry, I kinda got carried away with this one. Good luck.
 
Last edited:

Razz

Member I
Thanks for the advice and encouragement to Bud and Jim. I am a project person so I know of what you speak! Jim said "Keep sailing" and that is the best advice!

I've attached a couple of pictures lest you think I am totally nuts for doing this job. The good news is that the engine is in excellent condition and most of the work is cosmetic.

Bud, I've used the Starbrite approach, (with teflon!) and it gives a nice finish for almost 2 years. Maybe I can get away with just painting the stripes and replacing the rubrail.

The weather is not cooperating lately so I have no new news at this time except that I have purchased a small radial arm saw whick, in combination with my pickup and gas generator, I can cut wood at the boatyard! The saw I picked up at an estate sale for $100. It's a DeWalt 8" manufactured in the 1950's and in excellent condition. Jim, eat your heart out. (Do I have to account for the cost of the pickup and the generator in the repair bill too?)

Enjoy the pictures. Ericson (Bruce King) has the best looking bow entry!
 

Attachments

  • portbow2.jpg
    portbow2.jpg
    49.4 KB · Views: 861

rgraham

Member II
I've been restoring an E36-RH for the last two years and here are some things I have learned. The first thing I did was I cut some full 2"- 4" - 12' teak in half and dado out a 3/4 " for the rub rail. I got into a hurry (because I was trying to move the boat at the time) and didn't properly scarf the joints (used a 45 degree) they failed when I installed them. I've used epoxy and teak dust and have filled them but they keep cracking.

Lesson 1: If you use this thick of teak properly scarf the joints. Also if you use this thick of teak assemble the length into one single board a little longer than the side of your boat and start with a little hanging off the end of the stern. Then start at the stern and work your way to the bow because of the shape of the boat you will be able to bend the teak using its length as a lever. Then trim off the excess. (I think I'm going to pull them off and follow my own advice.)

Sole replacement (big job)
I replaced the sole (what was left of it) with the mast out of the boat. I used 3/4" teak and holly plywood. $200 a sheet and it took two sheets (I measured the square footage first and figured it would work with just two). I went to a Staples and bought foam board and built an entire pattern of the sole and fitted it in the boat. I also drew 11 hatches in the patterns so I could get to every part of the Tri-Axial Grid system (except for the little triangle in the front of the boat). Then I epoxyed the plywood (before cutting) front and rear using several coats of the west system. Then I used the patterns to layout the floor and use the least amount of wood. (The patterns have to be small enough to get through your entryway but as big as possible to allow for the least number of joints.) You also have to look at your cabinetry and make sure you can get the new wood under it (I had to cut some of the bulkheads that extended over the sole to accommodate the 3/4"previous sole was 1/2"). The patterns also let you slide them around and figure out how to fit this jigsaw puzzle.
Next I cut out the pieces from the plywood (no hatches yet), I used a 64-tooth carbide blade on a circular saw and clamped a guide (4 ft wood level) to get straight cuts and a jigsaw for everything else. The epoxy kept the edges nice and clean. Then I fitted these in the boat, because of the patterns I only had to make two adjustments. Next I found a wood shop that had a CNC controlled router, they were able to cut my hatches and allow for a 1/4" of teak trim around the opening and around the hatch. So I was able to use the wood they cut out for my hatches (cost $150 to cut the holes). I also had them install the teak trim because at the time I was traveling a lot (cost $350). I then cut 3" strips out of 3/4" marine plywood and epoxyed and screwed these on the backside of the sole with an 1 1/2" overlap to hold the hatches. I could only do this on a couple because I had to slide most of the sole under cabinetry (but I pre-assembled all of them out of the boat). I would also install any hatch hardware at this time. Then I put the sole in and screwed it to the TAG framing. Finally I epoxyed and screwed the rest of the hatch backing plates in. This turned out pretty good.

I'll let you know how the headliner turns out I haven't gotten to that yet.

MTCW
Robert
 

Sven

Seglare
Robert,

Originally posted by rgraham
I replaced the sole (what was left of it) with the mast out of the boat. I used 3/4" teak and holly plywood. $200 a sheet and it took two sheets

Do you mean that you got plywood that already has the alternating teak and holly strips ? If so, where did you get it ?

Follow-on question, did you trim the sole with a teak border before installing it ? Just curious how you did that, if you did.

Thanks,


-Sven
 

rgraham

Member II
Do you mean that you got plywood that already has the alternating teak and holly strips ? If so, where did you get it ?

Yes it was this kind, I know a supplier in Mobile AL, "Reliable Lumber" 334-342-4888 (I got these in 4/20/2002 so I don't know what the cost is now. At the time he got in different stock at different times and he would not ship small sales amounts (under 10 sheets). Tell him Robert Graham sent you, he probibly doesn't remeber me but what the heck.

Follow-on question, did you trim the sole with a teak border before installing it ? Just curious how you did that, if you did.

No there is teak trim that is installed above the sole, like base molding in a house.
 

escapade

Inactive Member
teak & holly sole

Sven;
I just purchased 3/4 X 4' X 8' teak & holly marine ply @ $205.00 per sheet. Public Lumber in Detroit, Mi. has it in stock. Try a search on Google or some other search engine for "teak & holly marine plywood". This should find you a retailer closer than Al. or Mi.!!!
Have fun & sail fast.
Bud E34 "Escapade"
 

tilwinter

Member III
Gelcoat Restoration

Razz:

I was able to remove the heavy chalking and oxidation on my 1981 E30+, and restore the shine to the gelcoat, without the need to paint. Most people who see the boat say it looks like new, which is an exageration, but in my large yard, there are not many boats shinier than mine.

I read how to do this on the ericson sailnet forum, in a discussion that took place in the spring of 2002. This should be available by searching the archives.

The secret is to use a variable velocity polisher which will maintain the same velocity you choose while under load. It usually works best at a velocity under 1000 rpm, with a wool bonnet, and 3M polishing compound (the liquid). The polisher needs to turn slowly or the compound will heat up and dry out too quickly. The speed seems to vary day to day, I guess due to temperature. The polishing compound can be thinned a little with Finesseit-II.

The results are almost magical.

I bought a Makita polisher at Coastal Tools on the web, for about $200. I did the whole hull over two springs, with my wife helping by loading the hull with the mixture so I didn't have to put down the polisher every few minutes. I used lots and lots of polishing compound and Finesse-it.

Rod Johnson
 

Razz

Member I
Refurb Update

It's been a while since I last posted to this thread so I thought I'd catch everyone up on the latest progress.

First of all, Rod, you were right on target regarding the polisher and the use of polishing compound.

I've powerwashed the topsides and went to work with my new 1000-3000 rpm variable speed polisher/sander and using 3M polishing compound. You have to work in the shade because the hot sun will dry out your pad and compound very quickly.

By manipulating the speed of the polisher/sander and applying considerable pressure, I was able to remove virtually all of the oxydation leaving a shiny gelcoat finish! I figured, what do I have to lose?

Below decks, I've removed the headliner, all decorative teak plywood, which was delaminating terribly, and all the teak trim. I figure it will take me a year to rebuild the interior. Ericson did an awful job originally. They used shoddy construction techniques to save materials and labor. There were nails driven through the cabin top! It was just not built to last. The "refrigerator-like" interiors of Catalinas and Hunters are more resilient if not more sterile for their lack of trim. But you would think that a premium builder like Ericson would do a better job.

Anyway...the principle source of water in the bilge was the anchor locker drain hose disconnecting from the little scupper in the bow. Everytime it rained, water came in and leaked right into the bilge. I discovered this when I removed the bulkhead forward of the vee berth and saw the drain hose just lying there.

Having considerable water in the boat just made a huge mess, delaminated the non-marine teak plywood and caused mildew beyond belief.

LOOKING FORWARD: It is time for a VC-TAR touch up on the bottom and a fresh coat of VC-17. I used both products before with WONDERFUL results. I applied both after I wetsanded the bottom and used an airless sprayer. That bottom lasted 6 years in the water. Light air performance was outstanding.

Time to go back to work. I'll be glad to post pictures if you are interested in the before and after. Work is progressing at a very nice pace.

- Nick
 

Bob in Va

Member III
A possible fix

I haven't tried this yet on a marine application, but intend to sometime in the future. Re: Those little gelcoat cracks that don't appear to be very deep, and thus don't seem to require immediate attention, but just nag your conscience and make you feel guilty about not repairing them. A couple of years ago I was restoring a car that had a urethane (I think) tail spoiler that was so badly cracked that the bodyshop guy told me to buy a new one, that it was unrepairable. After pricing a new one, I decided at least to try to salvage the old one, as I had some two part urethane primer left from another job. I did normal pre-primer prepping of the surface, got it super clean, then sprayed the primer on it with numerous coats, building it up so that it was fairly thick for a primer coat. What made it work is that urethane primer FILLS IN cracks rather than drawing back from them, as other paints and primers tend to do. It resulted in a tough, flexible coating that sanded out nicely, and when I took it to the bodyshop guy he couldn't believe it was the original. It still looks good on the car and no one can tell it has been worked. SO... I wonder if that stuff wouldn't work on fiberglass, filling in those spider cracks where there is no real structural damage, and allowing a standard deck paint then to be oversprayed without worry that the cracks would reappear.
 

Razz

Member I
Refurb Update!

Thanks to all the advice of fellow sailors my work on Rascal has progressed a fair pace to the point where we launched early in August. The interior is still under construction and there were many diversions related to the engine, electrical, etc.

I have an engine system story to tell and I'll be glad to keep you apprised of how the buildout of the interior is going. So far, I've been buying teak & holly and teak sheet products in preparation for the project.

In the mean time, WE'RE SAILING!!!!

:egrin:
 

Attachments

  • Small launch.jpg
    Small launch.jpg
    156.1 KB · Views: 360
Top