John Bouchard
Member II
I hope you all will bear with me... There are many threads on this site on this subject, and I've been involved with them. Also, most of the info gleaned from those threads have been immensely helpful. If this info is way old news, my apologies, and disregard!
I was describing the following to a friend via an email, and once I had it assembled, I figured it might be fodder for discussion on this site...
I've removed all of my portlights, and several of them needed new glass, as fogging has occurred on the 36 year old originals. The "safety glass" is 3/16", thinner than auto glass (I thought about some type of acrylic or plastic - but scratching of this material has always bugged me), and you need to find an installer that stocks this size, and also has access to gasketing material if the original gaskets are brittle/cracked/shrunk/etc. This normally U-shaped gasketing is what seals the glass water-tight in the frame. Along with others, I bought some gasketing material a while back from Gareth on this site (actually, Gareth, I have tried again just recently to determine where to send the money I have owed you for over a year!), who had purchased an excess amount (minimum order) from a dealer.
The principal reason that I post this item is that forever I have seen different sites talking about which caulk to use... such as 3M 5200 (NO!), 4200, 4000, or other. When I bought my 1971 Ericson 32, I originally replaced a couple of the portlights' glass, and used 4200 or the West Marine equivalent around the perimeter interface of the frame and cabin exterior. One of these portlights leaked almost immediately, my bad, and some of the originals have always leaked a little.
A big note of caution here - if using a caulk gun, this is definitely an installation where use of excess caulk is a huge NO -NO! Yes, it might help seal things up better, but in order to remove the portlights later, you need to shift the assembly around a bit to angle it and remove. Any excess caulk inside the exterior of the frame creates a block to this movement, and it must all be dug out/removed before you can manipulate the frame out of the opening. I discovered this faux pas during the recent removal effort.
So, under duress of complaints from the Admiral (read my better half...), I decided to renew the foggy glass and seal the portlights as best as I could learn how. I wasn't sure what caulk to use, which would be the better application, etc. and did do some searching on-line, including much on this site. Answers varied all over the lot - with no real concensus that I could discern.
This site and the manual for the boat indicated a closed-cell foam tape was originally used. I also saw on this site reference from a member who also fixed "rv's" - to a "butyl putty tape."
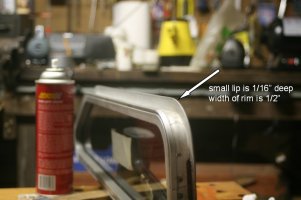
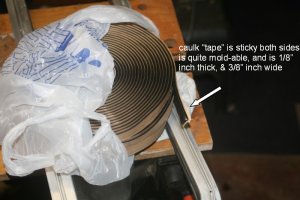
When I brought the portlights into the shop (in New Bedford, MA - auto place with experience in boat stuff...), I discussed the installation technique with one of the staff (a sailboat owner!) and asked about the original installation - I had kept some of the strips of the original caulking - carefully stripped off the portlight frames. I wondered aloud whether this had been a tape or whatever .... he thought it might have been a bead of caulk or a tape... BUT, he showed me what he would use - it's a "roll" of caulk, much like a roll of tape that is sticky on both sides (like carpet tape...). I guess it is what they use when installing auto glass? This rolled up strip of "caulk" comes in various sizes, widths, and thickness - the exterior "lip" on the "rim" of my portlights is 1/16 deep, and the rim is about 1/2 inch wide. So, the product that I am using is 1/8 inch thick, and 3/8 inch wide.
I never asked him the question - but this may be a roll of butyl putty tape?
One of the beauties of using this stuff is that you can pre-mark the exterior cabin where you want to place the portlight, then fit the tape of caulk on the frame (it is extremely sticky on both sides), and do a pretty good job singlehandedly of just "sticking" it into place!
In applying the stuff to the frame, it is soft and mold-able. Also, you can fix an extra piece or two in the joint between the two halves for extra confidence. Also, there is plenty of "play" to compensate for any small imperfections in the edge of the frame/lip.
The caulk is soft enough so that when you pull it all together from/with the inside frame, the caulk will compress, making for a real nice seal and appearance. The caulk strip is black, so any small amounts that squeeze out will need to be trimmed.
I've attached a picture of a portlight frame, and the "roll" of black caulk, so you can hopefully see what I'm talking about!
BTW, the installer used my gasketing (from Gareth) - they liked it very much and we are trying to identify the original supplier as they would like to purchase some and have it on hand... Gareth, help?
I inquired at the shop about shaded/tinted glass, and they did not stock any that was shaded. So clear glass it is. I'm thinking of maybe using the tinted stick-on material that is available for the interior surface of automobile windows... Does anyone have pros/cons on using this stuff?
Anyway, that's my story and I've got to stick to it! uuhh.. sorry 'bout that... Anyone with comments / suggestions / cautions?
Still snowing a bit around here... but the clock change has made it seem much like Spring!
John B.


