This blog is a repost and consolidation of a thread on the forum. Figured I would add it here, with some rewording as well. This was my first foray into fiberglass repair and reading others posts especially Kiwisailor's really helped give me the courage to start, so an extra special thanks for that.
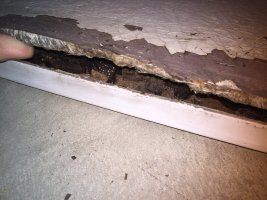
During the original survey of Rhumb Ration, two places were flagged where we might have water issues. One was the rudder, which the surveyor told us "always registered wet", and the other was the anchor locker lid, which was clearly soaking wet. This was after the boat had been on the hard and covered for several years. After one season with the boat, it was now so wet we couldn't stand on it without feeling like we would fall through. I think it was telling that when in November during winterizing we had below freezing temps for a week, and the cover had actually become rigid again, I think this was because the core had frozen. The back of the cover had split from the inner skin and through this split you could clearly see a very very soggy core, yes that is mold.
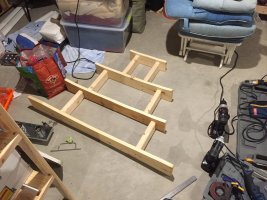
In preparation for this project I built a wood frame with several stations scribed from the deck with the cover in place so the cover would maintain the correct curvature during repair once I removed the inner skin. I suspect if the skin had been in one piece this wouldn't have been as big of a deal, but the outer flange had a split in two places, so I was worried that it would relax flat.
Then I went about removing the bottom skin and core. I found the best method was to cut the skin with a angle grinder and a cutting wheel, later cutting it into 1" wide strips and then prying with a chisel. The corners I did with a Dremel equipped with a 561 multipurpose bit. After much chiseling and cutting, I had a bare single skin. Some things to note, maybe about 20% or so of the original core was dry, and came out hard, as can be seen where you see the white of fiberglass instead of the brown of wood in the final picture. Also, I had thought water was coming in from the hinge bolts, but now I can confirm they were never through anything but solid glass, the handle bolts however, clearly were through core, and I think this is where most of the water came from. It looks like it traveled across the back of the cover, and then wicked up the two sides and down the centerline of the cover. I think because the cover is on a incline down from fwd to aft that is why the fwd end was in better condition. I don't know why, but Ericson brought the core very very close to everything.
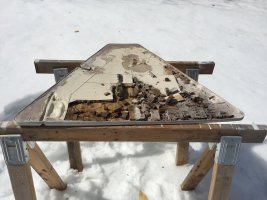
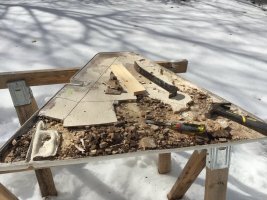
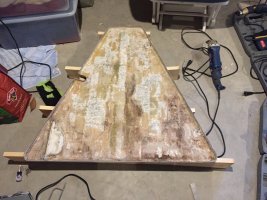
Once I had the empty skin my plan, (which was thrown out the window pretty fast) was to wet down a few small sections of glass, one by where the hatch had split, and one by the chain hole where the glass was thin and I had gotten to gel coat during removal. Then put a whole layer of glass down as a belt and suspenders type thing, followed by the balsa then fill the handle area with thickened epoxy to get it to the level of the surrounding balsa, and then apply two layers of 6oz glass over the whole thing, work it into a 5/8 gap I had left all around, and finally fill the channel around the edge with thickened epoxy.
A few things that worked against me during this plan:
1. My basement was at a balmy 56 degrees
2. I had never done anything like this.
I first leveled the hatch, both port starboard, and fore/aft, so I wouldn't have to worry too much about resin running around. I used a bunch of shims normally used for doors and windows and stapled them to my earlier work. Later I learned this was probably not a big deal, but at the time I thought I needed to do it to make sure my "mock" was ok, since I think I need to work on my jigsaw skills. Three levels were used during the leveling because, well if you have a best 2 out of 3 scenario that must be best right? And the 2' level would not span the hatch in all locations, but I was pretty sure the 4' one was a little wonky from being dropped too much during other projects, and to confirm my memory the smallest one agreed with the 2'. So now we know...anyway.
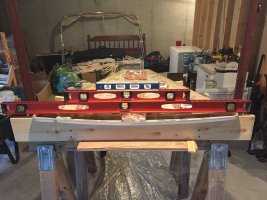
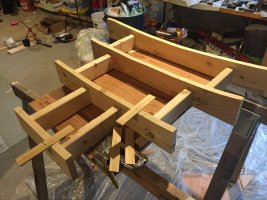
So after reading a bunch of west systems materials, I understood that I was working at the recommended edge of 60 degrees, though I was using the fast hardener, which supposedly could go down to 35 degrees. According to West system, I should use a water bath or heat box to keep the epoxy warm, so I took the lid off a cooler and put the two cans in a water bath I kept refreshing from the tea kettle, pouring out about 50% of the water each time and refilling with kettle water. This did keep the resin easy to pump, but once it was mixed and on the part, it seemed to quickly get gel like, even though I should still been well within the open working time.
So I mixed up some thickened epoxy, and filled the screw holes (I had backed them on the finished side with tape) and the center of the handle (to make it so I didn't have to follow the curve so much). Then I did the two little glass areas, and waited, as according to west systems, this should then cure to a consistency of rubber, but still let me lay additional layers without needing to clean off amine blush and sand.
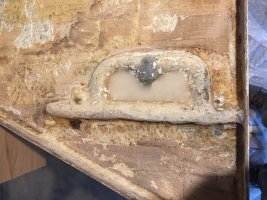
Then I waited, and waited, and......waited, and two hours later realized that at the low temp of my basement this probably was going to take many hours to cure to that level. Now I had an issue because I was thinking I would only have to wait an hour or less between, but that was obviously not going to happen. So I laid the full sheet layer down, and then considered my options. The bag in the middle is a weight which kept the hatch to the profile of the mock, as on its own it wanted to spring
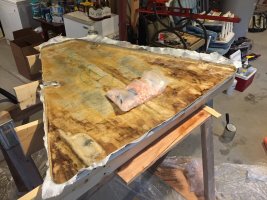
So at this point I realized that I was going to basically have to wet lay up the entire cover in one go, so I mixed up some regular epoxy and painted the bottom of the balsa so it wouldn't starve for resin, then mixed up a large batch of thickened epoxy, and set each section of balsa into it. If I was to go back and tell myself some advice, it would have probably have been to cut the balsa into smaller sections so I could work on smaller areas at a time, and also it allows you to "wiggle" the balsa down into the thickened epoxy. In addition the cover's curvature is probably small enough that I could have used unthickened epoxy, as at the temperatures I was working, as soon as I poured the thickened epoxy out of the cup, the lack of heat immediately turned it into more of a gel and it was hard to press the balsa into it.
The balsa went down, then two layers of 6oz cloth. Because I couldn't fill the handle area with thickened epoxy like I was hoping to, I had to fit the cloth around the handle. This was fiddly and hard, and I know I ended up with some trapped air in it. Part of the issue is I now had three layers of cloth over the area, and none of them was cured, so they would all kind of walk and slide by each other. It was less than ideal. Finally I poured the thickened epoxy around the edge and in the handle area. This was to fill the gap around the edges with something structural, as well as to give the nuts for the handle and hinge hardware a nice level surface.
At this point I had been working on it for about 6 hours, and the light at the end of the tunnel made me a little too hasty. I decided not to squeegee the extra resin off the top of the last layer of cloth, as I thought it would self level and give me a nice paint surface. But I still had to weight the cover in order for it to keep the correct curve, so taking a page from kiwisailor, I put down plastic, then cardboard, then lots of heavy things.
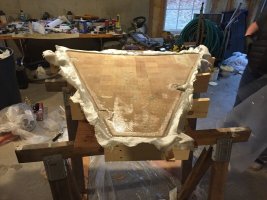
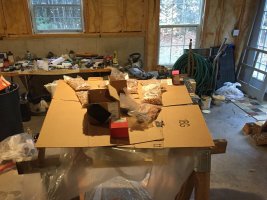
Taking the plastic off, I realized my mistake immediately. I had left too much resin, and the pressure was not totally even, so the resin ran and filled the plastic contours. The surface wasn't the nice level one I had wanted.
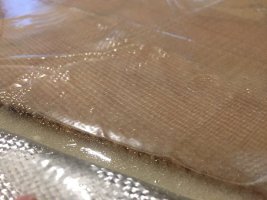
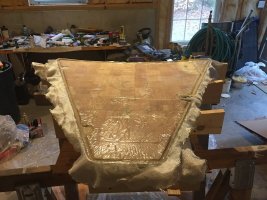
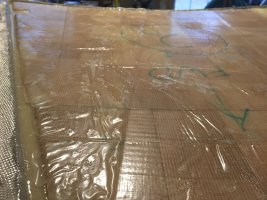
Primed, sanded and ready for paint:

Here it is all painted and ready to go back on. Still have to work on the topside, but in theory the first layer of glass I put on should have sealed it, so the core is safe. I think it will be a while before I get to fixing the gel coat. Looks bad on the outside, but shiny on the inside! Really happy with how it came out. Best part is now it doesn't feel like I am going to go crashing down through the anchor locker when I stand by the bow.


One last task was the hole that the handle sticks into. Ericson in their infinite wisdom decided to drill a hole directly into the core and this was of course allowing water into the deck. I oversized the hole with a large drill bit, then tried to pry out as much of the wet core as I could, and finally filled it with thickened epoxy. Once the epoxy was in I closed the hatch and latched it with cling wrap over the latch. This let me take the latch out later and worked to make a new custom hole. Lots of tape and plastic over any surface you care about is a must when doing this.
During the original survey of Rhumb Ration, two places were flagged where we might have water issues. One was the rudder, which the surveyor told us "always registered wet", and the other was the anchor locker lid, which was clearly soaking wet. This was after the boat had been on the hard and covered for several years. After one season with the boat, it was now so wet we couldn't stand on it without feeling like we would fall through. I think it was telling that when in November during winterizing we had below freezing temps for a week, and the cover had actually become rigid again, I think this was because the core had frozen. The back of the cover had split from the inner skin and through this split you could clearly see a very very soggy core, yes that is mold.

In preparation for this project I built a wood frame with several stations scribed from the deck with the cover in place so the cover would maintain the correct curvature during repair once I removed the inner skin. I suspect if the skin had been in one piece this wouldn't have been as big of a deal, but the outer flange had a split in two places, so I was worried that it would relax flat.

Then I went about removing the bottom skin and core. I found the best method was to cut the skin with a angle grinder and a cutting wheel, later cutting it into 1" wide strips and then prying with a chisel. The corners I did with a Dremel equipped with a 561 multipurpose bit. After much chiseling and cutting, I had a bare single skin. Some things to note, maybe about 20% or so of the original core was dry, and came out hard, as can be seen where you see the white of fiberglass instead of the brown of wood in the final picture. Also, I had thought water was coming in from the hinge bolts, but now I can confirm they were never through anything but solid glass, the handle bolts however, clearly were through core, and I think this is where most of the water came from. It looks like it traveled across the back of the cover, and then wicked up the two sides and down the centerline of the cover. I think because the cover is on a incline down from fwd to aft that is why the fwd end was in better condition. I don't know why, but Ericson brought the core very very close to everything.


Once I had the empty skin my plan, (which was thrown out the window pretty fast) was to wet down a few small sections of glass, one by where the hatch had split, and one by the chain hole where the glass was thin and I had gotten to gel coat during removal. Then put a whole layer of glass down as a belt and suspenders type thing, followed by the balsa then fill the handle area with thickened epoxy to get it to the level of the surrounding balsa, and then apply two layers of 6oz glass over the whole thing, work it into a 5/8 gap I had left all around, and finally fill the channel around the edge with thickened epoxy.
A few things that worked against me during this plan:
1. My basement was at a balmy 56 degrees
2. I had never done anything like this.
I first leveled the hatch, both port starboard, and fore/aft, so I wouldn't have to worry too much about resin running around. I used a bunch of shims normally used for doors and windows and stapled them to my earlier work. Later I learned this was probably not a big deal, but at the time I thought I needed to do it to make sure my "mock" was ok, since I think I need to work on my jigsaw skills. Three levels were used during the leveling because, well if you have a best 2 out of 3 scenario that must be best right? And the 2' level would not span the hatch in all locations, but I was pretty sure the 4' one was a little wonky from being dropped too much during other projects, and to confirm my memory the smallest one agreed with the 2'. So now we know...anyway.


So after reading a bunch of west systems materials, I understood that I was working at the recommended edge of 60 degrees, though I was using the fast hardener, which supposedly could go down to 35 degrees. According to West system, I should use a water bath or heat box to keep the epoxy warm, so I took the lid off a cooler and put the two cans in a water bath I kept refreshing from the tea kettle, pouring out about 50% of the water each time and refilling with kettle water. This did keep the resin easy to pump, but once it was mixed and on the part, it seemed to quickly get gel like, even though I should still been well within the open working time.
So I mixed up some thickened epoxy, and filled the screw holes (I had backed them on the finished side with tape) and the center of the handle (to make it so I didn't have to follow the curve so much). Then I did the two little glass areas, and waited, as according to west systems, this should then cure to a consistency of rubber, but still let me lay additional layers without needing to clean off amine blush and sand.

Then I waited, and waited, and......waited, and two hours later realized that at the low temp of my basement this probably was going to take many hours to cure to that level. Now I had an issue because I was thinking I would only have to wait an hour or less between, but that was obviously not going to happen. So I laid the full sheet layer down, and then considered my options. The bag in the middle is a weight which kept the hatch to the profile of the mock, as on its own it wanted to spring

So at this point I realized that I was going to basically have to wet lay up the entire cover in one go, so I mixed up some regular epoxy and painted the bottom of the balsa so it wouldn't starve for resin, then mixed up a large batch of thickened epoxy, and set each section of balsa into it. If I was to go back and tell myself some advice, it would have probably have been to cut the balsa into smaller sections so I could work on smaller areas at a time, and also it allows you to "wiggle" the balsa down into the thickened epoxy. In addition the cover's curvature is probably small enough that I could have used unthickened epoxy, as at the temperatures I was working, as soon as I poured the thickened epoxy out of the cup, the lack of heat immediately turned it into more of a gel and it was hard to press the balsa into it.
The balsa went down, then two layers of 6oz cloth. Because I couldn't fill the handle area with thickened epoxy like I was hoping to, I had to fit the cloth around the handle. This was fiddly and hard, and I know I ended up with some trapped air in it. Part of the issue is I now had three layers of cloth over the area, and none of them was cured, so they would all kind of walk and slide by each other. It was less than ideal. Finally I poured the thickened epoxy around the edge and in the handle area. This was to fill the gap around the edges with something structural, as well as to give the nuts for the handle and hinge hardware a nice level surface.
At this point I had been working on it for about 6 hours, and the light at the end of the tunnel made me a little too hasty. I decided not to squeegee the extra resin off the top of the last layer of cloth, as I thought it would self level and give me a nice paint surface. But I still had to weight the cover in order for it to keep the correct curve, so taking a page from kiwisailor, I put down plastic, then cardboard, then lots of heavy things.


Taking the plastic off, I realized my mistake immediately. I had left too much resin, and the pressure was not totally even, so the resin ran and filled the plastic contours. The surface wasn't the nice level one I had wanted.


Primed, sanded and ready for paint:
Here it is all painted and ready to go back on. Still have to work on the topside, but in theory the first layer of glass I put on should have sealed it, so the core is safe. I think it will be a while before I get to fixing the gel coat. Looks bad on the outside, but shiny on the inside! Really happy with how it came out. Best part is now it doesn't feel like I am going to go crashing down through the anchor locker when I stand by the bow.
One last task was the hole that the handle sticks into. Ericson in their infinite wisdom decided to drill a hole directly into the core and this was of course allowing water into the deck. I oversized the hole with a large drill bit, then tried to pry out as much of the wet core as I could, and finally filled it with thickened epoxy. Once the epoxy was in I closed the hatch and latched it with cling wrap over the latch. This let me take the latch out later and worked to make a new custom hole. Lots of tape and plastic over any surface you care about is a must when doing this.
