• Untitled Document

    The 2024-2025 Fund Raising Season has Opened!

    EricsonYachts.org has opened the season for raising funds to support the expenses of the site. If you would like to participate, please see the link below for additional information.

    Thanks so much for your continued support of EricsonYachts.org!

    2024-2025 Fund Raising Info

35-3 Shower issue, Polybutlyn plumbing

Christian Williams

E381 - Los Angeles
Senior Moderator
Blogs Author
You might explore Rockler veneers for the area. Maybe this could be made to work ( https://www.rockler.com/teak-3-sq-ft-pack ).

Years ago I bought a 4x8 sheet of teak sticky-back veneer for $100, and it has had many uses. Turns plywood into teak.

(I looked. Teak veneer is now $250. But mahogany can work for half that.)
 
Last edited:

Nick J

Contributing Partner
Moderator
Blogs Author
Since I didn't cut an access hatch in, I had to get a little creative with how the valve was actually secured. These valves are designed to be installed before the wall is closed in and are usually mounted on a 2x4 between the studs. I had to make a plywood bracket that I could attach the valve to and connect it to the backside of the existing panel. Unfortunately, this is the only picture I have of the bracket before I installed it. its the plywood piece on the table in the lower corner of this pic:


20230730_160928.jpg

Here's a quick sketch of how it fits in the existing hole:
1733251483080.png

It would be impossible to plumb it up with it in place, so I had to do everything in a specific order:
  • Run all electrical wires and conduits while the valve was out (hopefully this will be the last time I access this area for a long time)
  • place the plywood bracket in the compartment, but don't secure it yet.
  • install the shower head hose through the lower hole and out the access hole
  • Plumb the valve body (H - hot, C - cold, XC is a cap, and SH - shower head hose). leave all the plumbing long.
  • (Optional step - connect the long hoses to the boats plumbing and pressure test the assembly)
  • feed the plumbed assembly through the hole and position
  • secure the plywood bracket to the back of the panel using screws from the front of the panel
  • secure the valve to the bracket
  • complete the final connections under the sink
  • install the trim ring, valve, and handle.
 

nukey99

Member I
There is a lot of great input from this amazing community. Right now, I'm thinking I will get a piece of starboard to repair almost a complete cut out of the show fitting area. There are a couple of reasons for this. I think the tubing might be 3/8 ID, which means there is not a slip on Shark Link connector for the conversion for Polybutylene to Pex. A small hole will make getting a crimping tool positioned almost impossible. The approach would be to create the opening. Cut the PB tubing fairly low and connect in PEX tubing. I could then purchase a new shower mixing valve with refitted PEX connectors. The aesthetics will not be perfect, but it will be maintainable for future work/repairs. From what I can see on the boat, the shower is the worse connection for service. The sinks can be reached from below.

The current owner of the boat does have a service company coming out in the next day or so, to evaluate and propose a solution. I'll be interested in hearing what they have to say.

I just saw Nick's approach below, that looks like a pretty slick way to do it.
 
Last edited:

nukey99

Member I
Since I didn't cut an access hatch in, I had to get a little creative with how the valve was actually secured. These valves are designed to be installed before the wall is closed in and are usually mounted on a 2x4 between the studs. I had to make a plywood bracket that I could attach the valve to and connect it to the backside of the existing panel. Unfortunately, this is the only picture I have of the bracket before I installed it. its the plywood piece on the table in the lower corner of this pic:


View attachment 51667

Here's a quick sketch of how it fits in the existing hole:
View attachment 51666

It would be impossible to plumb it up with it in place, so I had to do everything in a specific order:
  • Run all electrical wires and conduits while the valve was out (hopefully this will be the last time I access this area for a long time)
  • place the plywood bracket in the compartment, but don't secure it yet.
  • install the shower head hose through the lower hole and out the access hole
  • Plumb the valve body (H - hot, C - cold, XC is a cap, and SH - shower head hose). leave all the plumbing long.
  • (Optional step - connect the long hoses to the boats plumbing and pressure test the assembly)
  • feed the plumbed assembly through the hole and position
  • secure the plywood bracket to the back of the panel using screws from the front of the panel
  • secure the valve to the bracket
  • complete the final connections under the sink
  • install the trim ring, valve, and handle.


Hey Nick - You mentioned final connections under the sink, right? Does that mean that the shower lines originate at some type of joint under the sink? If that is the case, I could see your approach, while being painful, also being the least visibly changed.
 

Nick J

Contributing Partner
Moderator
Blogs Author
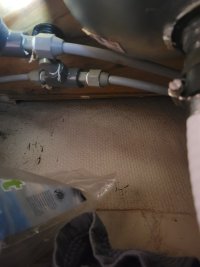
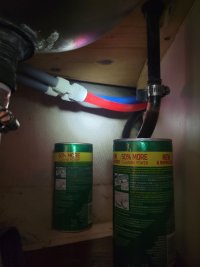
Yes, there's a hot and cold line from the engine compartment. each hits a T that's directly threaded on the faucet. The third leg of the T runs to the shower mixing valve. I cut that line to splice in the new PEX plumbing. Polybutylene is flexible, so it easily pulled down below the sink. When I was done, I tucked everything back up behind the sink and secured with plastic hose clips.

I ran into the same issue you mentioned with the PB to PEX shark bites which is why I ended up using the Flair-it connectors I linked in an earlier post.
 

nukey99

Member I
Yes, there's a hot and cold line from the engine compartment. each hits a T that's directly threaded on the faucet. The third leg of the T runs to the shower mixing valve. I cut that line to splice in the new PEX plumbing. Polybutylene is flexible, so it easily pulled down below the sink. When I was done, I tucked everything back up behind the sink and secured with plastic hose clips.

I ran into the same issue you mentioned with the PB to PEX shark bites which is why I ended up using the Flair-it connectors I linked in an earlier post.
I just got back from the boat and saw the connections you referenced beneath the sink. My water tubing for the shower shares a pretty snug hull with an overboard sewage discharge line. I think getting new lines through that hole might be very challenging. An approach I'm considering is along these lines: Detach the existing PB piping from the sink, remove the shower valve from the existing opening, pull it a few inches out using the slack from the detached lines, plumb new fittings and a short piece of PEX connected to the PB. Push everything back in and reconnect the sink lines. This might be the cleanest approach. Do you see anything I'm missing?
 

Nick J

Contributing Partner
Moderator
Blogs Author
The passage through the aft head bulkhead between the locker where the holding tank is and the cabinet is tight, but you shouldn't have to replace that line unless you want to replace everything back to the engine compartment. The passage from the sink to the shower mixing valve is pretty easy and is only shared with the water tank vent line.

20241204_174539.jpg

The waste overboard line should be a 1.5" line connected to a thru hull directly below the sink and shouldn't be in the way of any of your work.

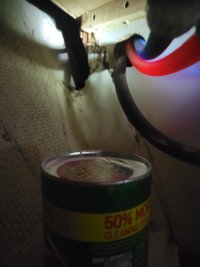
If you don't intend to replace the sink connection, I would leave them alone. The PB Fittings are delicate and you should avoid tinkering with them unless you intend to replace them. Just cut the line after the tees like this:

20241204_174529.jpg

He's the tees to the sink

20241204_174549.jpg
 

nukey99

Member I
The passage through the aft head bulkhead between the locker where the holding tank is and the cabinet is tight, but you shouldn't have to replace that line unless you want to replace everything back to the engine compartment. The passage from the sink to the shower mixing valve is pretty easy and is only shared with the water tank vent line.

View attachment 51669

The waste overboard line should be a 1.5" line connected to a thru hull directly below the sink and shouldn't be in the way of any of your work.

If you don't intend to replace the sink connection, I would leave them alone. The PB Fittings are delicate and you should avoid tinkering with them unless you intend to replace them. Just cut the line after the tees like this:

View attachment 51671

He's the tees to the sink

View attachment 51668
This is great input, thanks so much for the help. It looks like you went from 3/8 PB to 1/2 inch pex, correct? I think cutting the line and splicing in a fairly open spot would be easier than messing with the entire sink valves. I'll scan back up this thread and look at the fittings you used. I'm also considering using 3/8 pex because it will be easier to twist around etc. I don't know if we will ever really use the shower, so pressure is not that imprortant.


My waste thru hull is beneath the short step up to the V berth, where the speed and depth thru hulls are.

I'm pretty sure we are going to drill a 2 inch hole to run new pipes thru. Beneath the shower valve we will be putting in an 8 inch inspection plate, which will have a hole drilled in it for shower wand. This will allow much easier access for future efforts.

While I was in there yesterday, I checked to ensure there was a vented loop on the head, and thankfully there was!
 
Last edited:

Christian Williams

E381 - Los Angeles
Senior Moderator
Blogs Author
If it wasn't said earlier, caution about overtightening the plastic fittings. In very many cases old leaking Qest fittings were cracked by a wrench in hands of a frustrated owner groping in the dark. Understandable, but avoidable.
 

Nick J

Contributing Partner
Moderator
Blogs Author
My waste thru hull is beneath the short step up to the V berth, where the speed and depth thru hulls are.

Interesting, that's actually a better configuration as long as it isn't in front of the transducer. It keeps the sink drain that also functions as the head raw water pickup from the wast outlet. Less likely to suck waste back in while you're flushing which is a very good thing.
 

peaman

Sustaining Member
20241204_174529.jpg
Nick, it looks like a size difference between the PB and PEX tubing. My PB tubing matches 3/8" PEX tubing. Did you use 1/2" PEX for your new tubing?
 

nukey99

Member I
Here is an update on where we are going with this. Sorry if I'm flooding the airwaves, but I like to keep information flowing for all parties in a forum. You might find this amusing, a company the broker hired to fix the problem came aboard while I was on the boat and looked it and said, " this isn't something we really want to work on, we're going to tell the broker pass". I then spent 30 minutes with those guys and walked them through how it could be done etc. They said, you be there, you guide us and you get the plumbing fittings, we'll do it.

Based on a lot of good advice from this group and expertise that I can leverage, here is the plan. This plan is predicated on the piping being 3/8'th's which it looks like. We are going to cut the sink to shower head lines a 1/2 the way from the bulkhead. The lines which go to the shower, will be spliced with 3/8 PEX tubing with compression crimp connectors. An 8 inch inspection plate will be placed below the shower. We will do the push/pull to get the new tubing up to the shower mixing valve. Shark bit push to connect fitting will be on the mixing valve tubing will be attached there. The entire process is repeated for the second line. 1.5 feet of slack in both lines will be put in place to allow for future work outside the shower walls. On the sink side, 3/8 in couplers will be installed in the new PEX line and the old PB line from the sink. This will be then be locked with crimping rings on the outside of the tubing.

We have that type of plumbing throughout out our house in the PNW, which was constructed in 2018. Our Winnebago Forza also has this type of plumbing.

I see the following advantages. Fittings are in accessible places for inspection and or replacement, the only disturbance to existing cabinetry is the installation of the inspection plate.

If we have success, I will post some photos and updates. If we fail, I shall hide my head in shame.
 

Loren Beach

O34 - Portland, OR
Senior Moderator
Blogs Author
Way back when I replaced 90% of the factory Qest tubing, I went with 3/8" flexible tubing, I reformatted the whole system for barbed fittings with clamps. I knew that 1/2" tubing would provide a bit more flow, but the available tubing -at that time- from the local industrial hose shop was 3/8. This has worked great for over 20 years. It is a rather garish yellow color with fiber reinforcement and rated for 100++ psi and certified safe for humans -- it's used commonly for air hose for positive pressure masks for workers in hazardous spaces. It was a lot cheaper than the usual marine water system hose, but also has an FDA approved liner,
The guys at the shop kinda steered me away from the much-more expensive water system hose. They do a lot of business with the boating community for bilge and exhaust hoses, also... and carry a lot of ss and brass or bronze fittings to adapt lots of things to lots of other things.

Speaking of hiding your head in shame... not much room for that on a small sailboat! :)
 

nukey99

Member I
Way back when I replaced 90% of the factory Qest tubing, I went with 3/8" flexible tubing, I reformatted the whole system for barbed fittings with clamps. I knew that 1/2" tubing would provide a bit more flow, but the available tubing -at that time- from the local industrial hose shop was 3/8. This has worked great for over 20 years. It is a rather garish yellow color with fiber reinforcement and rated for 100++ psi and certified safe for humans -- it's used commonly for air hose for positive pressure masks for workers in hazardous spaces. It was a lot cheaper than the usual marine water system hose, but also has an FDA approved liner,
The guys at the shop kinda steered me away from the much-more expensive water system hose. They do a lot of business with the boating community for bilge and exhaust hoses, also... and carry a lot of ss and brass or bronze fittings to adapt lots of things to lots of other things.

Speaking of hiding your head in shame... not much room for that on a small sailboat! :)
I really like the flexibility of the 3/8 tubing for easy routing and all that. I don't see a need for high water flow on this vessel. I'm really hoping we can close the deal and be the owners soon. We live in what I believe is the perfect place for cruising sailing/island hopping.
 

Nick J

Contributing Partner
Moderator
Blogs Author
Agreed! Bellingham is beautiful. Good luck with the rest of the purchase. If you find yourself in Everett and want to check out another 35-3, send me a message. It's always good to compare experiences and learn from other owners.
 
Top