Somebody liked the idea when it was mentioned this in another thread so this thread is a resource for others to DIY.
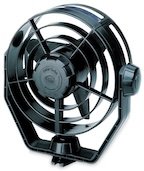
Marinco and others sell a lot of $160 solar powered fans which require a hole in the deck or hatch and there are knock-offs for about a third of that price. While they move enough air to prevent mold, these things look ugly, fail after a year or two, create trip hazards, are potential leaks, and block light.

I've got a small solar panel and when replacing the acrylic in my hatches I decided to go a different route by putting two easily replaceable computer fans in the existing ventilation. A 70mm one is in series with the bilge blower and an 80mm is in the ceiling of the head, both powered by a hot (always powered) bus. The fans draw less than .2 amps each, so the 100 Ah battery can run them essentially forever with even a 1.5W solar panel in a window (0.125A/hr) like this.

Installing the fan in the ceiling of the head was simple since my headliner is down. Trim the hole with a Multimax


Cut off the mounting flange for the downstream side of the fan.

Then sink four #6 screws into the plywood and connect the power. One note to add is that a piece of tape needs to seal the hole around the dorado drain hose because it is open to where the fan is blowing.


Obviously, use the black and red wires, not the yellow which is to report fan speed to some computers that regulate flow. These fans are one-way and not reversible if you reverse polarity on the wires. When I put the liner back up and a trim ring over this, I'll add a small switch. Since the fans are so low powered, they come with what is probably 20 AWG or 22 AWG wire. The white cable seen in the last photo is marine tinned duplex #18, so the red and black are in a common jacket but any tinned wire should do.
btw - This fan has a life of something like 40,000 hours but when it dies like so many electrical doo-dads will on a boat, it cost a whopping $3.49 and will be easily replaced without the hassle of removing and re-sealing a new $160 Marinco. It also could be used without the solar hot bus as just a fan for the head.
The fan in the bilge blower was a bit more involved and expensive, but still not rocket science. Being in the bilge, it also helps with mold prevention, plus helps with engine and fuel smells. It's not certified explosion proof so technically should not be used for a gasoline engine, but then when these die, they just quit without sparks or heat.
Start with two shower drains from Home Depot, Lowes, etc, and cut out the grid:


Use PVC plumbing glue to put the 70mm computer fan in the middle. It's important to let this assembly dry for a few days to let the plastic fuse and harden. It's not an instant connection like when putting plastic pipes into fittings, because there is no mechanical attachment.


Again in the plumbing aisle are these sleeves to attach the assembly to the existing blower fan. My switch for the computer fan is at the nav table.

Hope this helps.
Marinco and others sell a lot of $160 solar powered fans which require a hole in the deck or hatch and there are knock-offs for about a third of that price. While they move enough air to prevent mold, these things look ugly, fail after a year or two, create trip hazards, are potential leaks, and block light.
I've got a small solar panel and when replacing the acrylic in my hatches I decided to go a different route by putting two easily replaceable computer fans in the existing ventilation. A 70mm one is in series with the bilge blower and an 80mm is in the ceiling of the head, both powered by a hot (always powered) bus. The fans draw less than .2 amps each, so the 100 Ah battery can run them essentially forever with even a 1.5W solar panel in a window (0.125A/hr) like this.
Installing the fan in the ceiling of the head was simple since my headliner is down. Trim the hole with a Multimax
Cut off the mounting flange for the downstream side of the fan.
Then sink four #6 screws into the plywood and connect the power. One note to add is that a piece of tape needs to seal the hole around the dorado drain hose because it is open to where the fan is blowing.
Obviously, use the black and red wires, not the yellow which is to report fan speed to some computers that regulate flow. These fans are one-way and not reversible if you reverse polarity on the wires. When I put the liner back up and a trim ring over this, I'll add a small switch. Since the fans are so low powered, they come with what is probably 20 AWG or 22 AWG wire. The white cable seen in the last photo is marine tinned duplex #18, so the red and black are in a common jacket but any tinned wire should do.
btw - This fan has a life of something like 40,000 hours but when it dies like so many electrical doo-dads will on a boat, it cost a whopping $3.49 and will be easily replaced without the hassle of removing and re-sealing a new $160 Marinco. It also could be used without the solar hot bus as just a fan for the head.
The fan in the bilge blower was a bit more involved and expensive, but still not rocket science. Being in the bilge, it also helps with mold prevention, plus helps with engine and fuel smells. It's not certified explosion proof so technically should not be used for a gasoline engine, but then when these die, they just quit without sparks or heat.
Start with two shower drains from Home Depot, Lowes, etc, and cut out the grid:
Use PVC plumbing glue to put the 70mm computer fan in the middle. It's important to let this assembly dry for a few days to let the plastic fuse and harden. It's not an instant connection like when putting plastic pipes into fittings, because there is no mechanical attachment.
Again in the plumbing aisle are these sleeves to attach the assembly to the existing blower fan. My switch for the computer fan is at the nav table.
Hope this helps.
Last edited: