• Untitled Document

    Join us on April 25th, 7pm EDT

    for the CBEC Virtual Meeting

    EY.o April Zoom Meeting

    All EYO members and followers are welcome to join the fun and get to know the people you've met online!

    See the link below for login credentials and join us!

    April Meeting Info

    (dismiss this notice by hitting 'X', upper right)

Coolant Conundrum/Exhaust Riser Replacement [Master Thread]

Kenneth K

1985 32-3, Puget Sound
Blogs Author
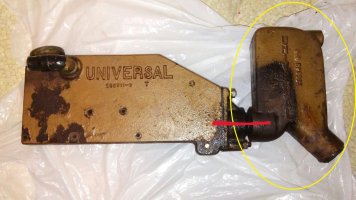
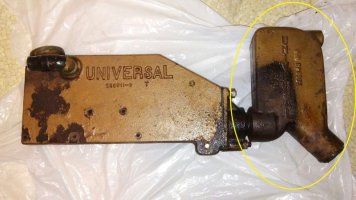
Yeah, your riser setup is interesting. Compare that to what I originally had on my M25.
20170125_223148.jpg
The one-piece Universal riser/elbow unit (circled in yellow) was considered enough "rise" for the raw water injection point.

For some reason on yours, they added a riser pipe below the riser/elbow unit. That's like having a double riser. I know there are some advantages to having the raw water injection point higher, but your set up seems like it would do induce a lot of stress in that lowest pipe fitting that has to hold everything else up.
 
Last edited:

Prairie Schooner

Jeff & Donna, E35-3 purchased 7/21
Yeah, your riser setup is interesting. Compare that to what I originally had on my M25.
View attachment 52560
The one-piece Universal riser/elbow unit (circled in yellow) was considered enough "rise" for the raw water injection point.

For some reason on yours, they added a riser pipe below the riser/elbow unit. That's like having a double riser. I know there are some advantages to having the raw water injection point higher, but your set up seems like it would do induce a lot of stress in that lowest pipe fitting that has to hold everything else up.

It's interesting that you point this out, Ken. I hadn't given it much thought. It's basically like what we got with the boat, but with some history. When I rebedded the strut in 2022 we ended up having a mechanic pull the engine, put in new mounts, reinstall it and align it. With a late start we only had two months with the boat. Heading to our winter yard at the end of the season a lot of commotion in the engine bay announced that the riser pipe had broken. An emergency call got the mechanic to come and repair it. It's possible in the rush he used whatever pipe was handy, longer.
2022_10-22 broken riser pipe sm.JPG

I confess that I have basically considered the engine a necessary evil and not paid more attention than minimum maintenance required. That, and when I hire a professional I'd like to assume it's going to be good to go. (re: the pipe breaking two months after he reinstalled it :() In about 2009 the PO had the top end of the engine rebuilt and at some point he installed the new alternator bracket. It's possible that during those he changed the riser setup from something that looked more like what you had. Comparing the poor photos I have of the previous set up, this pipe does look taller.

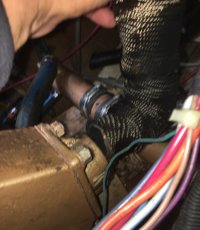
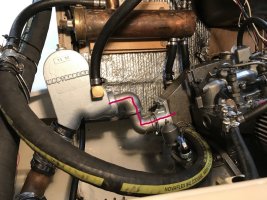
riser 2025_3-30 0815 sm.jpeg
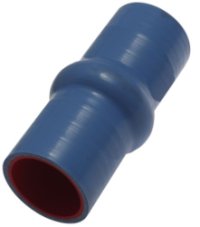
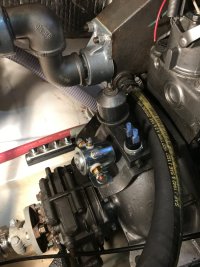
Current configuration. Could this create a problem? Should I get a shorter pipe? Rethink this entirely and isolate it with a hump?
silicone hump.jpg

I'm reluctant to make radical changes. I'll be forever grateful to @klb67pgh for acquainting me with Chesterton's Fence.
What kind of arrangement to you other M25 owners have?
 

bigd14

Contributing Partner
Blogs Author
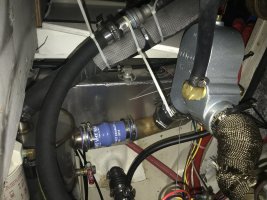
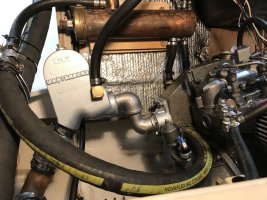
My M18 is the same as the M25 minus one cylinder, here is what I did. So far so good. I should probably brace it to the engine but haven’t gotten round to it.
1744123545651.jpeg
1744123621383.jpeg
 

Prairie Schooner

Jeff & Donna, E35-3 purchased 7/21
My M18 is the same as the M25 minus one cylinder, here is what I did. So far so good. I should probably brace it to the engine but haven’t gotten round to it.
Thanks Doug. I figured I'd seen the extra dogleg going up before. I see what Ken is saying, tho. It goes up to a half-U, then up again to a full one.

While we're at it, I've been meaning to share a link to your HX installation. I'd neglected to pay attention to your riser configuration in this photo. Definitely not as tall as ours. Great looking engine bay.

x BigD HX p23.jpeg
post #23

This is all helpful. Even if I don't do it exactly the same as another, it helps me break out of thinking one specific way. Especially important if our PO made missteps. I wasn't even going to unwrap that elbow, but I probably should. If the mechanic used old parts or mild steel pipe I'll want to change them out. While I'm in there . . . .
 

bigd14

Contributing Partner
Blogs Author
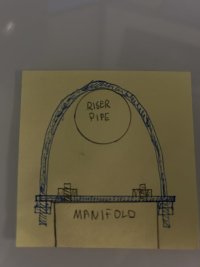
For a brace I am thinking a simple solution could be to bolt a piece of flat bar to the manifold and attach a big U-bolt running around the riser pipe to it to relieve tension on that pipe nipple.


Plan view:
1744125550345.jpeg
 

Prairie Schooner

Jeff & Donna, E35-3 purchased 7/21
For a brace I am thinking a simple solution could be to bolt a piece of flat bar to the manifold and attach a big U-bolt running around the riser pipe to it to relieve tension on that pipe nipple.


Plan view:

That would take some of the gravity pressure off. Maybe that's all it needs.

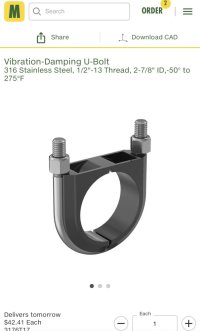
I've been wondering if one of these would be helpful.
2 parts b.jpeg
 

Kenneth K

1985 32-3, Puget Sound
Blogs Author
I wasn't even going to unwrap that elbow, but I probably should. If the mechanic used old parts or mild steel pipe I'll want to change them out. While I'm in there .
Jeff, I'd definitely unwrap that piping to see how he put things together.

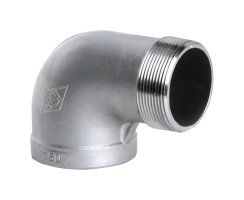
Doug used 90 degree street-elbows for his riser bends:
elbow.jpg
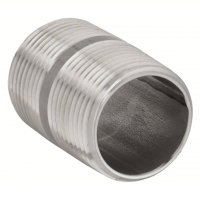
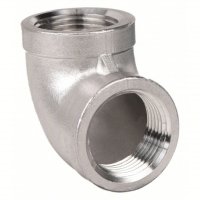
If you don't use street-elbows, you have to use nipple-and-elbow combinations:
nipple.jpg elbow2.jpg
Either way works, but here's the important thing: straight pipe and pipe nipples are available in two different gauges, schedule 40 (thin-walled) and schedule 80 (thick walled). Since your riser pipe broke after only 2 months, my first guess would be that your mechanic used a nipple-and-elbow combination with a schedule 40 (thin-walled) nipple. Just switching to a schedule 80 nipple (or, using a street elbow) may go a long way toward solving you problem. Adding a support bracket would be even better. Also, note that all these pipes and fittings are available in 316 stainless if you go to a plumbing outfitter.

And, I learned something today....

I couldn't figure out why both you and Doug (both with Westerbeke injection elbows) had your elbows elevated with piping, while my Universal injection elbow was mounted directly to my manifold tank, un-elevated. I mistakenly assumed the two elbow units were essentially the same.
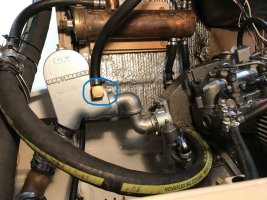
x BigD HX p23.jpeg Versus 20170125_223148.jpg

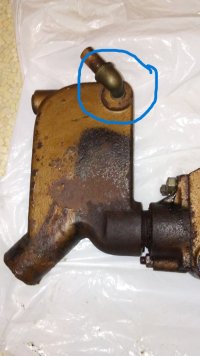
But now I think that's because the Westerbeke elbow injects water at the bottom of the elbow, while the Universal injects it at the top:
x BigD HX p23 (1).jpeg Versus 20170125_222828.jpg

So, the Universal unit had a built-in riser section that allowed Ericson to mount it straight off the back of the manifold. The Westerbeke unit has to be elevated with piping to achieve this same effect--i.e., injecting cooling water at an elevated location.
 
Last edited:

bigd14

Contributing Partner
Blogs Author
. Just switching to a schedule 80 nipple
You know, I just remembered that when I redid the exhaust I first got a schedule 40 nipple and didn’t like how flimsy it was. I switched it for a schedule 80 which was quite robust. I agree with Ken that you probably got a Schedule 40 nipple which failed. It will be interesting to see what you find.
 

bigd14

Contributing Partner
Blogs Author
injecting cooling water at an elevated location
Many years ago I came across a photo of a Westerbeke mixing elbow that was cut open, and the water is injected at the bottom but it travels along a separate channel until it mixes with the exhaust in a downward flow. I couldn’t find that photo but this one of a Yanmar is kind of similar. So for all intents and purposes the water is entering from the top it’s just adding a little extra cooling to the exhaust chamber wall on its way up. I’m not sure that explains why the additional riser pipe was added! It is a lower profile unit than yours though.
1744145497334.jpeg
 
Last edited:

Prairie Schooner

Jeff & Donna, E35-3 purchased 7/21
. . . you probably got a Schedule 40 nipple . . .
I strongly suspect they just put the old pipes back on.

They were going to charge us $900 for the emergency repair. We paid something like $6000 for the original work and I felt something was missed when they reassembled it. I didn't think I should have to pay full freight for the repair. We settled on $450, IIRC.
 

Kenneth K

1985 32-3, Puget Sound
Blogs Author
So for all intents and purposes the water is entering from the top
Yeah, I'd say you're right about that, and that's very good point!

So why would they amount a Universal riser straight to the manifold but elevate the Westerbeke? :rolleyes:
 

Prairie Schooner

Jeff & Donna, E35-3 purchased 7/21
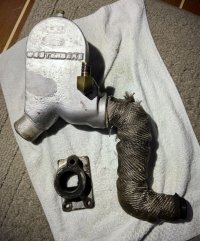
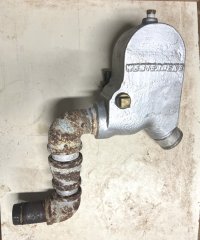
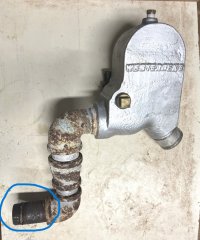
This is what I found under the heat wrap. Most likely this is what we got with the boat in 2021 and the mechanics kept it when reinstalling the parts. It was probably galvanized once upon a time. In their emergency repair described in post #122 I think the only part replaced was the nipple connecting the flange to the elbow.

riser 2025_4-9 29.jpeg

Visits to a marine engine supplier and four plumbing suppliers finally got us the stainless fittings we need. They had to special order schedule 80 nipples.

We decided to replicate the height of the existing setup. Niemiec Marine of New Bedford said the riser should be above waterline, even with an anti-siphon device. Ken discusses this in post #21 of T-fitting in Raw Water Circuit*. I gather that either riser high or anti-siphon is okay, but decided to stick with belt and suspender. There is room in the bay and I'm planning to brace it anyway.
* https://ericsonyachts.org/ie/threads/t-fitting-in-raw-water-circuit.21064/post-169668


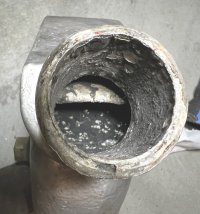
The actual exhaust riser (aka mixing elbow?) seems in good shape. Below is a look inside the exit port of the riser. I assume the space above that horizontal web is where the water finally enters the exhaust stream. That would have the water wrap almost the full loop in its own chamber, cooling things down. It would take a fascinating mold core for the foundry to get such a complex casting in one piece.

riser 2025_4-9 35.jpeg
 

Kenneth K

1985 32-3, Puget Sound
Blogs Author
This is what I found under the heat wrap...... It was probably galvanized once upon a time.
I'm glad you wet with stainless. I've read more than once that galvanized pipe should not be used in the exhaust system. Apparently, if gives off hazardous fumes when heated. Lucky for you, it looks like it's pretty old, so hopefully most of the bad stuff was burned off before you got it.

Maybe you should ask Niemiec Marine what they think about shortening up that first nipple that screws into the manifold flange. I think you should go shorter. I can't see what's gained by a longer nipple. The longer the nipple, the more torque it produces from the weight and vibration of the rest of the assembly. (You could also use a street elbow, like Doug did, but that gives you one less degree-of-freedom when tightening and aligning the parts).
riser 2025_4-9 29.jpeg

The actual exhaust riser (aka mixing elbow?) seems in good shape. Below is a look inside the exit port of the riser.
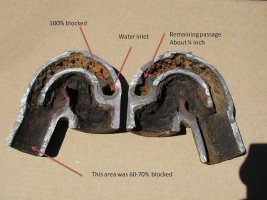
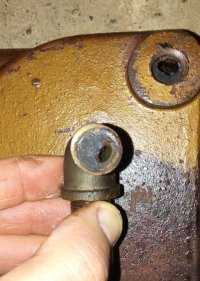
Jeff, I hate to add to your project list, but, while you have this thing mostly apart..... I'd recommend removing the bronze fitting where water is injected into Westerbeke unit. The injection point is where the "rubber hits the road" (cold, salty water hits hot metal). This is where most of the scale build-up and clogging occurs.
20170203_213828.jpg
 

Prairie Schooner

Jeff & Donna, E35-3 purchased 7/21
The extra stainless parts came in today. I decided to stick with the height. It adds some extra anti-siphon qualities (in my current understanding) and I was going to build a brace anyway. The schedule 40 fittings looked plenty strong to me but we special ordered the sched 80 nipples.

Riser 2025_4-17 1001.jpeg
 
Top