Yeah, you could argue that if it's stiff enough, or wire reinforced hose, it's not going to fold over, but it's still cheap insurance.Great idea Ken. They are Marelon elbows, but that's still a good precaution.
-
Untitled Document Join us on April 25th, 7pm EDT
for the CBEC Virtual Meeting
EY.o April Zoom Meeting
All EYO members and followers are welcome to join the fun and get to know the people you've met online!
See the link below for login credentials and join us!
(dismiss this notice by hitting 'X', upper right)
You are using an out of date browser. It may not display this or other websites correctly.
You should upgrade or use an alternative browser.
You should upgrade or use an alternative browser.
Coolant Conundrum/Exhaust Riser Replacement [Master Thread]
- Thread starter Prairie Schooner
- Start date
Prairie Schooner
Jeff & Donna, E35-3 purchased 7/21
. . .
I use a plastic Shur-flow, so I'm not against non-bronze strainers. Mine is located just above the waterline. But, if attaching hoses to plastic hose barbs, just remember that the plastic is the weakest link in the hose-clamp/hose/barb connection. If the plastic barb cracks or deforms and allows the hose to come loose, the upper hose end may still be able to drop/droop below the waterline. So, sometimes I'll safety safety-wire a hose into its elevated position when I attach it to plastic, i.e.,
. . .
I've never heard a convincing argument for the bronze strainers. I mean, they look really cool, Jules Verne Nautilus-y but the bowl is polycarbonate so by the 'weakest link' principle, they're still plastic. And they introduce another metal part into the galvanic action sweepstakes. But, I am open to be convinced otherwise.
Thanks Ken, I'll do some sort of hose anchor like you suggest. We do winterize every year, but it's never really been a hassle to disconnect a hose and stick it in a bucket. I'll reread your description, though. I could be missing something.
Prairie Schooner
Jeff & Donna, E35-3 purchased 7/21
Connecting some dots today and I realized that the ShurFlo threads appear to all be tapered whereas many (all?) of the Marelon threads are strait. On Defender's site there is a warning to that effect which pops up when I go to a Marelon strainer. I didn't look at all of both company's offerings, but it's something to be aware of.Great idea Ken. They are Marelon elbows, but that's still a good precaution.
Marelon offers some clear elbows which are pretty cool if they have the same strength as the black.
Prairie Schooner
Jeff & Donna, E35-3 purchased 7/21

Having some concern about the integrity of the water heater I made a pressure tester. A bike pump connected to a Schrader valve stem is used to pressurize it. A 30 lb. gauge was used to be able to see even a small drop and to keep me from pumping it up too much. I only went to 15 psi.

The coolant loop was all I tested, but thankfully, the pressure held.
Testers with radiator caps are made, and apparently some auto supply stores will rent them. But I couldn't figure out how to test the WH with one of those. It took some doing to make this unit airtight. ~ Out of curiosity, I just looked a little deeper online and found kits that I could have made work. And they are cheaper than I spent in materials. But, it was kind of a fun project. If anyone in driving distance wants to borrow it, let me know.

That looks like the model we installed over 25 years ago or so. Good quality item, imho.Groco ARG-500 raw water strainer in my boat,
Prairie Schooner
Jeff & Donna, E35-3 purchased 7/21

@Nick J @dhill Thanks for the input. - The Vetus 140 would fit in our engine compartment space and I'd gain about 12" of vertical height. The product specs list maximum ambient temperature at 167ºF. I was a little worried that sustained high temperatures might degrade the plastic over time, but realized whenever the engine is running, cool water will be going through the strainer. I'm leaning toward the engine compartment. Likely I'll move the fuel lift pump forward a little and clean up the installation on that overflow reservoir, potable water filter, etc. It's kind of a rat's nest. . . . While I'm in there . . .
Over breakfast today a friend was telling me about his current project - replacing a raw water impeller. The one he took out had little nubs/half blades where the rubber blades used to be and only one blade was still complete. He admitted that he had ignored this pump for several years.
He was looking for lost blades and found very few in the heat exchanged tubes and none in the hoses. He did finally find a bunch of rubber blade bits in the bronze L that was screwed into the outlet side of the pump. Until then he'd been mystified about where all of them could have gone to. He suspects that some small bits went overboard in the exhaust stream. (?)
He was looking for lost blades and found very few in the heat exchanged tubes and none in the hoses. He did finally find a bunch of rubber blade bits in the bronze L that was screwed into the outlet side of the pump. Until then he'd been mystified about where all of them could have gone to. He suspects that some small bits went overboard in the exhaust stream. (?)
Angel D.
Member II
That's some fine engineering Jeff , many times we need to make our own tools. You earn yourself a Pepsi Cola !View attachment 52491
Having some concern about the integrity of the water heater I made a pressure tester. A bike pump connected to a Schrader valve stem is used to pressurize it. A 30 lb. gauge was used to be able to see even a small drop and to keep me from pumping it up too much. I only went to 15 psi.
View attachment 52492
The coolant loop was all I tested, but thankfully, the pressure held.
Testers with radiator caps are made, and apparently some auto supply stores will rent them. But I couldn't figure out how to test the WH with one of those. It took some doing to make this unit airtight. ~ Out of curiosity, I just looked a little deeper online and found kits that I could have made work. And they are cheaper than I spent in materials. But, it was kind of a fun project. If anyone in driving distance wants to borrow it, let me know.
Prairie Schooner
Jeff & Donna, E35-3 purchased 7/21
Testing the thermostat showed it to open at about 160º-165º F. I'd never done this before and sort of expected it to snap open and closed. It was a much more gradual transition, but clear with a couple repetitions.

Online references seem to indicate closer to 180º is preferred for 'indirectly' cooled engines (raw water through a heat exchanger).
One such:
- https://saltwaterdiesels.com/diesel-school-thermostats/
Should I change it out for the next temp up?
Online references seem to indicate closer to 180º is preferred for 'indirectly' cooled engines (raw water through a heat exchanger).
One such:
- https://saltwaterdiesels.com/diesel-school-thermostats/
Should I change it out for the next temp up?


Prairie Schooner
Jeff & Donna, E35-3 purchased 7/21
The cooling and exhaust systems on our boats are so interconnected that working on one almost inevitably leads to work on the other. The following links have been important lodestars thus far.
Master link for Heat Exchanger issues:
 ericsonyachts.org
Christian's usual excellent documentation on his 2020 replacement of the cooling hoses on his E381 is linked in post #20 here.
Ken starts out with the alternator bracket, but it spreads out into the exhaust and cooling system with a great account, to our benefit.
 ericsonyachts.org
 ericsonyachts.org
There are a bunch more that I'll link later in this thread.
The boat has a petcock inline for the coolant connected to the water heater.

The Ericson/Universal literature says this is to bleed the system.

Re-reading of the conversation about the accumulation tank between Ken, Steven (Peaman), and others earlier in this thread, it seems like this would make more sense higher in the system and someplace easier to get to. Christian put one in, post #2 of his 2020 project. Or maybe just rely on the release on the thermostat housing. As I replace the hoses, do I really need to keep this WH bleeder? Any thoughts?

Some folks have re-routed the water heater, heat exchanger, etc. for a different flow pattern. I'm still trying to wrap my head around that.
Master link for Heat Exchanger issues:
Dreaded Universal 5432 running hot syndrome [Master Thread]
Hello All, I never motor very far, maybe a half hour or so at a time so I never really work the Universal 5432 in my E38 very hard or long. Well, I had to motor for about 1.5hrs on Monday to get where I was going and the engine ran pretty hot. Normally I don't run much above 2200rpm as I don't...
Christian's usual excellent documentation on his 2020 replacement of the cooling hoses on his E381 is linked in post #20 here.
Ken starts out with the alternator bracket, but it spreads out into the exhaust and cooling system with a great account, to our benefit.
E32-3 - Mariah Part I: Alternator Bracket Replacement, Exhaust Riser Rebuild and More........
The beginnings of this project came out of this post: http://c34.org/bbs/index.php?topic=5078.0 (a Catalina 34 forum, but applicable to Universal M25/25XP engines) This post helped me realized that my hoped-for, turn-key, Ericson...
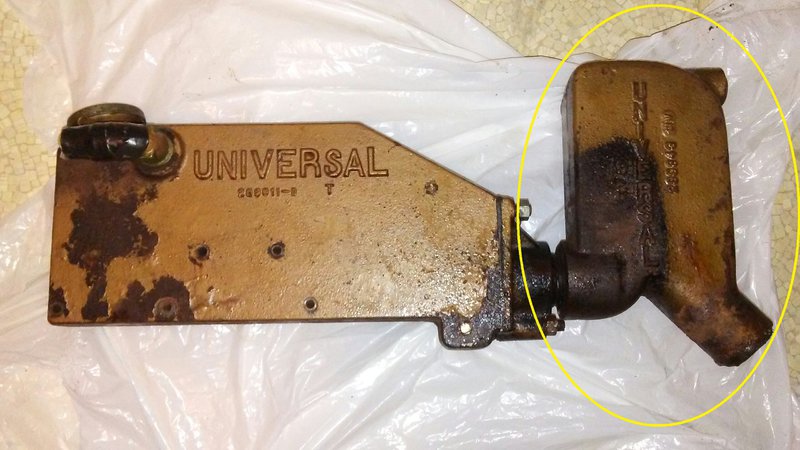
E32-3 - Mariah Part II: Exhaust Riser/Elbow Replacement with Support Bracket
As I mentioned in the previous post, I was unable to remove the bottom flange nut that held the exhaust flange on to the exhaust manifold. It wasn’t simply a case of the nut being frozen on the stud; there just wasn’t enough physical clearance...
There are a bunch more that I'll link later in this thread.
The boat has a petcock inline for the coolant connected to the water heater.
The Ericson/Universal literature says this is to bleed the system.
Re-reading of the conversation about the accumulation tank between Ken, Steven (Peaman), and others earlier in this thread, it seems like this would make more sense higher in the system and someplace easier to get to. Christian put one in, post #2 of his 2020 project. Or maybe just rely on the release on the thermostat housing. As I replace the hoses, do I really need to keep this WH bleeder? Any thoughts?
Some folks have re-routed the water heater, heat exchanger, etc. for a different flow pattern. I'm still trying to wrap my head around that.
In my world the manifold tank is highest in the system, and all air bleeds there, immediately. The air release valve I put in the water heater lines, which on my rig do rise above the manifold tank, was apparently unnecessary. So if the manifold tank cap is highest, I think we could reply on that, and see what happens. Can always add additional air bleeds later.
I don't know what the argument is for water heater coolant lines attached to the thermostat bypass, versus attached to the heat exchanger. My 32-3 came plumbed that way, and I switched to that just to simply my system. But what is the argument for thermostat bypass connection?
The Ericson diagram is very nice, but refers to hot water heaters. It seems to me that if you already have hot water, you don't need a hot water heater to heat the hot water up even more. All I have is a water heater, and it works fine.
I believe that the everyday usage of the term, at least in the US, refers to the heat exchanging coil inside your hot water tank. (In the UK these tanks are called calorifiers.) Same idea, tho - using the coolant line from the engine to transfer heat into your tank for you to enjoy hot water at your taps. Or have I misunderstood the question again?The Ericson diagram is very nice, but refers to hot water heaters.
")
Prairie Schooner
Jeff & Donna, E35-3 purchased 7/21
Hot Water Heater: One of the earliest memes I remember delighting in, long before the term had been coined, was the sign that read, "Help Stamp Out And Abolish Redundancy".
We got the new 3" exchanger in from Mr. Cool. I was so absurdly impressed with the quality of the exchanger and its packaging that I fell down the iMovie rabbit hole. Film editing is not as much fun as sailing, but can be more fun than working on the boat.* The actual video is pretty stupid. I recommend you don't watch it. Seriously, you will want your minute and thirty-nine seconds back.
* My typical process for big projects with new puzzles involves a dance of furious procrastination and copious research with fits and starts of work until it gains it's own momentum. It's painful to watch but after almost seventy years I am resigned that 'this is the way'.
Nice! I like the dual end-caps. The originals only had one removable end. Now that you have it removed from the engine, and you're likely replacing all the hoses anyway, there's no reason to think you have to re-install it in the same location. If you can find a sidewall with some open space, that might allow easier access for zinc and end-cap removals. Video had me laughing.....
Prairie Schooner
Jeff & Donna, E35-3 purchased 7/21
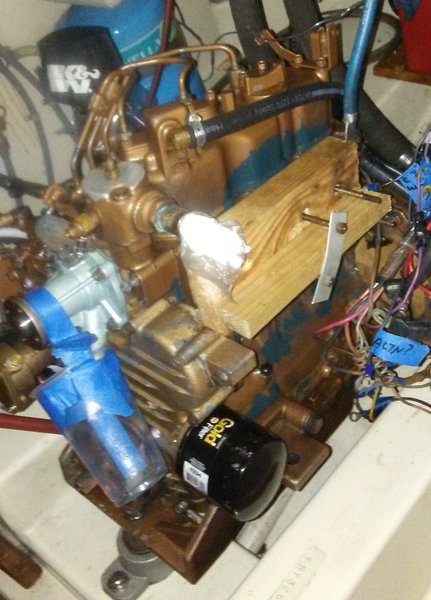
Huh. Your comment comes at a very good point Ken. I'd been in the process of trying to devise a way to make a structure that would combine a version of the original HX mount with a support for the riser. The old exchanger was mounted to the bell housing. I confirmed that the bell is, as you suggested, aluminum. I'm going to look at the space again, set free from the notion that the HX needs to be mounted as it was. The 3" HX is definitely heavier than the original.Nice! I like the dual end-caps. The originals only had one removable end. Now that you have it removed from the engine, and you're likely replacing all the hoses anyway, there's no reason to think you have to re-install it in the same location. If you can find a sidewall with some open space, that might allow easier access for zinc and end-cap removals. Video had me laughing.....


Another nice feature of the new exchanger is a larger diameter zinc. This with the nail polish trick and routine replacement should reduce the incidence of broken zincs.
Yeah, I think we talked about the problem with attaching the riser bracket to the aluminum bell housing. Too much weight, moment-arm and vibration. The heat exchanger is fine mounted to the housing because it sits so low.
And looking at it, have you considered an L bracket attached to the top two manifold flanges bolts? Those three flange bolts already support the full weight of the riser, so adding a bracket isn't adding any more stress to the bolts or the flange--it's just relieving the stress on the 1-1/4 pipe.

And looking at it, have you considered an L bracket attached to the top two manifold flanges bolts? Those three flange bolts already support the full weight of the riser, so adding a bracket isn't adding any more stress to the bolts or the flange--it's just relieving the stress on the 1-1/4 pipe.
Prairie Schooner
Jeff & Donna, E35-3 purchased 7/21
HW Tanks higher due to the narrowing of the stern sections of his designs?
I thought Loren's theory made sense. But then Vim, a 32-3, has an accumulator tank, and on that model the water heater typically sits much lower than the manifold cap.
View attachment 51608
And Jeff, in terms of world domination, the Royal Fiat of moderators here is more like a Royal Yugo.
Expansion/Accumlation Tank . v . Manifold Coolant Tank . v . Overflow Tank
An old thread turned up on this subject. In it some people seem to use the term heat exchanger when they are really talking about the Manifold Coolant Tank. The general conclusion seems to be what we've hashed through earlier in this thread. I place the link here just to connect threads.
Hot water expansion tank? something else? necessary?
I have removed the hot water heater from the system. There"s a square tank that seems to me to be an expansion tank in the water circuit on the motor, I would suspect as part of the hot water system in the circuit. I am thinking of removing it also and would like to see what you guys think...
Last edited:
Prairie Schooner
Jeff & Donna, E35-3 purchased 7/21
Great idea, Ken. I plan to go to the boat tomorrow and will mock that up. I'm thinking of putting a wood shelf athwartships for the HX.Yeah, I think we talked about the problem with attaching the riser bracket to the aluminum bell housing. Too much weight, moment-arm and vibration. The heat exchanger is fine mounted to the housing because it sits so low.
And looking at it, have you considered an L bracket attached to the top two manifold flanges bolts? Those three flange bolts already support the full weight of the riser, so adding a bracket isn't adding any more stress to the bolts or the flange--it's just relieving the stress on the 1-1/4 pipe.
View attachment 52558
re: Thermostat: Looking at several sites online and calling Niemiec Marine in New Bedford (MA) I find all that's readily available is the 160º. I suppose I could look around and find a 180º that would fit, but at this point I'm thinking to stick with what was done in the past. An Aqualarm will be installed with the system.