E27 transom cutout

pcb don

Member II
My E27 has an atomic 4 with a solid transom. I'm considering cutting out the transom as some with outboards have.I'm considering this to have a walk through to the dingy as opose to climing over the transom. The question then is what needs to be done to compensate for strucual integredy if in fact there is any. Does anyone know the difference between the transoms?
Thanks
Don
 

pcb don

Member II
Come on guys what about inovation? Some E27's were built this way for racing, so the what I need to find out is what the transom looks like inside. Simply wood backing which would sugest it's not a strucual issue or if metal was incorperated to provide the needed support.
 
Innovation

The guys who have responded, me included, have said, "Don't do it." It isn't about innovation as much as changing the aesthetics of your yacht. You have, I fear, tunnel vision on this project. It would appear to be a massive project just so as you would be able to more conveniently access your dinghy. Why not put a swim platform on the back, if you are going to that much trouble and expense, gain water line length and make your boat faster? This is NOT some weekend project.
 

pcb don

Member II
Morgan,
Not a weekend project but a 3 year project. Took an early retirement from carpentry and have essentialy rebuilt the boat. All new electrical incl. wireing, guages,electronics, windlass ,led's on all interial and exterior lights, new plumbing, incl.pump, transom shower, head, 41 gl. water and 9 gl. holding tanks. Interior wood removed, sanded, planed, reveneered, many new pieces and additions, wet sanded interior as well as new cushions. A4 updated and new valve springs. Bottom down to FG with 40 plus blisters, moved raw water intake thruhall, used Sea Hawk paint ,(I clean the bottom myself). Removed everything from the exterior, repainted with awl grip, incl. the mast, (the actuall spraying is the only thing I didn't do myself). Reused the original railings and stantions (with repairs), new cleats(6), selftailing winches, moved old winches to cabin top for solo sailing. All halards run internally thru the mast and all lines incl. vang,traveler,mainsheet, run to the cockpit for solo sailing. New sails, bimimi, dodger, all kinds of money.... And more to come.
So it has been a project,seems as tho I'm working more now than when I was being paid.
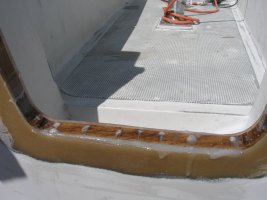
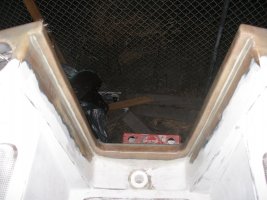
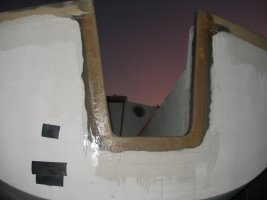
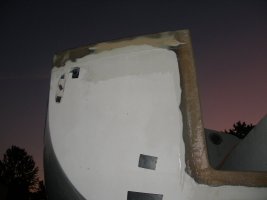
I've sent a few messages to members in hope of learning whether metal support was used in factory cutouts (it seems to me that this would be the case) or if the voids were filled with wood and FG, suggesting liitle or no structural issues. If I don't recieve a clear answer I'll incorperate metal, FG it and finish it of in teak.
Don
 

AleksT

Member III
I cut my transom out. my inboard was not economically fixable so I cut out a space for an outboard. Inside the cavity was some plywood that was being used as a spacer. (there were actually two pieces that were not touching in the middle athwartships) I was able to make the cutout with a handsaw in under an hour. I filled a few gaps in the lower part of the remaining part of the transom (where the outboard clamps on) with thin pieces of plywood and epoxy, then capped the opening with oak that I epoxied into place.
Other than curing time for the epoxy it was a weekend project.
 

bigd14

Contributing Partner
Blogs Author
Here are some photos of how I rebuilt my transom. It was actually pretty easy. As AleksT said, the inside of the transom was simply some one-inch plywood glassed in place (not very securely I might add). There was no metal anywhere. I cut some one-inch white oak to fit and glassed it in, then faired it smooth. I had to make a bunch of relief cuts so the oak would bend to match the transom contour. A lot of grinding and sanding inside and out though. I also added a couple layers of biaxial fabric on the inside to beef up the area between the hull and the cutout (although there was no flex at all in the first place). It seems pretty rock solid right now.
 

Attachments

  • P7190005.jpg
    P7190005.jpg
    81.5 KB · Views: 71
  • P7310005.jpg
    P7310005.jpg
    92.6 KB · Views: 98
  • P7310008.jpg
    P7310008.jpg
    44.9 KB · Views: 66
  • P7310009.jpg
    P7310009.jpg
    40.4 KB · Views: 79
  • P8270005.jpg
    P8270005.jpg
    53.6 KB · Views: 94
Last edited:
Top