E29 Spinnaker Rigging - Help :o

toddster

Curator of Broken Parts
Blogs Author
I was skimming through craigslist (dangerous, dangerous) and came across a decent symmetrical spinnaker that was the right size for my boat, and the price was right. In the distant past, the boat was raced extensively and came with all sorts of hardware remnants and a spinnaker pole. So now I'm trying to decipher how it was once rigged, how it should be rigged, and what more parts I need to buy (or remove.)

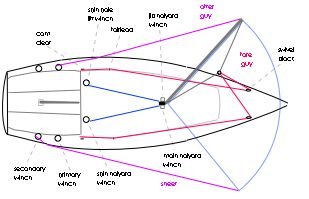
The attached diagram shows the approximate location of relevant hardware and my current interpretation. The boat did not come with a reaching strut, but there are brackets on the mast for one. (I had planned to order a new asymmetric next year, for reaching situations. But conditions are fluid.)

First question: Part A. I see some rigging diagrams show separate lines to each clew for after-guys and sheets. Others show just one. Why would I want to complicate things in this way?

Part B. Say I used the genoa sheets as after-guys, running them through their regular blocks on the genoa track (runs along the rail) to the primary winches. Would this eliminate the need for a reaching strut?

Second question: All of the diagrams I've seen show a single swivel block for the foreguy near the bow. Mine has one on each side, slightly aft of the bow, with a fairlead and a cam-cleat attached to the side of the cabin on each side. A faded label by each cleat says "foreguy." (I previously used one of them to run a down-f**ker to the jib, before I got roller-furling.) Why would they complicate things in this way? Does this mean that there is a "lazy foreguy?" There was apparently no provision for using winches on the foreguys previously. How much force does it take?

Man, this seems like a lot of strings dangling around. The next problem would be how on earth to gybe all that stuff. Obviously I want to keep the rigging as simple as possible.
spin riggin 1.jpg
 
Last edited:

Loren Beach

O34 - Portland, OR
Senior Moderator
Blogs Author
Truly, there are several "right" answers...
:nerd:

Your boat is small enough that in most light and medium air conditions it could be rigged out "small boat style".

While a true Foreguy has some advantages, there's much to like about a simpler Down Haul line -- line clipped to ring on bridle and led back to base of mast and from there down the cabin top to a cleat. That way the pole can be trimmed with the guy and rotate forward or aft in the same plane. With a true foreguy, you can "lock" the pole in place with pressure from the guy, but you also have to adjust that foreguy every time you change the guy position.

Our 34 footer has a fore guy with a two to one purchase and a guy line down each side of the cabin to the front of the cockpit. Our prior 26 footer was rigged with the simpler down haul line. Our smaller boat pole had self-latching ends and the current boat came with the even-nicer trigger ends.

Having extra sheets/guys (i.e. lazy sheets) is good for big winds when you want/need to do a dip pole jibe. For our lighter winds we rely on the end-for-end jibe, and the foredeck person has to be rather careful to keep control of that pole! :rolleyes:

Of course if we can spare a potential lost knot of speed in strong winds, we would just pole out the jib anyway.

The 29 is big enough for either solution, IMHO, and it will be interesting to see what other owners with similar-size foretriangles are doing.

One other bit of trivia, since you posted a common spinn rigging drawing: many owners have found that the correct turning point for those heavy aft spinnaker sheet/guy turning blocks is forward a ways from the edge of the transom. This will depend on how your chute luff "breaks" and it's cut and type of shape.
For out boat, the blocks go up by the secondaries or a bit more forward, for instance.
On our prior fractional-rig boat the blocks went forward of the primaries a bit.

Cheers,
Loren
 

toddster

Curator of Broken Parts
Blogs Author
Thanks Loren. I don't understand this part:

Our 34 footer has a fore guy with a two to one purchase and a guy line down each side of the cabin to the front of the cockpit. Our prior 26 footer was rigged with the simpler down haul line. Our smaller boat pole had self-latching ends and the current boat came with the even-nicer trigger ends.


The guy lines run down both sides of the cabin and attach to... some kind of block on the pole? Do they both go to the same point? I was imagining that one would go to each end of the pole. Or maybe the unused one is just clipped to the pulpit or something. :confused: I'm clueless here.

The diagram isn't intended to be accurate - I just traced off the deck plan of the boat and pasted things in at their relative locations. All of the turning blocks aft are on the genoa track, which runs all the way to the back of the cockpit. There are some bits of tape marking some of someone's favorite car positions. Several owners past, I suppose.

I'm afraid that I just heaved the pole up on the lumber rack when I was painting and neglected it since then. Edit: Oh, it's not too bad. There is only an upper bridle, no lower bridle. The ends are latched by little pistons that retract when you pull on a cable that runs down each side of the pole. The deck chocks were rotted, so I threw them in the trash. Will have to replace them with something. I notice that most people on my dock keep their poles clipped into the rigging in one way or another. Not many deck chocks in use. Having the pole on the side-deck did make going forward rather difficult, but it seemed secure there.
 
Last edited:

Loren Beach

O34 - Portland, OR
Senior Moderator
Blogs Author
More about the Fore Guy

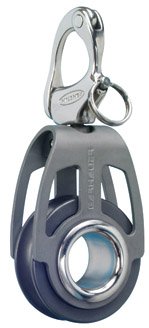
On our boat the fore guy is lead through a single block that has a snap shackle on it to clip onto the ring on the pole bridle.
I will post a photo of a similar block.

Those line ends are lead back down both sides of the cabin to cam cleats on each side of the rear of the cabin at the front of the cockpit. That way you have a two part purchase and can tend the fore guy from either side of the cockpit.
Here is a link with the starboard aft cam cleat shown on a picture.
http://www.ericsonyachts.org/infoexchange/blog.php?28-quot-Fresh-Air-quot/page2

Regards,
Loren
 

Attachments

  • 25-15 UAG.jpg
    25-15 UAG.jpg
    43.2 KB · Views: 2,675

toddster

Curator of Broken Parts
Blogs Author
OK, I get it now. Thanks. Google pics for "fore guy" mostly bring up pictures of golf or "family guy" cartoons. :rolleyes: Those cam-cleats and fairleads are just what I have, except mine go over the windows. Looks like yours have a better angle for pulling on.

I found some videos from forsespar on youtube, but they rush over the critical part in a tenth of a second, or it's just off-camera. It looks like they're tying the foreguy in to the end fitting. My pole is a forespar- just like the one in the video, except scuffed and aged.

OK, the setup that you are describing is shown briefly in the introduction to Part V of the videos.
 
Last edited:

Bill Sanborn

Member III
E29 Spinnaker Rigging

Unless you are planning to race and have several crew, I would keep it simple.

I have a block in the middle of the foredeck for a downhaul/foreguy that hooks to a bridle on the bottom of the pole and runs back to the cabin top. My topping lift clips to the middle of the top of the pole and also goes to the cabin top. Use end-for-end to jibe. If you are not racing just take it down if the wind picks up.

Are both ends of your pole the same. They need to be to end-for-end jibe.

I use only spin sheets, 5/16 with shackles. They sheet thru snatch blocks mounted about in the middle of the coaming. They don't need to be all the way back on the quarter because when in use they will ride on the underside of the boom. My sheets are long so that when taking down I just release the windward and let it run. This also makes it easier to rerig after takedown. While the spin halyard is in the cockpit from the takedown just clip the spin sheets to the halyard and use the old windward sheet to pull everything back to the bow.

Haven't needed a reaching strut. Can go nearly as fast with a large genoa.

Launch from a turtle on the bow. Take down by pulling in under the main and stuffing down the hatch.

No problems handling with 1 mediocre crew.
 

toddster

Curator of Broken Parts
Blogs Author
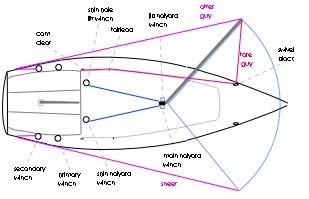
So maybe something more like this:
spin riggin 2.jpg
Those blocks on the genoa track can move up and down as needed. I wouldn't necessarily want to re-thread the sheets after every jibe. My little brain says, that's probably the difference between the two boats shown in the videos referenced above. One is rigged to set out across the ocean and probably they're not planning to jibe until maybe, next Thursday. The other is set up to jibe frequently.
 

Bill Sanborn

Member III
You can replace the two block near the bow with one in the middle of the foredeck which also gives you one less line to clutter up the cockpit.

I don't see a topping lift for the pole in the diagram. By connecting the topping lift to the middle of the pole you have fewer thing to get tangled up when handling the pole.

The reason the spin sheets are long is so you don't have to rethread them.
 

windjunkee

Member III
My two cents,

With a 29 footer, I would just run one line from each clew and use them alternately as a sheet and a guy. With strong pressure, it makes the gybes more challenging, but its not hard to fly the chute ddw without the pole while you're messing with making the transition. I presume you have an end for end set up? Thats what we have on VOR, but the other boats I race on are dip pole set ups.

Other than that, your foreguy set up is interesting but I like it. We have the attachment point midships closer to the bow.

Have fun with it.

Jim McCone
Voice of Reason, E-32 Hull #134
Redondo Beach, CA
 

toddster

Curator of Broken Parts
Blogs Author
Thanks guys.
The business-end of the topping lift is not shown because I didn't try to draw the mast in the diagram. It is one of the blue lines going to the cabin-top winches. I'll have to replace that line too... apparently the coiled-ends of the halyards were all moldy, so the PO just cut them off and threw them away - didn't whip the resulting ends either. So now they're all a bit short... Also I'll have to go aloft to replace the spin halyard and a few other chores up there that I've been putting off.

I should go up this week while the weather is still nice! Last time I did it in the rain in foulies, which was a drag.

Darn. I've been using the stbd secondary winch to park the roller-furler line. I'll have to add a cam-cleat or something for that too now.
 
Last edited:

toddster

Curator of Broken Parts
Blogs Author
Dawn slowly breaking... I gather that the reason for the elaborate fore-guy set-up is that - assuming one uses a primary winch for the after-guy - the fore-guy and after-guy controls are right together, no matter which tack you are on. As per Loren's comment above, that should make handling them both at the same time easier.

Also I'm still hoping to squeeze a windlass onto that foredeck. Running out of real estate in the middle there !
 
Last edited:

Steve A

Member II
spin set up

I singlehand my 32 w/ chute a bit. I have the halyard run aft w/ the turning block set out from the mast a few inches and an open jam cleat mounted on the mast. I hoist it from the mast (so I can see it)and set the halyard in the jam and then take up the slack from the cockpit(once i've got it trimmed right) so I can drop it easily.
I use a single foreguy. I have my pole and strut mounted on the lifelines to keep the deck clear ( and I don't have to bend over as far to get them).555a.jpg
 

toddster

Curator of Broken Parts
Blogs Author
Wow, I just looked at the price of new deck chocks. :0 I'm pretty sure I could make those in the shop for about two bucks in about an hour. Or maybe I'll just re-purpose the reaching strut brackets to make a mast-mount system.

Does anybody actually use a reaching strut? The manual claims that one came with the boat... I don't foresee doing a lot of reaching with this sail. But I could watch ebay for one if needed.

Also tried to draw the mast in to the diagram, but there's no way it works with that perspective. (The black box is the top of the mast.) And drawing the sail outline would become a lot harder too. We may assume that the topping lift is shown but obscured by the spinnaker pole!
 

Loren Beach

O34 - Portland, OR
Senior Moderator
Blogs Author
Strictly in the "for what it's worth" dept...

On my prior boat I kept the spinn. pole off the side deck with some "rings" I bent up out of 3/16" ss rod. I bent it into a D shape and fastened that D (about 3" across) to a stanchion, just above the base. I used an ss hose clamp. One end of the pole was clipped in to one at a stanchion and the other end - through sheer luck - could clip into another D-shaped holder at the rear upright of the bow pulpit. Pole was secure and off the deck surface, leaving a bit more walking room. Of course doing that required the good luck to have both ends of the pole close enough to the stanchion and pulpit tubing.

Random solutions, submitted randomly!
:)

Loren
 

windjunkee

Member III
We use a reaching strut if we're on long tacks with the pole close to the headstay. I've just seen too much pressure on the stanchion when we don't use it. That said, now with our reaching chutes primarily assymetrical, that problem has largely been resolved.

Jim McCone
Voice of Reason, E-32-2 Hull #134
Redondo Beach, CA
 

Bill Sanborn

Member III
Pole Storage

I store my spinnaker pole vertically on the forward edge of the mast. Leaves deck clear for windless and sails etc. I don't have roller furling.

I added what I think is a reaching strut eye above the spinnaker car track to hold the upper end of the pole when storing and use the pole car to hold the bottom end. There some disadvantages.
-More weight aloft
-When the pole is used the car on the pole track must be "turned over" so the pole end fitting doesn't hit the car adjustment fitting. By not having a stop on the
bottom end of the track this can be done fairly easily.
-Connecting the upper end of the pole to the top fitting can be "interesting" if the boat is moving much.
 
Top