klb67pgh
Member III
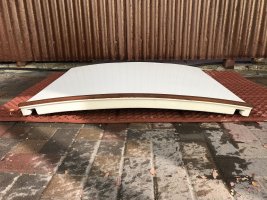
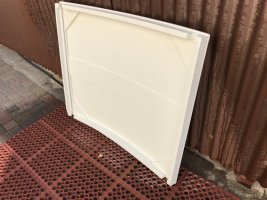
The original teak companionway sliding hatch for my E25 was badly damaged and delaminated beyond repair (but I have what is left of it). I was fortunate enough to acquire the hatch from campuscab's E25 - I recall it was a 73 or 74. It has some damage but I think it is very usable.
The new to me hatch is missing the fore end of the hatch. There is just a bit of the wood still attached to the hatch that I'll need to remove. I started to clean up the joints on each side to see what I was working with. The primary obstacle I have is there are stainless screws protruding through the plywood hatch that would have gone into the fore end, but there are no bungs at all in this hatch. Would the hatch have been constructed and then a final teak veneer applied to the top of the hatch? That's the only way I can figure out how those screws were located there. Can anyone confirm my findings? My hatch from my '78 E25 was constructed differently with a base layer of plywood and then strips of teak and seam compound between them.
I am planning to carefully remove what is left of the fore piece of the hatch, cut off the stainless screws flush, and then fabricate a new fore piece from used teak I have. Do you think I can get away with just adhesive of some sort (epoxy, polysulfide, something else?) to bond the fore piece and the plywood top, or will I have to install some screws down through the plywood into the new fore piece? Assuming the latter, do you think I will be able to cut holes in the plywood to accept teak bungs, and that the ply will do okay around the bungs? Obviously installing bungs into solid wood would be much better, but I don't have that here. Or perhaps I will just need to live with exposed flat slotted wood screws? That would certainly facilitate installation and removal for maintenance in the future.
There are a few splits in the teak veneer - you can see one was "repaired" with a white substance of some sort. I plan to carefully extract that and replace it with something teak colored before I varnish or oil the hatch. Not sure which substance I'll use.
Also, the contour of the hatch is pretty good, but there is a flat spot where my chisel is laying in the last pic. I expect I'll improve the shape when I install fore piece of the hatch, but do you have any advise or techniques I could use to reshape the hatch closer to its original shape? I considered cutting a few arcs to match the shape and trying to steam that area and place the hatch on the arcs and then put car batteries on the area to try to reform it. Thoughts?
The pictures are after my initial cleaning of the hatch (still wet) and before I have removed the old varnish from the underside of the hatch.