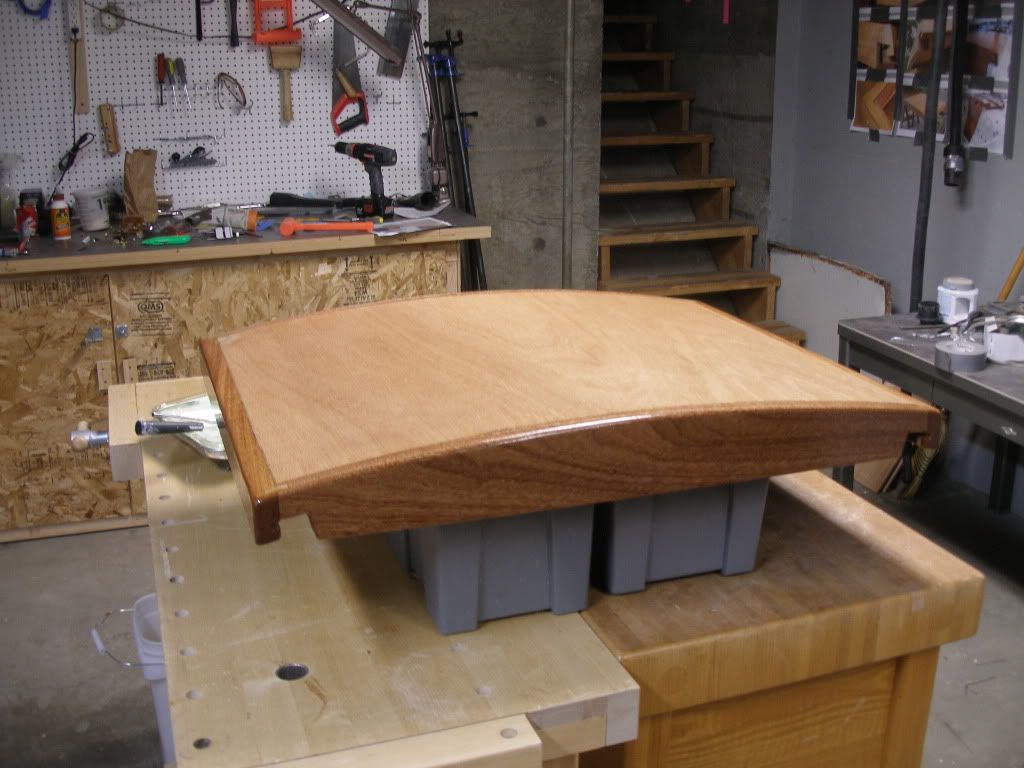
Making a sliding hatch...

Martin King

Sustaining Member
Blogs Author
Actually I called it "straightforward wooddorking". :) The hardest part
was laminating the panel. I still want to reiterate that vacuum
bagging would be my first choice in a home shop. Building the setup shown
in the photo with all the clamps and cauls is a do-able, but inferior method.
Notice that there is no clamp deep enough to reach out to the middle
of the panel. Instead, he has resorted to laying boxes of tile on top
of the cauls. Vacuum bagging gets around this problem.

Anyway regarding the slides I mentioned, I cut teak wedges into roughly
2" squares and located them at the 4 inside corners in such a manner that
when placed on the runners, the hatch sat level. These wedges were then
topped off with 2" square pieces of uhmw plastic using a countersunk
screw. I don't remember the exact thickness used but enough so
that the hatch frame was just lifted off the metal runners and riding
only on the plastic. I hope that clarifies it for you.

Martin
 
Last edited:

bigd14

Contributing Partner
Blogs Author
Heh, that was my hatch recently built. Wood"dorking" in the extreme! I agree with Martin, the vacuum bagging would definitely be better and probably easier. However I used what I had on hand. The boxes in the middle are full of vinyl tiles which probably weigh in at about 60lbs/box, which isn't quite enough to do the job but at least did apply some extra pressure. The cauls were simply the cut offs from the hatch form. If I had more clamps I would have put another cross member in the middle to apply more pressure, to the middle, but I ran out. The old adage that you can never have enough clamps was tested and found to be true on this occasion.

There were so many other trials and tribulations with the hatch that I almost wish I could do another one, so when this one disintegrates at least I will have had the experience and the next one will be much better (and will include vacuum bagging)! Hopefully by then my amateur woodworking skills will have improved- they were sorely tested with this project.

Regardless of which method you use, remember to allow for some springback when the laminate comes out of the mold. My ends came up at least 1/8-1/4 inch on each side.

Doug
 

davisr

Member III
Thanks, fellas, for the advice. Well, that's two new words I learned from this thread - cauls and wooddorking. I thought that the latter was a typo. Discovered on Google that there are lots of wooddorkers out there. I guess there are a lot here too . . . maybe I'm one of them. Constructed my form yesterday. Will post pictures as the project develops.

Best regards,
Roscoe
 

davisr

Member III
Martin,

I have one last question . . . in the years since you have built your hatch, have you had any problems with the varnish failing (often) along the joints of the teak veneer? I really like the look of the veneer, and would like to go this route. I can, though, see the benefits of Doug's approach. Here's a pic that I snatched from Doug's posting on plasticclassicforum.com. That's some beautiful woodworking, or I guess I should say, wooddorking.

Roscoe


P2260005.jpg
 

Martin King

Sustaining Member
Blogs Author
Roscoe,

I have had no issues with the varnish cracking along the veneer
joints. I refinished this piece last year and decided to shoot it
with clear LP which tolerates little or no movement in the substrate.
Essentially the techniques I detailed in this thread are the same
ones used in cold molded boat construction. I used standard west 105
resin here, but I suppose you could use their stage B pro set stuff
which requires post-curing, but I think that's overkill for this piece.
By the way, when I refer to veneer, we are talking about 1/4 "
thickness here, not what most people think of when they hear
the term. As my dad likes to point out, boats sometimes take some
pretty harsh treatment and having enough meat on the show surface
means you can sand and repair the inevitable bumps and bruises.

Martin
 

Michael Edwards

Member II
Sliding hatch continued

I have followed the postings here. Very good council has been shared. Annador is an E-32.
I took a slightly different approach. Instead of using the plywood; I found some 1/2" acrylic for $90.00. We really wanted more light below. Using a form,(like pictured in the postings) and a buddy heater, I got it up to 240 degrees then ratched it down to shape. That went suprisingly well. My problem: the original plywood was secured with screws from the sides. I was not comfortable doing that with the acrylic, so chose to screw down from the top edges. The rails don't have enough meat in the corners for a strong joint without raising the profile of the hatch. Which means I may have to recut the dodger for clearence. I used mohogany to save costs, but am rethinking about teak. I am open to sugestions. There is time to think about it. I just got deployed until October.
Michael
 

davisr

Member III
Martin,

I'm curious about your use of LP, which I suppose is clear linear polyurethane, on top of the varnish. I went back and read the recent thread titled "Epoxy on Teak," on which you posted several responses, at least one of which concerned your companionway hatch. You said that you gave your hatch 10 coats of varnish, and then finished it off with a coat of clear LP. I've looked around the internet for others who have used this method. It appears that some builders will spray their wooden boats with clear LP. I haven't, though, seen discussions about the use of clear LP on top of varnish. It seems, though, that you have used this method with success, since some five years have passed between your initial work and your recent refinishing work. Which brands of varnish and clear LP did you use?

Thanks for the pointers,
Roscoe
 

Martin King

Sustaining Member
Blogs Author
Originally my hatch was finished with standard oil based varnish. After
5 years it was time for a refresher. I happened to have a half quart
of Sterling clear sitting around and decided to try it. Since it's a royal
pain to remove that hatch, and I don't like varnishing it in place, I
decided to go with the clear LP in hopes of getting maximum longevity
out of the top coat. I would only attempt this if I felt pretty certain
that the wood was moving very little, if any. It's not recommended
for pieces that move-any thing with a scarf joint, for example.

Martin
 

davisr

Member III
I see what you're saying. All clear now. One final question, if I may, on the subject of treating companionway hatches. This question, in some ways, goes back to the subject under consideration in the thread, "Epoxy on Teak." In that thread there were many who voiced opposition to the view that teak could successfully be coated, first with epoxy, then varnish. Many spoke of the failure of the epoxy on account of cracks, dings, and the natural extrusion of teak oil from beneath the surface. The general sentiment was that it is far better to steel oneself for the regular upkeep of pure varnish (with no epoxy beneath), than to submit oneself to the lowly and unpleasant task of stripping failed layers of varnish and epoxy down to the bare wood.

My question concerns mahogany, or to be more specific, sapele. This wood, which some call African mahogany (perhaps wrongly), is commonly used by boat-builders in this area. A friend of mine who is in this business, and who is also associated with the epoxy business, has suggested that I use sapele as a veneer for this project, since teak has become quite difficult to find. He has, moreover, suggested that I place a layer of cloth on top of the veneer and saturate it with several clear coats of epoxy prior to the application of varnish.

Having said this, I am wondering if you know of anyone else who has approached a project of this sort from this angle.

Thanks,
Roscoe
 

Martin King

Sustaining Member
Blogs Author
My question concerns mahogany, or to be more specific, sapele. This wood, which some call African mahogany (perhaps wrongly), is commonly used by boat-builders in this area. A friend of mine who is in this business, and who is also associated with the epoxy business, has suggested that I use sapele as a veneer for this project, since teak has become quite difficult to find. He has, moreover, suggested that I place a layer of cloth on top of the veneer and saturate it with several clear coats of epoxy prior to the application of varnish.


I've worked with African mahogany, and I must say I prefer Swietenia
macrophylla, better known as Honduran mahogany. A layer of cloth
is sometimes used in cold molded hulls for added abrasion resistance,
but it's always filled and faired before being painted. If you are looking
to do brightwork on your exterior wood, I would suggest you do a standard
varnish buildup and forgo the epoxy. It will save you a lot of aggro later
when it's time to repair and recoat, not to mention it's less expensive.

Martin
 

Michael Edwards

Member II
I'm iclined to agree with Martin. I recently built a sea kayak that used oakuum and sapele plywoods covered with cloth and epoxy. I followed with Bristol Finish(sprayed via HVLP). The sapele turned quite dark, but made a nice contrast to the less interesting oakuum.
What my major concern would be, if a clear finish is not maintained, the LP or epoxy is a lot more work to get off. Previously I had experince of epoxy under a varnish and it did not perform as well as expected. It built up fast and deep and looked amazing with four coats of epiphanes on it, but two years later it had started separating a nd turning yellow(not the varnish). My assumption is that four coats of top quality varnish over West #207 cured epoxy was insufficent. Ultimately clear finishes are not for everyone. That's why Cetol was invented.
Michael
AL Udeid, Qatar
 
Top