Symptoms: Apparent decrease in water volume at exhaust. Temperature RPM limitation at Wide Open Throttle. Steam from exhaust at idle.
Solution: clean heat exchanger, optional general upgrade.
[Note 2024: For routine maintenance of the cooling system I later had success with the immersion system, which doesn't require removal of the heat exchanger.]
When I took over Thelonious II four years ago, the boat would run at near seven knots all day at 180 degrees on the engine temperature gauge. Lately, above 2300 rpm, the temperature began to rise. Also, I didn’t like seeing a lot of steam at idle. Our cooling systems send raw water from the heat exchanger into the exhaust system at the exhaust elbow. The water lift muffler accepts the hot exhaust and water, then burps it into the long hose that goes to the transom. The sporadic spray of water and exhaust proves the cooling system is working, which is why we check it every engine start.
Recently I concluded that the volume of water coming out was less than previously. Steam was one indication. There’s a bucket test to see how much water is expelled with the exhaust in, say, one minute. But I had no baseline for such a test. Anyhow, cleaning out the heat exchanger is routine maintenance and mine had not been removed since 2012. Perhaps it was clogged?
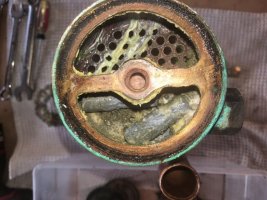
I’ll say. Those fossilized pencil zincs cut flow by at least half. Heat exchangers suffer a buildup of scale over time, and cleaning them requires an acid wash. I’ve used muriatic acid (phosphoric acid is better) in the past, and it’s not difficult to observe the deposits boiling away and control the reaction by eyeball. But this time I wanted a pro to “boil out” the Hx. Times have changed, however, and finding a willing radiator shop was a struggle. Enter Carlos at Blanco Brothers, 446 S Union Ave, Los Angeles, who calls himself the Last of the Mohicans. Fifty bucks and the job done in a day. What happened to radiator shops? “LA County doesn’t like us messing with acid disposal.”
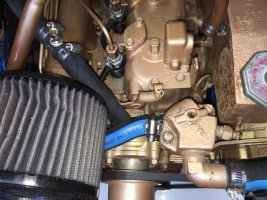
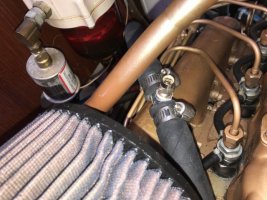
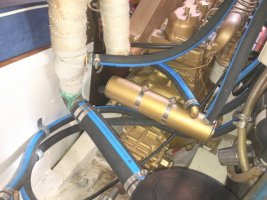
As everyone knows, removing the heat exchanger—even from a 381, one of the larger Ericson models--is jujitsu in a gopher hole. So I determined I might as well replace all the hoses while in there, revise the Isotemp water heater coolant connections and solve its Qest fitting leaks. It’s all just a labor job, but I now understand why the estimates from boat mechanics are high: awkward means time. Some specialty tools really help for this work, notably a small socket wrench to fit the many hose clamps (forget a screwdriver in confined spaces). Some old hoses are fused to their barbs or stubs. For that, a 10-dollar “Drake Off Road 4521 Hose Removal Tool” is a luxury. A heat gun is required too, along with towels for spillage for the inevitable mess of drained fluid, raw water and knuckle blood.
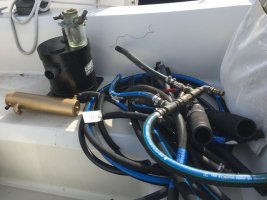
The old hoses make a satisfying pile. Mine ranged in age from 1997 to 2004, and frankly looked good for another 20 years. But hoses do have a lifespan, and a mere $400 worth of new ones starts the clock all over again.
On Thelonious II the raw water path starts with a through-hull with no exterior screen. A Graco filter assembly is mounted inside to strain the sea water. Mine rarely picks up any weed, but the strainer basket was dirtied by time. The raw water hoses showed about 10 percent constriction by salt buildup--probably not an important impediment to flow.
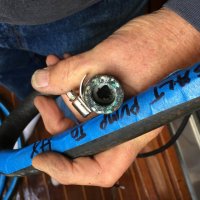
Sea water is drawn in by an Oberdorfer pump. In the past, I have found heavy salt deposits clogging the pump fittings. The pump is new and so is the impeller, but I did scrape away a 20-percent salt buildup in the bronze hose connectors. My guess is every salt-water boat has such buildup there.
The Oberdorfer directs raw water to the heat exchanger. It circulates there, absorbing heat from the engine coolant, then exits to an anti-siphon valve tucked high above the waterline. From there the raw water descends to enter the exhaust elbow on the engine. The elbow is hot when running. The point of raw water entry is subject to rust or clogging. Mine was clear, but others have found the source of overheating to be corrosion at that connection.
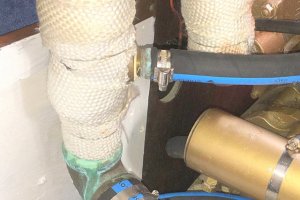
The hot exhaust and water mixture then has a short path through 2-inch hose to the waterlift muffler. That hose looked fine, but I could compress it with two fingers. The new hose is hard as a rock. Apparently some boats have a flap valve installed at this point to prevent backflow from the exhaust. The consensus seems to be that such a valve is more trouble than it’s worth, and can be removed if present.
The exhaust then rises from the muffler in a 2-inch hose to the transom exhaust. I left that long hose unchanged, assured now that the raw water path was clear.
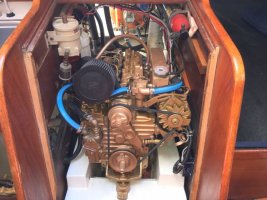
On the Universal/Westerbeke 5432 four-cylinder engine the coolant (“antifreeze”) is held in a manifold tank with a pressure cap. The coolant is circulated by a “fresh water” pump on the engine. The hot coolant is cooled by the heat exchanger and routed back into the engine block. The heat can also be used to warm water in the yacht’s drinking water system. Often, or usually, the coolant is diverted directly to the water heater from the heat exchanger before returning to the engine block.
There is an alternate water heater hookup: to connect the heater hoses at the thermostat bypass on the front of the engine. The idea is to put the water heater on a separate path, so the heat exchanger is dedicated to engine-block cooling. Since the pressure of the coolant flow should be the same in either configuration, I don’t quite get the theory. I wanted to make the change for another reason.
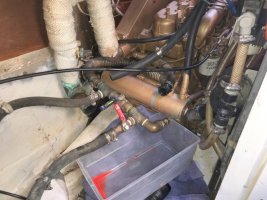
The former owner had created a clumsy heat-exchanger-to-water-heater manifold that hung over the transmission like a cloud of bronze. Access to my heat exchanger pencil zinc was already awkward, and the manifold connections made it a struggle.
(Continued)
Solution: clean heat exchanger, optional general upgrade.
[Note 2024: For routine maintenance of the cooling system I later had success with the immersion system, which doesn't require removal of the heat exchanger.]
When I took over Thelonious II four years ago, the boat would run at near seven knots all day at 180 degrees on the engine temperature gauge. Lately, above 2300 rpm, the temperature began to rise. Also, I didn’t like seeing a lot of steam at idle. Our cooling systems send raw water from the heat exchanger into the exhaust system at the exhaust elbow. The water lift muffler accepts the hot exhaust and water, then burps it into the long hose that goes to the transom. The sporadic spray of water and exhaust proves the cooling system is working, which is why we check it every engine start.
Recently I concluded that the volume of water coming out was less than previously. Steam was one indication. There’s a bucket test to see how much water is expelled with the exhaust in, say, one minute. But I had no baseline for such a test. Anyhow, cleaning out the heat exchanger is routine maintenance and mine had not been removed since 2012. Perhaps it was clogged?

I’ll say. Those fossilized pencil zincs cut flow by at least half. Heat exchangers suffer a buildup of scale over time, and cleaning them requires an acid wash. I’ve used muriatic acid (phosphoric acid is better) in the past, and it’s not difficult to observe the deposits boiling away and control the reaction by eyeball. But this time I wanted a pro to “boil out” the Hx. Times have changed, however, and finding a willing radiator shop was a struggle. Enter Carlos at Blanco Brothers, 446 S Union Ave, Los Angeles, who calls himself the Last of the Mohicans. Fifty bucks and the job done in a day. What happened to radiator shops? “LA County doesn’t like us messing with acid disposal.”
As everyone knows, removing the heat exchanger—even from a 381, one of the larger Ericson models--is jujitsu in a gopher hole. So I determined I might as well replace all the hoses while in there, revise the Isotemp water heater coolant connections and solve its Qest fitting leaks. It’s all just a labor job, but I now understand why the estimates from boat mechanics are high: awkward means time. Some specialty tools really help for this work, notably a small socket wrench to fit the many hose clamps (forget a screwdriver in confined spaces). Some old hoses are fused to their barbs or stubs. For that, a 10-dollar “Drake Off Road 4521 Hose Removal Tool” is a luxury. A heat gun is required too, along with towels for spillage for the inevitable mess of drained fluid, raw water and knuckle blood.

The old hoses make a satisfying pile. Mine ranged in age from 1997 to 2004, and frankly looked good for another 20 years. But hoses do have a lifespan, and a mere $400 worth of new ones starts the clock all over again.
On Thelonious II the raw water path starts with a through-hull with no exterior screen. A Graco filter assembly is mounted inside to strain the sea water. Mine rarely picks up any weed, but the strainer basket was dirtied by time. The raw water hoses showed about 10 percent constriction by salt buildup--probably not an important impediment to flow.
Sea water is drawn in by an Oberdorfer pump. In the past, I have found heavy salt deposits clogging the pump fittings. The pump is new and so is the impeller, but I did scrape away a 20-percent salt buildup in the bronze hose connectors. My guess is every salt-water boat has such buildup there.

The Oberdorfer directs raw water to the heat exchanger. It circulates there, absorbing heat from the engine coolant, then exits to an anti-siphon valve tucked high above the waterline. From there the raw water descends to enter the exhaust elbow on the engine. The elbow is hot when running. The point of raw water entry is subject to rust or clogging. Mine was clear, but others have found the source of overheating to be corrosion at that connection.

The hot exhaust and water mixture then has a short path through 2-inch hose to the waterlift muffler. That hose looked fine, but I could compress it with two fingers. The new hose is hard as a rock. Apparently some boats have a flap valve installed at this point to prevent backflow from the exhaust. The consensus seems to be that such a valve is more trouble than it’s worth, and can be removed if present.
The exhaust then rises from the muffler in a 2-inch hose to the transom exhaust. I left that long hose unchanged, assured now that the raw water path was clear.
On the Universal/Westerbeke 5432 four-cylinder engine the coolant (“antifreeze”) is held in a manifold tank with a pressure cap. The coolant is circulated by a “fresh water” pump on the engine. The hot coolant is cooled by the heat exchanger and routed back into the engine block. The heat can also be used to warm water in the yacht’s drinking water system. Often, or usually, the coolant is diverted directly to the water heater from the heat exchanger before returning to the engine block.
There is an alternate water heater hookup: to connect the heater hoses at the thermostat bypass on the front of the engine. The idea is to put the water heater on a separate path, so the heat exchanger is dedicated to engine-block cooling. Since the pressure of the coolant flow should be the same in either configuration, I don’t quite get the theory. I wanted to make the change for another reason.
The former owner had created a clumsy heat-exchanger-to-water-heater manifold that hung over the transmission like a cloud of bronze. Access to my heat exchanger pencil zinc was already awkward, and the manifold connections made it a struggle.

(Continued)
Last edited:

