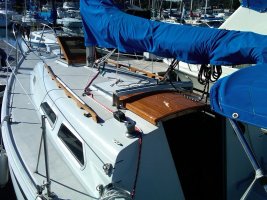
Need New Companionway Hatch for Ericson 27

greco

New Member
My son and his wife are new owners of a 1977 Ericson 27. They are in need of a new companionway hatch. Would all or some other models share the same companionway sliding hatch? Do companionway hatches... of that vintage have identical dimensions? Could we use a hatch from other manufactures? Would prefer to purchase a good used one before having to make a new one. He and we all live in Huntington Beach, CA. I was thinking of rummaging through some of the old boat yards in Wilmington or Long Beach. Mini's in Newport Beach on Old Newport Road didn't have anything close that would work. Lastly, if we strike out on finding a good used hatch, where could we get plans to make a new one like the original?

Thanks all, we have many more questions to post in the future, but this is our start. Me, dad, has been sailing off and on for 40 + years and helped my son at least get himself his first good sailboat. It's great to see the Ericson brand live on.
 

ignacio

Member III
Blogs Author
I built my own

Hi Greco,

I literally just installed (like 45 mins ago) my newly-built companionway hatch on my E27. I built this myself and it was a pretty involved project. I had lots of great support, feedback, and direction from members of this site, and thoroughly enjoyed the learning process. In total, it took me about 5 or 6 weeks to complete it (evenings/weekends), and even longer to work up the nerve to tackle it. Here's the thread:

http://www.ericsonyachts.org/infoexchange/showthread.php?t=9238

I did contact H&L Marine in Southern Cal and explained what I was looking for. They said they would build it if I sent my old one in, but finally decided that I wanted to tackle the project myself for the sake of learning more about brightwork, joinery, epoxy, and other woodworking skills. And, I wanted to be able to control what went into the replacement and how it got done much more closely.

My son and his wife are new owners of a 1977 Ericson 27. They are in need of a new companionway hatch. Would all or some other models share the same companionway sliding hatch? Do companionway hatches... of that vintage have identical dimensions? Could we use a hatch from other manufactures? Would prefer to purchase a good used one before having to make a new one. He and we all live in Huntington Beach, CA. I was thinking of rummaging through some of the old boat yards in Wilmington or Long Beach. Mini's in Newport Beach on Old Newport Road didn't have anything close that would work. Lastly, if we strike out on finding a good used hatch, where could we get plans to make a new one like the original?

Thanks all, we have many more questions to post in the future, but this is our start. Me, dad, has been sailing off and on for 40 + years and helped my son at least get himself his first good sailboat. It's great to see the Ericson brand live on.
 

dt222

Member III
Build it, and it will come

As Ignacio states, if you search the site, there have been many postings with attached pictures showing lots of suggestions and variation, and there is no shortage of helpful guidance from the other members, particularly if you are willing (as he was) to invest some time and learning. I would also build my own for the same reasons he listed.

Good luck to your son with his new boat.
 

toddbrsd

Ex-Viking, Now Native American
Try Dans in Long Beach

Greco,

Welcome to the site. As a relatively new owner, I can attest that you have struck gold in finding this site!

Try Dan's in Long Beach. He has a small operation, usually salvaging sailboats one at a time. He just had an Ericson 29 and may have kept the hatch. Not sure if it will fit a 27, but worth a try. Usually he buys or hauls away neglected sailboats, so even though he has something, it may not be in much better condition than yours

Sailboat Junkyard: Dan 310-795-8978

BTW, I also live in Huntington Beach and my E-27 is in Alamitos Bay Marina. I am relatively new to sailing, but I would be happy help if I can. Welcome to the group and get your son logged on and involved
 

Martin King

Sustaining Member
Blogs Author
It's unlikely you will find a decent replacement laying around some
salvage yard. Not impossible, but unlikely. I think I have the old
tooling I used to build mine, and you are welcome to use it if you
want to build your own. I'm close by in Costa Mesa.I believe the
dimensions do vary between the boats. You are better off building
a new part that will be better than what the factory
supplied.


Her's a pic of
the one I built:

<a href="http://s128.photobucket.com/albums/p200/cruizin31/?action=view&current=slidinghatch.jpg" target="_blank"><img src="http://i128.photobucket.com/albums/p200/cruizin31/slidinghatch.jpg" border="0" alt="Photobucket"></a>
 
Last edited:

tenders

Innocent Bystander
Martin's offer is pretty close to Michelangelo offering to let you borrow the stencils he used to paint the Sistine Chapel.
 

greco

New Member
Thank You!

Hey everyone, Thank you all so much for all the feedback! It looks like we will have to build one from scratch. Fortunately, on their gangway is another 27 with a very nice teak hatch and we can use those dimensions as a template. Ignacio...would love to see a pic of your finished product. Epoxy seems like the way to go which makes sense. Bending it to form will be the challenge, but maybe just using a power type planer could work for the curve. Nothing like just diving in on the project.

Onward!

:cool:
 

greco

New Member
to Martin King

If you're still around and have the plans for the 27 companionway sliding hatch please let me know and I'd be happy to come by to copy. My cell phone # is (714) 222-9398

My son joined this site, but he's currently in a fire fighting academy and he's coming home tired and has to study a bunch. He's following this.

Thanks again,

Greco:cool:
 

Martin King

Sustaining Member
Blogs Author
Mr. Greco,

There really isn't a drawing that I am aware of for the sliding
hatch on your boat. Speaking for my self, I just based my
build on what was there previously and updated the
design with a couple of improvements. The techniques used
are fairly straightforward and were detailed elsewhere on this
site. Several other handy owners have also posted their hatch
projects as well and there is some good info on making one. The
main thing aside from getting the dimensions correct, is doing
the curved laminations. Once you have that done, the rest is
a piece of cake.

Martin
 

rgoff

Member III
When I rebuilt my hatch several years ago, the original curved plywood base had started to delaminate. I found some "bendable plywood" at a place in Anaheim, CA and bent it to shape then covered it with epoxy. All the rest of the original wood I used for the new hatch. The hatch is still sturdy and working great (with no leaks) after about 7 years!
 

Jeff Asbury

Principal Partner
Previous discussions, Making a sliding Companionway Hatch

Here is the link to previous discussions about how other's took on the DIY subject of making the Making a sliding Companionway Hatch. Martin goes into much detail. I recommend you read all the other accounts to see what might work best for you.

http://www.ericsonyachts.org/infoexchange/showthread.php?t=6823

I have worked pretty hard to preserve my original 37 year old ply hatch. A bit of epoxy and varnishing every two years has kept it acceptably decent looking and functional.

Todd is right about Dan's Sailboat Junk Yard. I saw a very nice solid teak (not ply) hatch at his place a couple years ago. He was asking $150. I thought long and hard about it for my self but I ended up referring a friend who needed it more than I did.

Good Luck!
 

ignacio

Member III
Blogs Author
Mr. Greco,

There really isn't a drawing that I am aware of for the sliding
hatch on your boat. Speaking for my self, I just based my
build on what was there previously and updated the
design with a couple of improvements. The techniques used
are fairly straightforward and were detailed elsewhere on this
site. Several other handy owners have also posted their hatch
projects as well and there is some good info on making one. The
main thing aside from getting the dimensions correct, is doing
the curved laminations. Once you have that done, the rest is
a piece of cake.

Martin

Hi Martin,

Ironically, I found that making the curved lams was actually the easy part, and all the angles/cuts/joinery to be more complex. It was probably a result of my spending so much time thinking through how to make the lams than anything else.

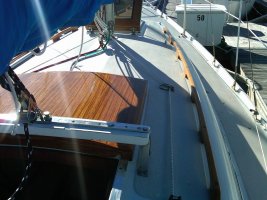
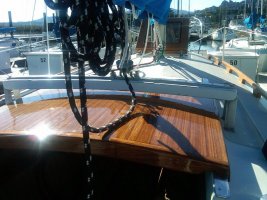
Greco: here' the final pics installed on the E27.
 

Attachments

  • IMG00129-20101102-1456.jpg
    IMG00129-20101102-1456.jpg
    108.5 KB · Views: 221
  • IMG00140-20101102-1500.jpg
    IMG00140-20101102-1500.jpg
    123.4 KB · Views: 244
  • IMG00133-20101102-1457.jpg
    IMG00133-20101102-1457.jpg
    102 KB · Views: 282

exoduse35

Sustaining Member
none of it is really hard if you have access to some good tools and time. It is not any harder than the stuff a high school wood shop student can turn out. The key is to do the prep work and have a plan. laminating a curve is not much different than doing a flat piece. cutting a curved line is about the same as a sraight one. and a table saw will cut a 30* Angle the same as a 90*. Just relax, take your time, and think about what you are doing. By the time you finish the project you will be so proud of what you thought you didn't know how to do. If you read the threads from all the guys who have done this exact project, you will soon see there are a bunch of ways to get a good result! So dive in! The first one is always the scariest!:egrin: And if you own a boat there will always be another project in your future so you might as well start now!
 

ignacio

Member III
Blogs Author
Well said! :cheers:

none of it is really hard if you have access to some good tools and time. It is not any harder than the stuff a high school wood shop student can turn out. The key is to do the prep work and have a plan. laminating a curve is not much different than doing a flat piece. cutting a curved line is about the same as a sraight one. and a table saw will cut a 30* Angle the same as a 90*. Just relax, take your time, and think about what you are doing. By the time you finish the project you will be so proud of what you thought you didn't know how to do. If you read the threads from all the guys who have done this exact project, you will soon see there are a bunch of ways to get a good result! So dive in! The first one is always the scariest!:egrin: And if you own a boat there will always be another project in your future so you might as well start now!
 

Martin King

Sustaining Member
Blogs Author
Hi Martin,

Ironically, I found that making the curved lams was actually the easy part, and all the angles/cuts/joinery to be more complex. It was probably a result of my spending so much time thinking through how to make the lams than anything else.

.

Ignacio, that is ironic. To my way of thinking, the real work was in
the lams. For me it started with hand selecting rough sawn teak. Then
resawing, and glueing up a panel wide enough. Then building
a form to the correct curve and accounting for springback, and finally
vacuum bagging the whole shebang to said form. The rest of it
was just trimming out the panel in solid wood, pretty much standard
frame and panel stuff, without any complicated joinery. Anyway
there's more than one way to skin the cat. I'm glad to see other
owners into preserving their boats with projects like this.

Martin
 

Capt. Max

Member II
for sale

I can build you a new hatch, I built one for my e27
message me if you are interested in buying one
I have some pics, I also made one for the forward hatch
 

jkenan

Member III
I'm glad to see other
owners into preserving their boats with projects like this.

Martin

:cheers:
Cheers to that! I hope your dad sees some of these owner-projects. I believe they are all a tribute to his great work. The numbers of people here who are restoring these beautiful Ericons that have been enjoyed for decades with their best efforts, to levels that often exceed their own expectations... need I say more?
 
Top