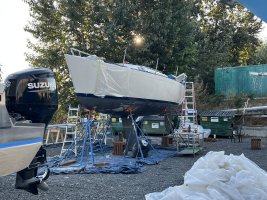
I was in a collision earlier this summer- had to drop the mast, haul the boat and have a lot of fiberglass work done. As the glass work wraps-up, I thought I'd share a few things I learned.
Bow Pulpits & bow plates
- Olson 34s are not all the same!
- After measuring 3 other Olson 34s and looking at pre-collision photos, there are two different bows on our boats
- The hull was made in 3 pieces- glassed together. Port half, Starboard half and Stern which is tabbed in and puttied on the outside
- As a result the bows vary widely. In the collision, mine cracked between the two halfs right down the middle of the bow
- The company I'm using to re-do the bow 3D scanned several O34 bows, they are all different due to how they halves came together
- Pulpits- originals were built by Railmakers in SoCal. They still have the drawings and can replicate- 2025 cost is $1700 ni shipping
- Early boats have the toe rail terminating much further back with several screws visible on the deck for the hull/deck joint in front of the toe rail
- Later boats have the toe rail ending much further forward with only 1 screw in front of the toe rail
- Garhauer is building my replacement bow plate- $800 ni shipping
Mast learnings
- I have a Sparcraft mast. Rig-Rite has parts if you need them. It's the same section as the J109
- Some Olsons have Ballenger or Seldon spars
- The original Sparcraft boot is available- but it's not clear if it's NOS or recent rubber, so I passed (it's $200)
- I'm using a generic stepped boot that looks like a hat from a DEVO concert- $60
Portlights- not a collision thing but I know too many people with glued window issues
- Think about moving to portlights instead of re-doing the acrylic or polycarbonate
- My boat has Lewmar portlights, no cut/glued acrylic or polycarbonate
- I have a friend that had to have 3 sets of glued portlights installed until the yard "got it right" last year
- Fastening strategy is key to success. The system needs to be able to float for thermal expansion/contraction and flexing
- Go read cruiser forums comparing Acrylic and Polycarbonate if you are going to stay with glued cut material
- Polycarbonate vs. Acrylic if you have to re-do them:
Polycarbonate scratches much easier than Acrylic
Polycarbonate flexes more between fasteners than Acrylic- so it's harder to seal well unless you step-up the thickness
Polycarbonate will yellow due to UV, Acrylic will not- with the smoke tint, not sure how much this matters
Polycarbonate blocks most UV, Acrylic needs to be treated to pass less UV
Polycarbonate does have more impact strength but the originals were Acrylic- so do you need it?
- After watching other boats leak due to UV damaging the adhesive and general flexing, I'm very happy to not have acrylic or polycarbonate
- Normal portlights can be re-bedded without having to replace them
Wiring
- Original Olson 34 wiring was just copper, not tinned. I can see the wire the Seattle yard used finishing my boat vs. Ericson. Tinned vs. just copper.
- Start replacing what you can when you can. It will be a problem someday
- You may see lumps in the insulation- imaging a snake swallowing a mouse. That's the copper corroding inside the insulation
- If you have AIS and are installing a Tri-Color masthead light, don't use MarineBeam. It's a great idea but the LED power supply puts out a lot EMI and interferes with your ability to receive AIS signals
Fuel System- Not related to collision- but 3 years ago I pulled my tank, had it cleaned and replaced the fuel line with rubber hose.
- My original was bent copper line which had several hairline cracks at the bends which let air into the system due to corrosion and stress
- Replacing the line made a HUGE difference in how the engine runs.
When the boat is done- I'll post before/after photos. I'm doing things serially- glass/bowplate mfg/pulpit to make sure everything fits so it will be a while.
Bow Pulpits & bow plates
- Olson 34s are not all the same!
- After measuring 3 other Olson 34s and looking at pre-collision photos, there are two different bows on our boats
- The hull was made in 3 pieces- glassed together. Port half, Starboard half and Stern which is tabbed in and puttied on the outside
- As a result the bows vary widely. In the collision, mine cracked between the two halfs right down the middle of the bow
- The company I'm using to re-do the bow 3D scanned several O34 bows, they are all different due to how they halves came together
- Pulpits- originals were built by Railmakers in SoCal. They still have the drawings and can replicate- 2025 cost is $1700 ni shipping
- Early boats have the toe rail terminating much further back with several screws visible on the deck for the hull/deck joint in front of the toe rail
- Later boats have the toe rail ending much further forward with only 1 screw in front of the toe rail
- Garhauer is building my replacement bow plate- $800 ni shipping
Mast learnings
- I have a Sparcraft mast. Rig-Rite has parts if you need them. It's the same section as the J109
- Some Olsons have Ballenger or Seldon spars
- The original Sparcraft boot is available- but it's not clear if it's NOS or recent rubber, so I passed (it's $200)
- I'm using a generic stepped boot that looks like a hat from a DEVO concert- $60
Portlights- not a collision thing but I know too many people with glued window issues
- Think about moving to portlights instead of re-doing the acrylic or polycarbonate
- My boat has Lewmar portlights, no cut/glued acrylic or polycarbonate
- I have a friend that had to have 3 sets of glued portlights installed until the yard "got it right" last year
- Fastening strategy is key to success. The system needs to be able to float for thermal expansion/contraction and flexing
- Go read cruiser forums comparing Acrylic and Polycarbonate if you are going to stay with glued cut material
- Polycarbonate vs. Acrylic if you have to re-do them:
Polycarbonate scratches much easier than Acrylic
Polycarbonate flexes more between fasteners than Acrylic- so it's harder to seal well unless you step-up the thickness
Polycarbonate will yellow due to UV, Acrylic will not- with the smoke tint, not sure how much this matters
Polycarbonate blocks most UV, Acrylic needs to be treated to pass less UV
Polycarbonate does have more impact strength but the originals were Acrylic- so do you need it?
- After watching other boats leak due to UV damaging the adhesive and general flexing, I'm very happy to not have acrylic or polycarbonate
- Normal portlights can be re-bedded without having to replace them
Wiring
- Original Olson 34 wiring was just copper, not tinned. I can see the wire the Seattle yard used finishing my boat vs. Ericson. Tinned vs. just copper.
- Start replacing what you can when you can. It will be a problem someday
- You may see lumps in the insulation- imaging a snake swallowing a mouse. That's the copper corroding inside the insulation
- If you have AIS and are installing a Tri-Color masthead light, don't use MarineBeam. It's a great idea but the LED power supply puts out a lot EMI and interferes with your ability to receive AIS signals
Fuel System- Not related to collision- but 3 years ago I pulled my tank, had it cleaned and replaced the fuel line with rubber hose.
- My original was bent copper line which had several hairline cracks at the bends which let air into the system due to corrosion and stress
- Replacing the line made a HUGE difference in how the engine runs.
When the boat is done- I'll post before/after photos. I'm doing things serially- glass/bowplate mfg/pulpit to make sure everything fits so it will be a while.

 , and several lenses have developed multiple small cracks and will all four have to be replaced. Grrrrrrr.