Removal of fuel tank in 32-3

peaman

Sustaining Member
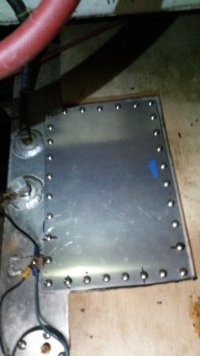
I need to remove my fuel tank to check on a possible fuel leak into the bilge. I know of at least three members here who have been there, done that, so I know it is generally do-able. I thought that if I could disconnect the fill and vent lines at the aft end of the tank, I should be able to shift the tank aft and outboard to get out from under the quarter berth construction, but there are two issues with that: 1) the length of 1-1/2" fill hose is too short, and the nipple too long, to be able to disconnect it without cutting it, and 2) the fuel hoses, battery cables and significant other wiring passing over the fuel tank and into the engine compartment greatly restrict any movement at the forward end.

So my questions are:
a) how can the very stubborn fuel fill hose be disconnected from the rear of the tank prior to moving the tank?
b) If I need to remove wiring at the forward inboard corner of the tank in order to remove the tank, are there suggestions for improving the wiring routing when the wiring is put back into place?

I did see this thread with some great pictures and commentary from Tin Kicker, Kenneth K, and nquigley, so thanks for that good info.
 

Kenneth K

1985 32-3, Puget Sound
Blogs Author
So my questions are:
a) how can the very stubborn fuel fill hose be disconnected from the rear of the tank prior to moving the tank?
I remember the filler hose being stiff, but not as bad as what you have. Maybe it just feels more stiff because it is frozen/bonded to the nipple. In my (limited) experience, you can't pull a 'bonded' hose off of a fitting--pulling it just constricts the hose and makes it grip tighter. Try heating, rotating and "pushing" the hose further onto the fitting to break the bond. After the bond breaks you can rotate it and pull it off.

b) If I need to remove wiring at the forward inboard corner of the tank in order to remove the tank, are there suggestions for improving the wiring routing when the wiring is put back into place?
On the 32-3, removing the fuel tank opens up all kinds of wiring options between the engine bay, battery box, and electrical panel that you'll lose after reinstalling the tank. It's a great time to replace/reroute heavy batt cables. To minimize chafing on the batt cables and other wires that run in front of the fuel tank, I screwed a couple of wire-bundle loops to the outside/back wall of the battery box.

After 3 years, I still haven't reinstalled the old fuel tank. Laziness is one of the reasons, but the "temporary" 3 gal tank I plumbed in has a few advantages too, so the old tank is still on the "someday" list.
 

Tin Kicker

Sustaining Member
Moderator
I have an L-shaped cotter pin puller similar to Christian's photo and used that. There's plenty of access.
20200212_151256-XL.jpg

That said, the hoses are probably 30+ years old and this is the time to replace ALL of them. If you disconnect at the deck fill fitting (also a pain) then the hoses will slide forward with the tank. Or you can just cut them to pull up a couple inches at the deck fitting to disconnect there. When replacing, connect them to the deck fitting first with an extra foot or so and feed them to the tank. That way you can first seal the deck fitting to the deck as it is easier to trim at the tank end and gravity is working with you not against.

I also found a battery cable chafed through the vinyl sleeve so the battery cables had to go. I intended to install conduit to slide the new ones through but sold the boat before finishing. The toughest part was getting them through the pinched area beneath the AC part of the electric panel.
20200212_154609-XL.jpg

Before putting the new tank in place I lined the compartment with fluted Coroplast, as it is lightweight, provides abrasion protection from the coarse fiberglass weave, and the polypropylene won't be affected by spilled fuel.
20200304_154146-4K.jpg


I also had custom hoses made up and installed a new fuel quantity sender.
20200410_144249-XL.jpg
 

vanilladuck

E32-3 / San Francisco
Blogs Author
After 3 years, I still haven't reinstalled the old fuel tank. Laziness is one of the reasons, but the "temporary" 3 gal tank I plumbed in has a few advantages too, so the old tank is still on the "someday" list.
@Kenneth K - I'm currently in the process of removing the fuel tank on my E32-3. While waiting for fabrication of a new tank, I'm thinking of a temporary tank so I can still take the boat out. How did you build your 'temporary' tank setup?
 

Prairie Schooner

Jeff & Donna, E35-3 purchased 7/21
+1 Bryan, @vanilladuck
I'm doing the same thing on our 35-3 and wondering if a temp tank might be warranted to get us started for the season.
@Kenneth K - Any descriptions or pictures of your temporary set-up would be much appreciated.
Thanks, Jeff
 

Dave G.

1984 E30+ Ludington, MI
wondering if a temp tank might be warranted to get us started for the season.
Do you know where your tank is leaking ? Typically the aluminum tanks corrode right under the fuel pick up where all the "sludge" sits and develop pinholes through the metal. Being a diesel you can patch that area using epoxy & fiberglass. Can you access the top of the tank without major surgery? It has to be done inside the tank so you need to have an access port to do the work. I did this to mine a couple of years ago and so far so good(knocking wood..). Once you get the port installed it's pretty straight forward process. Clean it out well, rough up the aluminum with sandpaper to give it some teeth, clean the patch area again with some acetone, apply epoxy, layer of cloth, epoxy & another layer of cloth, a little more epoxy if needed, done. I used west system epoxy and their guidance & recommendations. My patch is about 6" x 6" and as mine had corrosion in the area adjoining the weld for the forward wall of the tank I ran the patch over the weld and up the wall about 1 1/2". There is another here on the site who had done the same with success which is why I decided to repair in place. I made my own access plate with 1/8" aluminum which worked ok but took a lot of screws & sealant to get it sealed. There are off the shelf ones that may work better just make sure it's big enough to stick your arm in and still see what you're doing. All in all It was about 3 days work but I'm slowpoke :).
 

Prairie Schooner

Jeff & Donna, E35-3 purchased 7/21
Do you know where your tank is leaking ? Typically the aluminum tanks corrode right under the fuel pick up where all the "sludge" sits and develop pinholes through the metal. Being a diesel you can patch that area using epoxy & fiberglass. Can you access the top of the tank without major surgery? It has to be done inside the tank so you need to have an access port to do the work. I did this to mine a couple of years ago and so far so good(knocking wood..). Once you get the port installed it's pretty straight forward process. Clean it out well, rough up the aluminum with sandpaper to give it some teeth, clean the patch area again with some acetone, apply epoxy, layer of cloth, epoxy & another layer of cloth, a little more epoxy if needed, done. I used west system epoxy and their guidance & recommendations. My patch is about 6" x 6" and as mine had corrosion in the area adjoining the weld for the forward wall of the tank I ran the patch over the weld and up the wall about 1 1/2". There is another here on the site who had done the same with success which is why I decided to repair in place. I made my own access plate with 1/8" aluminum which worked ok but took a lot of screws & sealant to get it sealed. There are off the shelf ones that may work better just make sure it's big enough to stick your arm in and still see what you're doing. All in all It was about 3 days work but I'm slowpoke :).
Thanks for this Dave. I've sort of been mentally locked into taking the tank out of the boat and having it repaired by a welder. Or buy a replacement. Our tank is under the quarter berth. I've removed all the screws from the panel and taken off the front teak moulding. Next trip to the boat I'll be taking that panel out and will have a better look around the tank. I've got a fair amount of metalworking experience so the idea of making a bigger port is not daunting.
After a repair, on our boat I don't think I'd catch further leaking until it started soaking into the new sole we're installing. How do you monitor whether the patch is working?
I've been dreading this and it would be awesome if I could repair it while it's in the boat.
 

Prairie Schooner

Jeff & Donna, E35-3 purchased 7/21
Homemade inspection ports described here.
Christian, When we first got our boat we had fuel delivery problems and I read your posts on this in great detail. I think we solved it without tank cleaning so I thought I could put off cleaning ports until ‘someday’. But as long as I’ve got it exposed I’m definitely going to reproduce the modifications you made. Likely I’ll be pinging you with questions.
 

Kenneth K

1985 32-3, Puget Sound
Blogs Author
@Kenneth K - How did you build your 'temporary' tank setup?
Since the walls on almost any plastic tank are too thin to support threaded fittings, you have to find a tank that has a reinforced area big enough to support the tapping two additional threaded fittings: 1) a return line and 2) a vent line.

Many tanks with quantity gauges have such an enlarged, reinforced base area to work with. You'll also need a 1/4" or 3/8" NPT tap (I forget which). It's super easy to tap into plastic, but go slow so you don't crack it.
20190602_192819_Burst01 (1).jpg 20190525_151026.jpg

It can be hard to get a good seal with the brass fittings screwed into plastic, so use a good, diesel compatible, thread sealant (Permatex or Gasoila). I had a slight vacuum leak at first, which is no big deal if you have a bleed knob on your injector pump, but it's more of a hassle if you just have the old bleed screw.
 
Last edited:

Dave G.

1984 E30+ Ludington, MI
How do you monitor whether the patch is working?
My tank is under the cockpit and accessed via the port laz. So I can see the front half of the tank & the entire forward end. It is mounted midship and tabbed on outboard ends so there is also about an inch spare between the bottom of the tank & the hull. For a good time after the repair I kept paper towels stuffed in that space and every week or so I checked for any signs of diesel. I think it's a viable solution but I did have my doubts until I did some research and spoke to the folks @ West Systems. Also it was Ed Knebel on this site that suggested this method and his input was also a big influence. Here is his comment when I was contemplating what to do;
"My guess is corrosion at the base of the tank where it comes to a vee near where the fuel pickup tube is. this is the lowest point in the tank, so it is where the water and gunk collect, and form pinholes. Replacement is the best course of action, since you can never be sure how many pinholes are almost thru the plate. But when mine started to leak, I wasn't able to commit to replacement at the time. I did a "temporary" fix using several layers of glass cloth with epoxy resin about 10 years ago, figuring to replace the tank when I replace the transmission(which doesn't like to go in reverse from a long neutral idle). I am still waiting..."
 

Prairie Schooner

Jeff & Donna, E35-3 purchased 7/21
@peaman Do you mind if I continue to piggy-back on your thread?

fuel tank E35-3 k1.jpg

We’ve got the tank on our 35-3 exposed now. I’ve been doing research on repairing the tank. I’ve pretty much ruled out trying to repair the tank with epoxy/glass. There are very compelling anecdotal accounts where this has worked successfully, in at least one case for ten years. I called Total Boat and they would not recommend epoxy to patch an aluminum tank. Then I talked to someone who builds ocean going research vessels. He said they’ve been trying for some time to find an epoxy for bonding to aluminum that they could have confidence in. They haven’t found one.

Since we’re putting in the new sole we want something with a high probability of success.

We’re currently exploring options including welded repairs to this tank; new off-the-shelf plastic; new custom plastic; though the discussion in Christian’s post makes me reluctant to try plastic ( https://ericsonyachts.org/ie/threads/plastic-diesel-fuel-tanks-worrisome-outcome-for-tally-ho.20227/ ) new custom aluminum; new custom fuel cell.
-
> > Has anyone successfully removed a diesel tank from a 35-3? Were you able to get it out of the companionway?

Thanks,
Jeff
 
Last edited by a moderator:

Tin Kicker

Sustaining Member
Moderator
Places that weld truck radiators can clean the interior, put it in water to find ALL the leaks, and then properly weld it. That’s what I did for the 32-3 and it came out great.
 

Dave G.

1984 E30+ Ludington, MI
I called Total Boat and they would not recommend epoxy to patch an aluminum tank.
I like some of their products especially the varnishes but before you abandon the epoxy idea you should really talk to West Systems directly. West has epoxy to repair aluminum hulls so I would debate Total Boat recommendations. That being said If you can get the tank out whole that is the best way to get it repaired. I could not get mine out without removing the engine or cutting the tank and neither of those options seemed logical to me at the time.
 

Frank Langer

1984 Ericson 30+, Nanaimo, BC
I like some of their products especially the varnishes but before you abandon the epoxy idea you should really talk to West Systems directly. West has epoxy to repair aluminum hulls so I would debate Total Boat recommendations. That being said If you can get the tank out whole that is the best way to get it repaired. I could not get mine out without removing the engine or cutting the tank and neither of those options seemed logical to me at the time.
The radiator shop and several metal fabrication shops told me that I can try to epoxy or weld a repair, but they all advised against it. The reason was that apparently aluminum tanks will somehow absorb some diesel fuel, making it almost impossible to get it totally clean to achieve a good bond. Although some on this site have has success with both epoxy repair and welding, i decided to replace the tank with a new aluminum tank, partly for the peace of mind.
Frank
 

Prairie Schooner

Jeff & Donna, E35-3 purchased 7/21
"not necessarily true or reliable, because based on personal accounts rather than facts or research." hmmm :)
I would not use that exact definition, Dave. I completely believe you've achieved success with your repair. So your account is based on fact and research. I just don't have high confidence that I can reproduce that success in a way that will last at least ten years. And our tank is boxed in such that I couldn't monitor it. Long may your repair succeed!!
 

vanilladuck

E32-3 / San Francisco
Blogs Author
The Temporary Janky Tanky

Following @Kenneth K's model I went a slightly different direction after some sleuthing. This temporary tank doesn't require any drilling or tapping -- but it does require finding a few harder-to-find parts.

PXL_20230409_193809107.jpg

The tank is a 6-gallon portable fuel tank, produced by Moeller and sold by West Marine. It comes with a self-venting fill cap, supply withdrawal pickup with 1/4 NPT thread, and a primitive fuel gauge which is a yellow nipple on the end of a teeter-totter with a float inside the tank.
620049LP-portable-tank_WI.jpg
By purchasing a few extra parts, I was able to use brass barbs with NPT threads to make all the necessary connections:
  • Supply Connection
    • Used the existing withdrawal supply connection
    • 1/4 NPT to 5/16" barb to match my 5/16" ID fuel hoses
  • Return Connection
    • Purchased another withdrawal supply connection and tube with a matching cap. The fuel gauge cap was removed and I pried the teeter-totter out with some pliers. The opening is the same size as the supply opening.
    • Finding another withdrawal tube was insanity, as West Marine didn't have one in stock and I couldn't find one *anywhere* online. I resorted to buying a smaller Moeller tank with one
    • 1/4" NPT to 1/4" barb to match my 1/4" ID fuel return hoses
  • Vent Connection
    • Found an older version of the portable tank fill cap with a manual vent. The vent can be completely removed exposing... yep, something close to a 1/4" NPT thread
    • 1/4" NPT thread to 5/16" barb and hose, then adapted to 5/8" barb for the vent hose to the stern of the boat
Viola!

PXL_20230409_193759887.jpg

Tested with a few fun little jaunts in the SF Bay and everything seems to be working. Thinking this will get me by while the new tank is fabricated.


New Tank Fabrication

@Prairie Schooner et al, I too am trying to hunt down a fabricator. I have a call into one that produced a tank for a friend's E32-3 about five years ago. I also ran across https://www.sptanks.com/, which looks promising with some nice durability features. I need to get some dimensions for a quote.
 
Top