EMKoper
Member II
First, I am an engineer and I am good at multiplying units, but understanding the battery "20 AH Rate" and using that information to size a solar trickle charger (non-regulated) has me a little perplexed. Clarity is desired ....
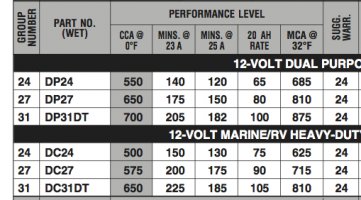
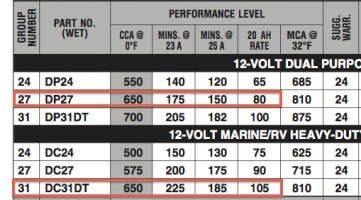
My 3 battery bank is 2x DC31DT house batteries and 1x DP27 Starter ... I would like to understand the size of a solar unit to trickle charge the full bank. From the Deka website:

*** Note: if you are reading this, the correct approach was not 3%, but 0.3% ... please keep reading! ***
OK ... I have read that a trickle charge is supposed to be 3% of the amp capacity (more that below) .. but I am a little lost in the "20 AH Rate" definition (sorry, engineering confusion, rate is "something"/"something" not "something"*"something" but don't let me overthink this, too) ...
The DP27 "20 AH Rate" is 80 ... I think this means that it have expel 4 amps per hour under a load that totally depletes the battery in a 20 hour period. So this would be an 80 AH battery... right?
The 2x DC31DTs are a rating of 105 ... which means they are each 5 amps per hour under load, so each is about a 100 AH battery ...
So, in total, I have ... (drum roll) .... 280 AH with a full charge by the "20 AH Rate" standard ... this seems basically reasonable but I have never pressed the test first hand on the true working capacity of these batteries.
I have this book, "Sailboat Electronics Simplified" by Casey (page 123) and it says that a maintenance current is 3% of the Amp-Hour Capacity which says I need 8.4 amp for maintenance (280 AH * 3%) or (based on their formula, amps*16V) 134 Watts of solar power to maintain charge under idle conditions. (never mind that the units don't multiple/divide correctly in their equation).
This seems unreasonable ... too high ... too much for simple maintaining a charge ... what am I missing?
My 3 battery bank is 2x DC31DT house batteries and 1x DP27 Starter ... I would like to understand the size of a solar unit to trickle charge the full bank. From the Deka website:
*** Note: if you are reading this, the correct approach was not 3%, but 0.3% ... please keep reading! ***
OK ... I have read that a trickle charge is supposed to be 3% of the amp capacity (more that below) .. but I am a little lost in the "20 AH Rate" definition (sorry, engineering confusion, rate is "something"/"something" not "something"*"something" but don't let me overthink this, too) ...
The DP27 "20 AH Rate" is 80 ... I think this means that it have expel 4 amps per hour under a load that totally depletes the battery in a 20 hour period. So this would be an 80 AH battery... right?
The 2x DC31DTs are a rating of 105 ... which means they are each 5 amps per hour under load, so each is about a 100 AH battery ...
So, in total, I have ... (drum roll) .... 280 AH with a full charge by the "20 AH Rate" standard ... this seems basically reasonable but I have never pressed the test first hand on the true working capacity of these batteries.
I have this book, "Sailboat Electronics Simplified" by Casey (page 123) and it says that a maintenance current is 3% of the Amp-Hour Capacity which says I need 8.4 amp for maintenance (280 AH * 3%) or (based on their formula, amps*16V) 134 Watts of solar power to maintain charge under idle conditions. (never mind that the units don't multiple/divide correctly in their equation).
This seems unreasonable ... too high ... too much for simple maintaining a charge ... what am I missing?
Attachments
-
 Deka Marine Master Specs (June 2009).jpg176.6 KB · Views: 49
 -
 Deka Marine Master Specs (June 2009).jpg183 KB · Views: 478
Last edited by a moderator:
") Thanks for the help ... this, and conversing with myself, was more therapeutic than anything!
Thanks for the help ... this, and conversing with myself, was more therapeutic than anything!  unctuationKerning/> <w:ValidateAgainstSchemas/> <w:SaveIfXMLInvalid>false</w:SaveIfXMLInvalid> <w:IgnoreMixedContent>false</w:IgnoreMixedContent> <w:AlwaysShowPlaceholderText>false</w:AlwaysShowPlaceholderText> <w