Thinking Ahead to Glassing in a Bottom Thru-Hull

windblown

Member III
I have yet to venture into the world of fiberglass repair, but I am considering glassing in two below-water thru-hulls next time the boat is pulled. I replaced a depth instrument with an Airmar DST-800 several years ago, when I added an NMEA-2000 backbone. The combined unit eliminated the need for the old speed transducer, but it's still in the hull. I'd like to pull it, and glass in that hole. I also have the old thru-hull under the head sink for an off-shore head discharge. It was disconnected from the head plumbing years ago, but the big marelon valve is still there, plugged with what I believe is a PVC fitting. I'd like to pull the thru-hull and glass it in. In both cases, there isn't an urgency to do this, but it seems to make sense to eliminate the risk of any kind of future failure. . .
I've read lots of posts and videos, but I still have a couple of questions before undertaking this DIY project below the waterline. 1. Am I crazy to try this as my first glass project? I'm pretty handy, and I follow directions well, but is this a risk I shouldn't take? 2. After glassing in these two holes, what kind of gel coat/barrier coat should I plan to add? I'm in the Great Lakes, so the boat is in fresh water from May - October. Like most sailors in our area, we use VC-17 for bottom paint, with a fresh (thin) coat each spring. From the records that I have, the hull had a full Interlux barrier coat applied maybe twenty years ago. The bottom is in good shape.
All input is welcome.
Thanks,
Deborah
 

Loren Beach

O34 - Portland, OR
Senior Moderator
Blogs Author
I would suggest you first d/l this manual. Hole repair starts on Page 20. There is a lot of great basic info throughout this manual and they do not charge for it.
I have used their products for over 20 years, and get no payment/payola to say so. :)

Apropos of whatever, I used to use VC-17 for a decade--- racing in fresh water here. I would get two years out of each application. Good stuff, Although I did have to have a diver wipe the bottom clean with a terry towel several times a season.
 

David Vaughn

Member II
Blogs Author
I agree with Christian.

I’ve done this a couple of times and it’s not a difficult task but having some previous experience fiberglassing non critical stuff, made it much less stressful when the time came.
Be warned, this repair done right requires a lot of grinding and cleaning - before and after. Laying the glass is relatively simple, the prep is the key and what takes most of the time.

If you think you still want to give it a go, get the manual Loren recommended. Study it like your boat depends on it. Then, get a modest amount of supplies. Glass several layers of cloth onto a plastic sheet and make a small sample hull section.

Drill a 1” hole in the middle. Follow the process for filling that hole. See how it goes. You may enjoy it. You may want to pay someone so you never have to do that again.

Patching the hole in your hull will be exactly the same process as patching that sample hole. Except depending on where the thru hull is, you’ll have to be on your back or working over your head.

Fiberglassing is a good skill to have, but there is a bit of a learning curve and not everyone enjoys it.
 

bigd14

Contributing Partner
Blogs Author
Assuming the thru hulls and valves are good, no real reason to. Never know when you might want to add something that needs a thru hull later.
 

N.A.

E34 / SF Bay
I am facing the same question, actually, so this is very useful. I will probably just leave the second sensor there as a spare.

Question though: where are the sensors? I pulled up the floorboards near the V-berth (where I assumed they would be) and did not see them. There is some fiberglass there that I am not sure if the hull... maybe they are glasses in? Whatever it is, I am sure it is origninal, not some later modification.

I sort of assume maybe they;re farther back (near the table? That requires removing the table to get the floorboards up, which is why I did not do it yet.) I have an E34-2 if that matters, but I assume there is a somewhat standard location (x % back from the bow, or something).
 

Prairie Schooner

Jeff & Donna, E35-3 purchased 7/21
I am facing the same question, actually, so this is very useful. I will probably just leave the second sensor there as a spare.

Question though: where are the sensors? I pulled up the floorboards near the V-berth (where I assumed they would be) and did not see them. There is some fiberglass there that I am not sure if the hull... maybe they are glasses in? Whatever it is, I am sure it is origninal, not some later modification.

I sort of assume maybe they;re farther back (near the table? That requires removing the table to get the floorboards up, which is why I did not do it yet.) I have an E34-2 if that matters, but I assume there is a somewhat standard location (x % back from the bow, or something).
In our V-berth there is a step up with a formica covered access panel. Lifting this reveals a round spin out access panel. Under that is our sensor. Yours may be different.
 

Pete the Cat

Sustaining Member
I am with the rest of the group with leaving it alone. Having said that, I would remove the PVC fitting from the Marlon through hull fitting when you are in the yard next time (in case something gets broken in the process). Apparently, in my boat, Ericson used some PVC that does not age well in the Marlon fittings--when I went to remove the PVC elbow in my 35 year old boat, it shattered into hundreds of pieces. I will remove the rest of it when I haul next time and look for hard to find genuine Marlon fittings. Also, the repair is, as others mention, easy but dirty to accomplish. You really do not have to go the extremes outlined in the West Manuals (feathering back 6 or 12 X the size of the hole). I have never seen anyone in the yards I have been in do that much to plug one--remember that you had a flimsy plastic plug in there before and it held, They generally fill the hole with thickened epoxy with some adhesive in it and put 3 layers of glass cloth over it. Also, you absolutely do not want to replace gelcoat below the waterline. Ever. As I have noted elsewhere, the Scandinavian builders (Swan, Nautor, Baltic) all stopped putting gelcoat below the waterline in their later years of production because of its propensity to soak up water and produce blisters. Gelcoat underwater is a major medium for producing blisters, is much more porous than folks seem to think and properly finished fiberglass with a barrier coat is better imho. I stripped my Tartan 37 of all gelcoat 25 years ago and never had a problem with any kind of blister or water intrusion in the glass. I think production boat folks just found it cheaper and easier to spray the whole mold with gelcoat in the production process.
 

Gaviate

Member III
After the galley sink thru-hull failed last season, it was pulled and hole glassed over by staff at Marina. I would have done it myself but ran into serious time constraints. Now, after pulling marine head, holding tank and associated plumbing for a composting conversion, I have it planned to also pull and glass over both head thru-hulls. Alas the clock is ticking so in the interest of actually sailing this season, I may do this in the fall since, as Christian says, no urgency here, unlike last year. For now they are just capped off on interior.
The bill from Marina listed 3.25 hrs labor, of which I would expect about 30 minutes for removal and grinding out area, with the balance of time to clean, glass in (multiple layers), fair and paint.
My first season of ownership had me rebuilding the deck on forepeak which was not hardly safe to walk on. Fiberglass work is messy but if you plan ahead, and ready the materials needed Before you mix, it will go much easier!
I'm also adamant that cleaning the area should be in between every step, between every layer whether you think it needs it or not.
As Loren suggests, reading is first, and greatly beneficial. If you are handy and can follow instructions, not to many things can go wrong with fiberglass.
 

Prairie Schooner

Jeff & Donna, E35-3 purchased 7/21
I have yet to venture into the world of fiberglass repair, but I am considering glassing in two below-water thru-hulls next time the boat is pulled. I replaced a depth instrument with an Airmar DST-800 several years ago, when I added an NMEA-2000 backbone. The combined unit eliminated the need for the old speed transducer, but it's still in the hull. I'd like to pull it, and glass in that hole. I also have the old thru-hull under the head sink for an off-shore head discharge. It was disconnected from the head plumbing years ago, but the big marelon valve is still there, plugged with what I believe is a PVC fitting. I'd like to pull the thru-hull and glass it in. In both cases, there isn't an urgency to do this, but it seems to make sense to eliminate the risk of any kind of future failure. . .
I've read lots of posts and videos, but I still have a couple of questions before undertaking this DIY project below the waterline. 1. Am I crazy to try this as my first glass project? I'm pretty handy, and I follow directions well, but is this a risk I shouldn't take? 2. After glassing in these two holes, what kind of gel coat/barrier coat should I plan to add? I'm in the Great Lakes, so the boat is in fresh water from May - October. Like most sailors in our area, we use VC-17 for bottom paint, with a fresh (thin) coat each spring. From the records that I have, the hull had a full Interlux barrier coat applied maybe twenty years ago. The bottom is in good shape.
All input is welcome.
Thanks,
Deborah
If you're comfortable with the security of the thru-hulls as they are, leaving them alone is a good plan. However, our surveyor called out the PVC fittings as a danger in need of replacement. In our case, we had three separate transducers which I removed and glassed the resulting big hole. Once complete we had a single tri-ducer installed.

The strength of fiberglass comes from the long fibers, like rebar in cement. Scarfing (angling) the hole allows the fibers of the patch to integrate with the structure of the hull. That was a key concept for me to grasp. That said, Ray makes a good point about extreme scarfing likely being overkill for a relatively small hole. I'd probably bevel out some, but not the full 12x.

@David Vaughn 's suggestion of a practice piece is great. Make a sample board or if there's someone local with an old FG canoe or dinghy which has a hole, that could be a good place to start. I happen to like fiberglass work. I'd rather do that than wood or engine work. It seems people have a bent for different materials and processes.

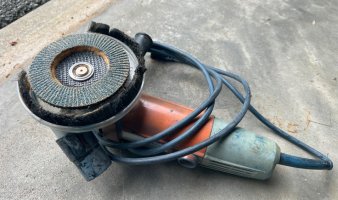
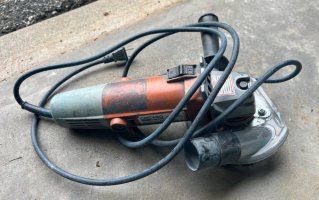
This bad boy has been indispensable:
tulz Grinder a sm.jpg tulz Grinder b sm.jpg
Typically I don't buy Harbor Freight tools, but this has actually worked out pretty well. Except the on/off switch guard isn't tall enough which has caused some startling unintended incidents. The dust collector hood is from Amazon. I have a big shop vac which pulled maybe 3/4 of the dust.

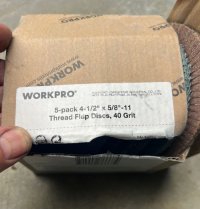
These flap wheels take off material like nobody's business:
tulz Grinder c sm.jpg

Solid leather gloves and a good dust cartridge respirator are vital, and eye protection, of course. Tyvek suit with hood will keep much of the dust off you.

Cheers,
Jeff
 

Loren Beach

O34 - Portland, OR
Senior Moderator
Blogs Author
These flap wheels take off material like nobody's business:
Waaay back when I ground/roughed up about six foot of inside bottom surface under the starboard settee -- for adding two layers of heavy cloth & roving to support a larger water tank--- I used a right angle grinder and put the shop-vac inlet hose with a cardboard "guide" taped around it a foot from the "out fly" of material. This picked up most of the dust and swarf. Very little cloud of hazzardous sanding dust floating around.
(I added some longer tabbing onto the nearby structure, as well.)

A 38 gallon custom ss water tank went into that space to replace the factory 23 gallon rotomolded plastic OEM tank.
A generous water supply pleases the Admiral, and her happiness contributes to my happiness. :)

And, unique to the O-34, when that tank is full the 2 degree port list goes away...... Win-Win.
 

KS Dave

Dastardly Villain
Blogs Author
Lots of good advice here - all of it I can support. However, when faced with a similar decision, I decided to go ahead and seal my unneeded holes closed. My holes were an intake valve for the marine head and a valve to pump the waste tank overboard. I was switching over to a porta-pottie and I'm on a lake, so I needed neither. One of them was so ill-placed, I couldn't have reused it later if I wanted to.

It was my first fiberglass project. I had some advice from a fellow club member who helped me make sure I had the feathering margins down correctly, but I went for it and I have zero regrets. I don't have to remember to exercise the valves and I've removed the liability of having PVC before the valve.
 

Kenneth K

1985 32-3, Puget Sound
Blogs Author
I have yet to venture into the world of fiberglass repair, but I am considering glassing in two below-water thru-hulls next time the boat is pulled.

I've done lots of epoxy repair work, and some that included fiberglass cloth or mat, but never jobs where appearance mattered. But I'll never take on a 6- or 12-to-one tapered exterior hull repair job.

After you do all those individual FG layers, you then have to fair and sand. Even if you do this perfectly, you are now exactly even with the hull surface. But then you still have to paint or gelcoat, which raises the repair surface up higher again which now needs to be leveled/blended again, back to the original hull surface height. This is advanced body-shop work.

You could just fill the holes with thickened epoxy. Even better, you could add a layer or two of cloth over the INSIDE surface of the hull (after you clean and sand it) before the repair plug has cured, if possible. You could even drill/screw 2-3 small screws into the interior sides of the open holes before filling with epoxy. Any cross-stranding (screws, plywood, or glass fibers) that extend beyond the diameter of the hole and into the adjacent hull itself make the repair stronger.
 

bigd14

Contributing Partner
Blogs Author
But I'll never take on a 6- or 12-to-one tapered exterior hull repair job.
Ditto. I have repaired a dozen thru hulls on two boats and after following this advice for the first I one I gave it up in favor of smaller tapers. I am prone to over engineering everything I touch, but given the thickness of the material where my thru hulls were located and the general stability of the surrounding areas the 12:1 seemed overkill even to me. Too much grinding and layering. Maybe for a thinner hull the 12:1 would be appropriate.

For some of the thicker areas I used a disc of G10 as filler. I finished the repairs with a large layer of 1708 biaxial fabric over the inside and outside of the repair area to bond everything together with the surrounding area. The end result was very solid when poking and prodding at it, so my OCD for bombproof installations was satisfied.
 

tenders

Innocent Bystander
I've done lots of epoxy repair work, and some that included fiberglass cloth or mat, but never jobs where appearance mattered. But I'll never take on a 6- or 12-to-one tapered exterior hull repair job.

Gosh, this is a pretty easy job in my experience, as long as you have a grinder. I tapered halfway through on each side of the hole and patched both sides with concentric circles of cloth, starting with the big one and finishing with the smallest one. Maybe six glass discs per side? I did the outside first, and the only real challenge was that the stack of epoxy and glass warmed up a bit as it cured, and slid a few inches down the side of the boat until I moved it back and (I think) held it in place with some Gorilla tape over waxed paper. Grinding that smooth wasn't difficult but if you're too generous with the epoxy, it can be hard to avoid sanding a divot in the surrounding softer fiberglass. Even that isn't too hard to fair with fairing epoxy. I left the inside as it cured.
 

Slick470

Member III
My first "major" fiberglass repair on our boat was filling in an old through hull. Turned out pretty easy as far as boat projects go. Our hulls are pretty thick so the big things I learned was to make up the hull thickness it actually takes up quite a few layers of fiberglass. I tried to simplify that by mixing in a few layers of 1708 vectorply which is two layers of single bias 9oz glass cloth stitched to a 3/4" random oriented mat. That helped cut down on the total number of layers. Even so, there were probably 30 or so layers of 10 oz glass. Another trick was to wet out several layers at a time on a plastic plate and stick them up together.

Depending on where your hole is you may or may not have choices on how you do your taper. Mine was mostly from the outside with a small taper on the inside to "lock" it in. Mostly that was due to the space constraints where the hole landed inside the boat. I would strongly recommend taping over the hole on the inside for any outside grinding as an impressive amount of fiberglass dust will get inside (oops).

Grinding was probably the worst part. Second was cutting all the fiberglass cloth circles, just because of the number needed, but that was done at home. Actually filling the hole with the circles and epoxy wasn't that bad.
 

Prairie Schooner

Jeff & Donna, E35-3 purchased 7/21
Do be aware that fiberglass mat is not compatible with epoxy. It has a coating which makes it saturate well with vinyl- or poly- ester, but not epoxy.

I prefer using epoxy which is stronger than the others, even though probably overkill for our applications.

Jeff
 
Have never done a thru-hole FRP patch but am curious if folks do all the layers at once? My experience with epoxy is it really starts to heat up and kick hard with multiple/many layers. I'll usually only do 2 or 3 at a time - maybe this isn't as relevant for smaller things but just wondering
 

Slick470

Member III
Do be aware that fiberglass mat is not compatible with epoxy. It has a coating which makes it saturate well with vinyl- or poly- ester, but not epoxy.

I prefer using epoxy which is stronger than the others, even though probably overkill for our applications.

Jeff
Partially true on the mat and compatibility with epoxy. You need to make sure you order it without binder. The product that I used did not have a binder.

Out of curiosity, I did a quick search to see what the current thinking is and I found this on the EpoxyWorks website:

Can WEST SYSTEM® Epoxy be used to wet out chopped strand mat? The answer is yes. The fiberglass strand in mat wets out with epoxy, but the binder holding things together does not dissolve. (It does get put into suspension and is sealed in the cured epoxy.) This undissolved binder causes the wet-out mat to remain a bit stiff compared to wet-out with a styrene-based resin. For gently curving or flat projects like cabin soles or plywood decks, mat and epoxy should work fine. The fabric does not wet out perfectly clear with epoxy. Wet-out clarity of mat with epoxy varies somewhat with different suppliers, but none of them wet out as clear as a good 4 oz or 6 oz fiberglass cloth.
So maybe less of a concern than it used to be?
 

Slick470

Member III
Have never done a thru-hole FRP patch but am curious if folks do all the layers at once? My experience with epoxy is it really starts to heat up and kick hard with multiple/many layers. I'll usually only do 2 or 3 at a time - maybe this isn't as relevant for smaller things but just wondering
I did my layup in one pass. Managing heat is the trick. I was under the boat so in the shade, the through hull location never had full sunlight so no local heating. You can also do things like chill the epoxy but I found that just working in the shade kept things from kicking off before I was done.
 
Top