What's Beneath the Bump?

Grizz

Grizz
I believe the time has come to reach out to the assembled Ericson family, but not before a bit of background:
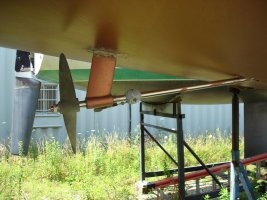
  • A month ago I shoved the prop strut laterally while crawling 'round beneath the boat...and it rocked about 1/8" to port and starboard (immediate thought = "this can't be good")
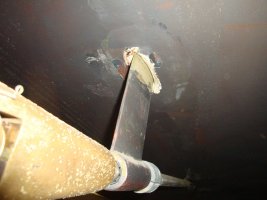
  • There is access from above, somewhat, to the strut, but the only visible trait is a glassed in 'bump'.
  • From the outside, it appears that there is a base plate that surrounds the strut, but there are no bolts/screws visible.
  • No chipping or grinding has occurred, yet, but these are next in queue, if necessary
  • I have searched and used the 'Advanced Search' option within this site, to no avail. I've Googled and queried elsewhere and still haven't found what's actually beneath this bump in this Olson 34. I did find a sketch of a strut embedment to an E-34 #203, which helped a bit, somewhat. There remain questions.
  • The pre-purchase survey recommended fairing of the mushed in thickened epoxy (my words) but did not ask why there was mushed in thickened epoxy in that particular location. In retrospect, an error of omission on my part.
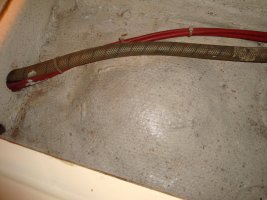
So now I'm hoping that there's someone who has encountered a similar problem and can provide insight. I believe the 3 pics attached will explain a lot. As Loren will attest "It's always something"...
 

Attachments

  • Exterior P&S Gap.jpg
    Exterior P&S Gap.jpg
    78.4 KB · Views: 47
  • Olson strut glassed-in 'hump'.jpg
    Olson strut glassed-in 'hump'.jpg
    98.8 KB · Views: 53
  • 'As Bought' Strut and Prop.jpg
    'As Bought' Strut and Prop.jpg
    116.1 KB · Views: 47

Loren Beach

O34 - Portland, OR
Senior Moderator
Blogs Author
Mystery Lump of Fiberglass

I do not know of anyone who has ground off the glass on the inside. Our boat looks just the same, and (knock wood) our strut remains solid. My misplaced intuition is that there must be some sort of "T" shape to the top of the casting, but that would not have allowed them to insert the strut thru a narrow slot in the hull bottom. Much More logical is that there is a molded recess in the bottom and the strut was thru-bolted to a plate on the inside and then heavily glassed over. Even that is only a SWAG.

Anyone with narrative or pictures of grinding out the inside of the strut attachment on an 80's Ericson or Olson, please post!

This work is not on any "list" for us -- yet -- but the future is out there.

Best,
Loren
 

Wind River

Inactive Member
did this fix on an E38

if you search on "E38 strut" you will find a pic showing the fix I had done to my strut. The bump was ground off. There is a backing plate to the strut that was then through bolted to the hull bottom. Did this maybe 5 years ago and it is solid. No stress cracks whatsoever.
 

Grizz

Grizz
The E 38 Strut Puzzle Piece

Thanks Wind River, I found your image during my initial search and it's filed in the Strut Repair file. I'm still not sure if your repair and OEM strut configuration are identical to the O-34, but answers to a few questions may help guide:
  • Are your 6 mounting bolts visible from the exterior?
  • Once ground out and exposed, did you have to remove the strut to prep for the re-install?
  • Is your strut (and perhaps mine) a 2-part component (strut and plate)?
  • Do you remember what the plate is bedded and attached to (directly to hull)?
  • Any other pics of the process and final product (from the exterior)?
I guess there's 1 additional question: did you ever figure out what caused the 'wobble'? If so, what caused it? (Yeah, yeah, I know, that's technically 2 questions!)

Thanks for the help, thus far.
 

Loren Beach

O34 - Portland, OR
Senior Moderator
Blogs Author
Convening a Panel of "Experts"

Our "retired sailor coffee drinking and walking group" (AKA the Geezer Club) discussed this problem this morning...
Couple of 'em have had strut work done over the decades. Best narrative by far was about having the yard grind away the whole 'lump' to expose whatever was inside the hull. Then they reportedly laid in thickened epoxy around the part, and cloth, and more of both and built it up again. No more strut movement.
The owner did not get to see the dusty work site and has no report on what it all looked like after the archeological dig was initially accomplished. :)

LB

ps: this thread: (?)
http://www.ericsonyachts.org/infoexchange/showthread.php?6789-E-38-Strut&referrerid=28
 
Last edited:

tenders

Innocent Bystander
If you have decent access to the bump, I'd hit it with an angle grinder until it reveals its secrets.

There are much worse places for something like this to happen. This situation is horizontal, noncosmetic, easily vacuumed while grinding, and gravitationally simple for the ensuing repair to set up.

Just remember to stop grinding at the first sign of metal or daylight!
 
Last edited:

Grizz

Grizz
"gravitationally simple"!

Loved the imagery, akin to the cautionary: 'Warning! Gravity in Effect'. And yes, seeing 'daylight' will indicate a bit too much grinding. There is access, the vacuum can suck while the grinder whirrrrs and it appears as though there's only a 1/2+" rise that creates the bump. If most of that is plate...it shouldn't take much to expose the metal.

From this beginning, the on-going concern is there's been nothing definitive to indicate why there's movement on this strut, IE - what's become loose, why it became loose or worse...what's failed. The cosmetic repair by the PO didn't solve anything and now the search for the root cause begins in earnest, with a permanent fix to follow close behind.

And to Loren's reply, the question is whether Molly Ringwald is a member of your club. Oh right...that was 'Breakfast Club', although she may be of the right age these days. Nevermind...
 

tcooper

Member II
What I've been doing when there's an unknown is, rather than grinding, I drill 3/8" or 1/2" holes slowly till I find the wood or structure under. I put electrical tape on bit so I can tell where I'm at. Much easier to fix if I see "daylight"..... Ok I admit it I saw daylight once:rolleyes:.

Tom
 

footrope

Contributing Partner
Blogs Author
Thanks Wind River, I found your image during my initial search and it's filed in the Strut Repair file. I'm still not sure if your repair and OEM strut configuration are identical to the O-34, but answers to a few questions may help guide:

  • Are your 6 mounting bolts visible from the exterior?
snip

Griz,

There are no exposed fasteners for the strut, inside or outside the hull, on my Ericson 38. In the strut repairs and pictures spread around in this forum, I've not seen or heard of exposed fasteners. The solutions described have been to grind away the inside until the strut can be worked on or replaced and then once the alignment is done it's all covered up again, inside and outside. The outside hull would have to be ground to expose fasteners once the pattern is known from the inside grinding.

Based on your pics that's probably the OEM configuration. Good luck.
 

Loren Beach

O34 - Portland, OR
Senior Moderator
Blogs Author
It's a generational thing

And to Loren's reply, the question is whether Molly Ringwald is a member of your club. Oh right...that was 'Breakfast Club', although she may be of the right age these days. Nevermind...

Ms Ringwald is a generation behind us.
Now if Diane Keaton or Susan Sarandon want to join us, just to go for a walk of course, that's entirely different! :rolleyes:

LB
 

Slick470

Member III
an old post on the Olson 911 email list indicates that someone went in from the bottom once and ended up with a decent result. I'd probably grind carefully from the top myself though...

"... have fixed loose strut the bronze strut is held in a pocket in the hull. the top of the strut has 2 nut and bolts that are perpendicular to the fore aft alinement of the strut itself. It is basicly glassed in place ins the recess of the hull, I dug the strut out from the bottom and had a local fiberglass guy reinstall it using amix he called bog (short and chop strand). my cost about $100 ,I would have spent that on material easy!"

http://www.sailpix.com/email/olson911/2009/0572.html

If Ericson did the two bolts for the strut on the O34 like they did on the O911 and they are even a bit loose, there would be your side to side wobble. Best of luck and please post pictures of what you do find.
 

Grizz

Grizz
Sneaking up on the answer!

Hints to what lies beneath are trickling in and a definitive won't be known until mid-January, as the yard is closed until the 9th :confused: and the 'chip grind and drill' procedure won't begin until at least the 14th. This helps, as the 911 (and O-30) should serve as viable references. Not quite sure what the "2 bolts perpendicular to the fore and aft' actually means, as it could mean the bolts are at 12 & 6 o'clock or 3 and 9 o'clock. I'm hoping it's the latter. I did like the $100 barometer, but it's a few years ago and this is Chicago, so the inflation factor kicks in.

Thanks for the reply. And yes, there will be pics, eventually, of the OEM assembly and the eventual repair. Take care.
 

Grizz

Grizz
The Strut Repair (AKA - The Shade Tree Mechanic's Approach)

Since there's time to kill before the grinding, drilling and chipping begins, here are the initial thoughts:
  • A final alignment of the strut and shaft will eventually be necessary, especially if removal of the shaft is required and the strut moves in any direction...even if it's a little.
  • A plumbed support of the strut in its current elevation and angle has been built (2x4's w/ plywood spacers + a small plywood platform to support the base of the strut), which will eventually be indexed on the pavement with marking spray paint. This should permit the repair to be completed within 1/16" +/- of this existing orientation.
  • All grinding/drilling and chipping will be completed with this support in position, from the interior (fingers crossed)!
  • I hope I don't have to drop the rudder to slide out the shaft, which means the zinc will have to be removed (easy) and the shaft uncoupled from the tranny and stuffing box (not so easy). Ugh.
  • I hope 'the wobble' is just an indication of age and only requires a nip, torque and tuck and NOT an indication of failure, fatigue or rot. Or worse...all the previous!
So, there you have it. The Cliff Notes version, thus far. Stay tuned, pics to follow by month's end.
 
Top