Owned an Ericson 27 for 10 years. Went bigger with a Pearson 36-2.
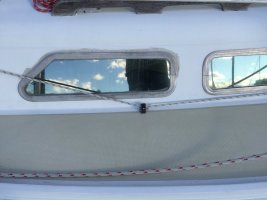
I thought I’d share my experience of rebedding my portlights on my 1977 Ericson 27. To more or lesser degree all portlights leaked.
On the exterior, PO(s) smeared silicone around the frame, and on some cases along the glazing/gasket connection inside and out.

EXTRACTION
I always operated on the assumption that if frame went in, it would have to come out. Thankfully, no 5200 or 4200 was used. Foam adhesive tape was used originally.
On the inner frame, the SS screws came out with a moderate amount of coaxing. A couple of stubborn ones needed a little PB blaster. But nothing too bad.
In my case, the exterior was the challenge. I lightly scored the silicone and sprayed with various applicants. Debond worked best. It is expensive, but worth it. Spray and let it sit and work. That usually meant 10 minutes. It loosened the silicone in a hurry and seeped down into the frame/cabin connection. While Debond was doing its thing, I took a straight razor and slowly worked it deeper into the frame/hull space, little by little with each pass, slowly working into the foam adhesive tape. As I worked into the crevice I used putty knives as shims to keep the opening. To further work the frame out my tool of choice was a 6-in-1 painters tool.
When the frame felt loose enough to push out, I found it nice to have a second pair of hands to ensure that I didn’t push the unit into the water. I did couple on my own but positioned myself outside the cabin and made sure some body parts were between the frame and the Hampton River. I’d say two frames came out easily. Two frames needed a couple of pushes. And two needed someone on either side as we worked it out, sometime pushing relatively hard and even giving firm love taps.
I soaked the adhesive remaining on the cabin with Debond, and then went at it with a razor blade. I made sure I was using a sharp razor blade. I wasn't shy about switching them out frequently. Made a big difference. As I got down to silicone residue I used all kinds of stuff to loosen it on the cabin exterior. Based on my experience, alternating between Debond, acetone, and even MEK helped get residue completely off. Two other pieces of advice. Walk away sometimes so that impatience and frustration at PO’s decisions to use silicone don’t lead to scratching or gouging the cabin top. Also, dragging the sharp razor back across the adhesive is as or more effective at raising up the offending material as trying to push the razor into it once the adhesive residue is hardly visible but still there. It’s easy to tell when it’s as gone by running your thumb along the area.
Once the frames were out, where needed I used a dremel with barrel sander to smooth off sharp edges of rough cuts and to even out humps that I suspected made the frame hard to pop out.
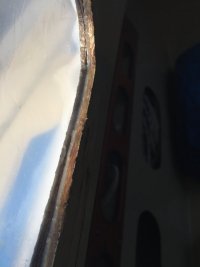
In each port opening there was a gap between the exterior cabin top and the interior cabin lining. Sometimes these pieces where touching but in most places there was a significant gap of 1/8” to ¼” wide. I filled these gaps with West Systems 610 and smoothed it into and over the edges until there were no visible openings or pinholes. I also smoothed the epoxy over all flat surfaces on the two linings so any future leaks would not penetrate between or into the linings. Here’s a picture:

CLEANING THE FRAMES
This phase required the most patience. The amount of crud and silicone was maddening to clean up. I would estimate that cleaning frames to satisfaction took at least two hours per frame, spread out over time to let solutions do their work on the crud and adhesives.
My approach was to clean the loose crud and adhesive tape off the inner and outer frames with Debond. That stuff made the bulk of the foam tape come off quite easily with a scraper and fingers (with nitrile gloves, have a box of gloves on hand).
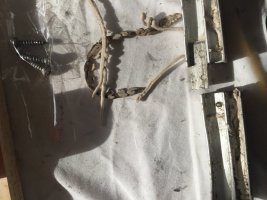
These frames have 1 rectangular piece of aluminum with two drilled holes that hold the frame together. The forward smaller frames require riveting on both sides because those frames are two pieces. I drilled into tops of rivets with a 1/8” drill bit and with a light twist the tops would pop off being careful not to enlarge the existing hole. I used a center punch to pop the rivets out. I soaked the aluminum rectangular pieces in acetone to clean crud and silicone until I was ready to reinsert them. [Note: On one of the larger frames I lost track of what I was doing and riveted the aluminum piece on the outer side of the frame. That wouldn’t work on the larger frame because it will interfere with the tight fit when reinstalling].
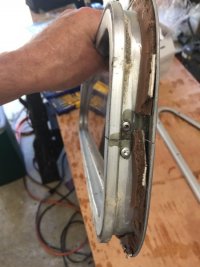
Here is a picture of a frame with foam remnants still there and the rivets:

GLAZING EXTRACTION
Once rivets are popped the glazing comes out. These processes were all doable single handed. But two people can make it much easier. It helped to have one person holding the larger frame open while I worked out the glazing and gasket being patience to work slowly to not bend the frame or crack or fling the glass across the garage. This took some steady but heavy pulling.
It appeared to me upon taking the glazing and gasket off that most of my leaking problems originated where the frame comes together. I’m sure they leaked in other places, but the connection is problematic and needs special attention in my opinion.
Once disassembled I had a lot of work to clean up the frames and safety glass. I cleaned the bahgeezus out of the frame and and glass. I started with Debond and acetone. On the glass I used a razor blade on the exterior, but on the interior had to be much more careful with the tinting. Kudos to the Ericson 27 Facebook site contributor who suggested also using Never Dull on the frame. That stuff really loosens the silicone and adhesive material once you’ve worked with the Debond as much as possible. Never Dull at the end of a screwdriver eventually gets all the gunk out of the inner troughs and off the surfaces of the inner and outer frame.
Once cleaned up—again, that took hours—it’s time for reassembly. I purchased materials from Catalinadirect.com. The order came with glazing gasket, the inner finishing trim, Dow Corning 795 sealant, and 3M 4000 for bedding the frame to the cabin.
I taped off glass leaving about 3/8” along edges to clear the gasket. A mistake I made on the first reassembly was using too much 795 sealant in the frame trough and inside the gasket. As another E27 owner advised me, a bead of between 1/8” to ¼” inch of 795 in the gasket is about all it takes to ensure a good seal. And about a ¼” bead in the frame. The glazing and gasket go into the frame so tightly that leaking there is unlikely if you seat it properly.
Seating the glazing and gasket is a critical step to have a good seal and a good looking portlight. Doing all six allowed me to become much better over time. A few things that worked for me were: 1) have gasket come together at the top of the glass, and have a slight overlap 1/8 to ¼” to ensure you don’t come up short. You can always cut it, 2) when seating gasket on glazing seat it firmly pushing out air bubbles, 3) I dribbled small amount of soapy water to help gasket and glazing work into frame, 4) work glass in very slowly using large clamps to assist (ever so slowly). I used a plastic epoxy mixing stick to help seat the gasket in frame, 5) while working glass/gasket in, its most important to focus on gasket not stretching out of shape, and make sure you are pushing gasket down into frame even if it separates from bottom of glass. Glass will work back to position. I found this maneuver critical to ensure an eventual complete gasket/frame seating. Otherwise you end up with a gap between frame and gasket top edge.

After all this, my first reinstall leaked a bit. Leak was where frame comes together at riveted joint. I redid the rivets and used 795 in the rivet holes, frame seam, under and over and around the aluminum piece, and then refastened. That leak seems to be taken care of.
I used butyl tape when replacing windows and not the 4000 that came with my kit. Decision made simply because I’m more comfortable using butyl and it has not let me down yet for compression fits. Also, I was still unsure that I had gotten all silicone off given 1) what I have read about the tenacity of the stuff, and 2) the copious amounts of silicone used by PO. And I was concerned that silicone I missed might compromise another type of sealant. I made sure that the butyl was even with the frame edge, or slightly overlapped by 1/32” to 1/8”. Two mistakes I made on the first reinstall were 1) too much butyl tape. I used 2 strips on the first window and it was too much for my liking, and 2) on the second window I did not make sure of overlap with frame and ended up with a minute leak. Rebedded and so far so good. [Note: butyl will not stick to 795 so that area around rivets took some finessing. Trim excess. Don’t tighten all the way. A firm snug at first and then tighten down later. Tightening opposite screws].
On the exterior, PO(s) smeared silicone around the frame, and on some cases along the glazing/gasket connection inside and out.
EXTRACTION
I always operated on the assumption that if frame went in, it would have to come out. Thankfully, no 5200 or 4200 was used. Foam adhesive tape was used originally.
On the inner frame, the SS screws came out with a moderate amount of coaxing. A couple of stubborn ones needed a little PB blaster. But nothing too bad.
In my case, the exterior was the challenge. I lightly scored the silicone and sprayed with various applicants. Debond worked best. It is expensive, but worth it. Spray and let it sit and work. That usually meant 10 minutes. It loosened the silicone in a hurry and seeped down into the frame/cabin connection. While Debond was doing its thing, I took a straight razor and slowly worked it deeper into the frame/hull space, little by little with each pass, slowly working into the foam adhesive tape. As I worked into the crevice I used putty knives as shims to keep the opening. To further work the frame out my tool of choice was a 6-in-1 painters tool.
When the frame felt loose enough to push out, I found it nice to have a second pair of hands to ensure that I didn’t push the unit into the water. I did couple on my own but positioned myself outside the cabin and made sure some body parts were between the frame and the Hampton River. I’d say two frames came out easily. Two frames needed a couple of pushes. And two needed someone on either side as we worked it out, sometime pushing relatively hard and even giving firm love taps.
I soaked the adhesive remaining on the cabin with Debond, and then went at it with a razor blade. I made sure I was using a sharp razor blade. I wasn't shy about switching them out frequently. Made a big difference. As I got down to silicone residue I used all kinds of stuff to loosen it on the cabin exterior. Based on my experience, alternating between Debond, acetone, and even MEK helped get residue completely off. Two other pieces of advice. Walk away sometimes so that impatience and frustration at PO’s decisions to use silicone don’t lead to scratching or gouging the cabin top. Also, dragging the sharp razor back across the adhesive is as or more effective at raising up the offending material as trying to push the razor into it once the adhesive residue is hardly visible but still there. It’s easy to tell when it’s as gone by running your thumb along the area.
Once the frames were out, where needed I used a dremel with barrel sander to smooth off sharp edges of rough cuts and to even out humps that I suspected made the frame hard to pop out.
In each port opening there was a gap between the exterior cabin top and the interior cabin lining. Sometimes these pieces where touching but in most places there was a significant gap of 1/8” to ¼” wide. I filled these gaps with West Systems 610 and smoothed it into and over the edges until there were no visible openings or pinholes. I also smoothed the epoxy over all flat surfaces on the two linings so any future leaks would not penetrate between or into the linings. Here’s a picture:
CLEANING THE FRAMES
This phase required the most patience. The amount of crud and silicone was maddening to clean up. I would estimate that cleaning frames to satisfaction took at least two hours per frame, spread out over time to let solutions do their work on the crud and adhesives.
My approach was to clean the loose crud and adhesive tape off the inner and outer frames with Debond. That stuff made the bulk of the foam tape come off quite easily with a scraper and fingers (with nitrile gloves, have a box of gloves on hand).
These frames have 1 rectangular piece of aluminum with two drilled holes that hold the frame together. The forward smaller frames require riveting on both sides because those frames are two pieces. I drilled into tops of rivets with a 1/8” drill bit and with a light twist the tops would pop off being careful not to enlarge the existing hole. I used a center punch to pop the rivets out. I soaked the aluminum rectangular pieces in acetone to clean crud and silicone until I was ready to reinsert them. [Note: On one of the larger frames I lost track of what I was doing and riveted the aluminum piece on the outer side of the frame. That wouldn’t work on the larger frame because it will interfere with the tight fit when reinstalling].
Here is a picture of a frame with foam remnants still there and the rivets:
GLAZING EXTRACTION
Once rivets are popped the glazing comes out. These processes were all doable single handed. But two people can make it much easier. It helped to have one person holding the larger frame open while I worked out the glazing and gasket being patience to work slowly to not bend the frame or crack or fling the glass across the garage. This took some steady but heavy pulling.
It appeared to me upon taking the glazing and gasket off that most of my leaking problems originated where the frame comes together. I’m sure they leaked in other places, but the connection is problematic and needs special attention in my opinion.
Once disassembled I had a lot of work to clean up the frames and safety glass. I cleaned the bahgeezus out of the frame and and glass. I started with Debond and acetone. On the glass I used a razor blade on the exterior, but on the interior had to be much more careful with the tinting. Kudos to the Ericson 27 Facebook site contributor who suggested also using Never Dull on the frame. That stuff really loosens the silicone and adhesive material once you’ve worked with the Debond as much as possible. Never Dull at the end of a screwdriver eventually gets all the gunk out of the inner troughs and off the surfaces of the inner and outer frame.
Once cleaned up—again, that took hours—it’s time for reassembly. I purchased materials from Catalinadirect.com. The order came with glazing gasket, the inner finishing trim, Dow Corning 795 sealant, and 3M 4000 for bedding the frame to the cabin.
I taped off glass leaving about 3/8” along edges to clear the gasket. A mistake I made on the first reassembly was using too much 795 sealant in the frame trough and inside the gasket. As another E27 owner advised me, a bead of between 1/8” to ¼” inch of 795 in the gasket is about all it takes to ensure a good seal. And about a ¼” bead in the frame. The glazing and gasket go into the frame so tightly that leaking there is unlikely if you seat it properly.
Seating the glazing and gasket is a critical step to have a good seal and a good looking portlight. Doing all six allowed me to become much better over time. A few things that worked for me were: 1) have gasket come together at the top of the glass, and have a slight overlap 1/8 to ¼” to ensure you don’t come up short. You can always cut it, 2) when seating gasket on glazing seat it firmly pushing out air bubbles, 3) I dribbled small amount of soapy water to help gasket and glazing work into frame, 4) work glass in very slowly using large clamps to assist (ever so slowly). I used a plastic epoxy mixing stick to help seat the gasket in frame, 5) while working glass/gasket in, its most important to focus on gasket not stretching out of shape, and make sure you are pushing gasket down into frame even if it separates from bottom of glass. Glass will work back to position. I found this maneuver critical to ensure an eventual complete gasket/frame seating. Otherwise you end up with a gap between frame and gasket top edge.
After all this, my first reinstall leaked a bit. Leak was where frame comes together at riveted joint. I redid the rivets and used 795 in the rivet holes, frame seam, under and over and around the aluminum piece, and then refastened. That leak seems to be taken care of.
I used butyl tape when replacing windows and not the 4000 that came with my kit. Decision made simply because I’m more comfortable using butyl and it has not let me down yet for compression fits. Also, I was still unsure that I had gotten all silicone off given 1) what I have read about the tenacity of the stuff, and 2) the copious amounts of silicone used by PO. And I was concerned that silicone I missed might compromise another type of sealant. I made sure that the butyl was even with the frame edge, or slightly overlapped by 1/32” to 1/8”. Two mistakes I made on the first reinstall were 1) too much butyl tape. I used 2 strips on the first window and it was too much for my liking, and 2) on the second window I did not make sure of overlap with frame and ended up with a minute leak. Rebedded and so far so good. [Note: butyl will not stick to 795 so that area around rivets took some finessing. Trim excess. Don’t tighten all the way. A firm snug at first and then tighten down later. Tightening opposite screws].


