Aside from needing to replace most things still original, when I took possession of Tween'r the first thing identified as needing attention were the leaky handrails on the dog house. While inspecting the project, I was a bit surprised to learn the rails were not through bolted with access from below. I didn't notice this when I was inspecting the boat for purchase, even though it wouldn't have made any difference. After researching the excellent forums here at EricsonYachts.org, I learned that most of the attachments were secured via barrel nuts glassed into the deck (the end bolts are through bolted with accessed provided via the metal covers in the liner.) I immediately realized, this wasn't going to be a standard handrail removal, refinish, and rebed project. I was right.

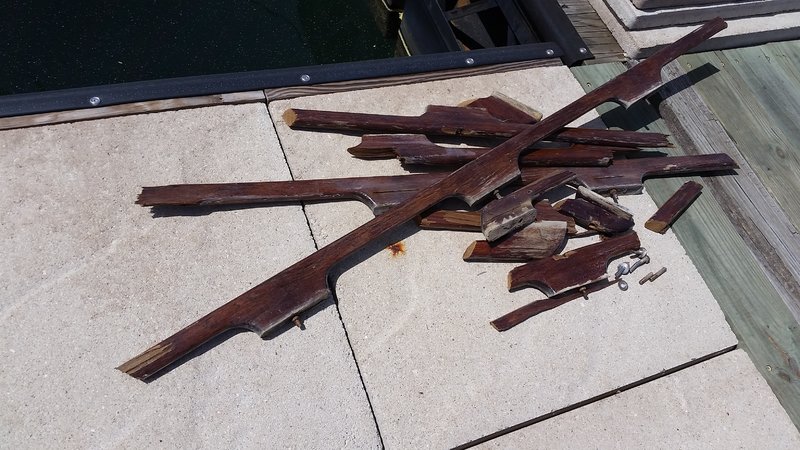
I started removing (digging) out the 40-year-old bungs to find those lovely slot-headed bolts (I hate those damn things). To make matters worse, the tops of them were covered in the epoxy used to secure the bungs. So, there would be no getting a grip on those slot-heads to back out anything. Removal, Refinish, and Rebed became Demolition, Replace New, and Instal. Break out the sawzall and wiz wheel.

Once the pieces were cut into manageable pieces, all it took was a little pressure and those glassed in barrel nuts popped right out. The ones that were leaking were not attached at all, so they make one hell of a hole. No wonder they leaked like a firehose. Long story short, they weren't long for this world anyway, so replacing them ended up being the proper thing to do anyway. Now they can be done in a proper fashion.

The next question was: What to replace them with? One thing was sure, there would be no buying production rails off the self. The standard foot print of today isn't anything close to what they were 40 years ago. They would have to be custom made. And there are some great posts on this site where folks have done just that. I am not that handy. I thought about stainless, but they were cost prohibitive. I thought about commissioning the job out to have some more teak rails fabricated, but decided against it. I wanted something that looked good but required less maintenance (don't we all). I decided on PlasTeak. https://www.plasteak.com/. The cost of production for 7/8" rails was $1.00 an inch. I did the math and realized it wasn't too bad ($96.00 for each side). BUT ... due to the length of each side, shipping was going to be $138.00. OUCH!
So, I decided to break them up into two sections per side. A three looper and a two looper. That brought the cost of the rails down to $83.00 per side and the shipping to $33.00. PERFECT! Ship them! When they arrived, I couldn't have been more pleased.
The only thing left to do was to drill out the existing holes to a half inch, remove the rotten core, refill with thicken epoxy, re-drill the new holes through the overhead, rebed them with butyl rubber, and bolt them in. I must say that breaking them up into two sections looks better (to me anyway) than one continuous rail. It gives the dog house a bit more definition. And above everything else, I love the look and everybody on the dock seems to agree. I couldn't be happier.


I started removing (digging) out the 40-year-old bungs to find those lovely slot-headed bolts (I hate those damn things). To make matters worse, the tops of them were covered in the epoxy used to secure the bungs. So, there would be no getting a grip on those slot-heads to back out anything. Removal, Refinish, and Rebed became Demolition, Replace New, and Instal. Break out the sawzall and wiz wheel.
Once the pieces were cut into manageable pieces, all it took was a little pressure and those glassed in barrel nuts popped right out. The ones that were leaking were not attached at all, so they make one hell of a hole. No wonder they leaked like a firehose. Long story short, they weren't long for this world anyway, so replacing them ended up being the proper thing to do anyway. Now they can be done in a proper fashion.
The next question was: What to replace them with? One thing was sure, there would be no buying production rails off the self. The standard foot print of today isn't anything close to what they were 40 years ago. They would have to be custom made. And there are some great posts on this site where folks have done just that. I am not that handy. I thought about stainless, but they were cost prohibitive. I thought about commissioning the job out to have some more teak rails fabricated, but decided against it. I wanted something that looked good but required less maintenance (don't we all). I decided on PlasTeak. https://www.plasteak.com/. The cost of production for 7/8" rails was $1.00 an inch. I did the math and realized it wasn't too bad ($96.00 for each side). BUT ... due to the length of each side, shipping was going to be $138.00. OUCH!
So, I decided to break them up into two sections per side. A three looper and a two looper. That brought the cost of the rails down to $83.00 per side and the shipping to $33.00. PERFECT! Ship them! When they arrived, I couldn't have been more pleased.
The only thing left to do was to drill out the existing holes to a half inch, remove the rotten core, refill with thicken epoxy, re-drill the new holes through the overhead, rebed them with butyl rubber, and bolt them in. I must say that breaking them up into two sections looks better (to me anyway) than one continuous rail. It gives the dog house a bit more definition. And above everything else, I love the look and everybody on the dock seems to agree. I couldn't be happier.

