Thru-Hull ?

Tegski

Junior Member
Hi! Just picked up a 1978 E29 on the southern gulf coast of Florida.

Seems to be in relatively well cared for condition, excluding a few of the PO's wiring choices.

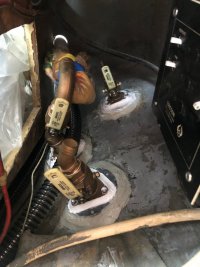
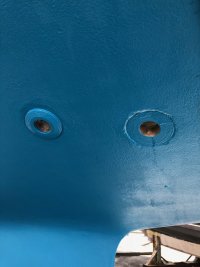
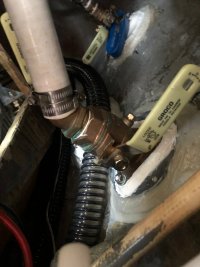
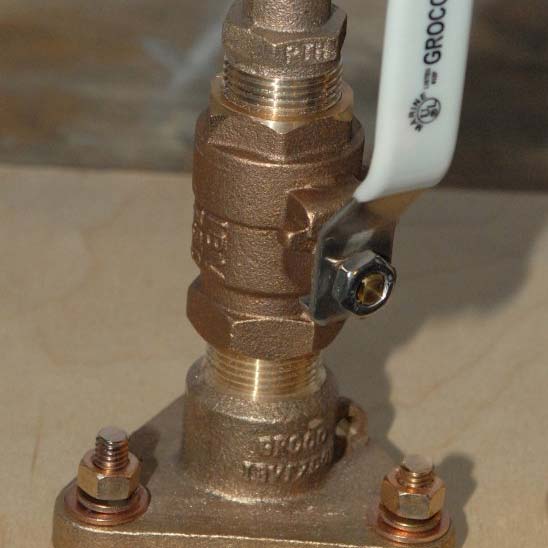
I need to replace the seacock and thru hull for the head sink, and also a seacock for the water intake for the A4. Does anyone know off the top of their head what size these are and if they were even a standard size? I've never had to replace thru hulls and I'm attempting to order them in before the boat goes on the hard so I dont have to pay for additional time.

Budget is key since my business is shut down at the moment, otherwise I'd not worry about timing.
 

goldenstate

Sustaining Member
Blogs Author
Given the variety of changes that may have occurred to your new craft in the last 42 years, you might be better off measuring in person, or even waiting until the old ones are removed before your decide what size/material to replace them with.

Are you putting in a flanged seacock that will be screwed to a backing plate?

Your boat probably did not come with that, but that style is what is now recommended.
 

JPS27

Member III
I believe on my e27 mine the sink was 1 1/4" and the raw water was 3/4", but I can double check. I'll have to dig thru some files. I got backing plates from some guy on ebay for cheaper than groco's. And saved me the time from making them. I bought the t-h's from groco directly and talked to some fellow named Patrick if memory serves. He was super helpful. I hadn't done thru hull changes either and did 4, 2 years ago. They are still working! I followed advice on this site and the mainesail site. here's a pic. you can see the raw water in the back and there's a t-h for a supper drain in between. (somewhere on this site is a thread where i asked a bunch of questions as I was doing the install.

I didn't wait to measure as goldenstate suggests. Probably a good idea. but then you are waiting for shipping while on the hard. One thing I didn't expect was that at least one of the t-h holes had some sort of plastic rim or flange built in that seated the head of the t-h flush. see raw water in pic.
 

Attachments

  • IMG_0035.jpg
    IMG_0035.jpg
    117.1 KB · Views: 41
  • IMG_0053.jpg
    IMG_0053.jpg
    125.3 KB · Views: 41
  • IMG_0072.jpg
    IMG_0072.jpg
    106.2 KB · Views: 40

toddster

Curator of Broken Parts
Blogs Author
On my 71 E29, both intakes are 1/2" and outlets are 1 1/4". All flush-mounted (not mushroom-head). The 1/2" replacements can be found, with a bit of scrounging. A lot of brands stop at 3/4". One might consider just moving up - but then in the case of flush-mount fittings, there might be a bit of fiberglass work to make the new one fit. That seemed intimidating when I was a new boat owner, but now I think I'd just do it. Looks to me like that's exactly what happened on JPS27 boat.
 

Tegski

Junior Member
Okay great. These are the smaller valves and fittings in the boat. I am not replacing with flanged yet. We originally planned on picking up a lower priced E32, but the 29 was a smarter step-up. I had a 1980 19ft Cape Dory Typhoon Weekender that I inherited and have memories from learning to sail on as a teenager. It felt like the spirit of my CD was also in this E29 and emotion had a lot to do with it.

Due to the price hike between the boats. My plan is to redo the thru hulls as simply as I can. When things start rolling with the business again, i will haul out and replace every thru hull with TruDesign fittings.

I've also never worked with fiberglass, and have a few side projects to guinea pig to teach myself. So that's also part of the reason to wait on the flaged fittings.

With summer looming, the boat will likely stay docked and used occasionally so I feel safe waiting until the fall to beef things up.

The specific one of concern is this head sink drain thru hull which is corroded enough that I wouldn't trust it on any crest of a wave. The water inlet is also corroded, and this unidentified red twist valve that does something with the head/holding tank tubes and is also corroded. I am not brave enough to even touch them until haul out. 20200414_173820.jpg20200414_174737.jpg20200414_174508.jpg
 

toddster

Curator of Broken Parts
Blogs Author
Yikes. Yeah, I wouldn't touch those without a wooden plug handy. Looks like 1/2" to me. Those old wood backing plates likely weep a bit if they dry out, then snug up again when they get wet. Hence all the old caulking.
 

Tegski

Junior Member
Yikes. Yeah, I wouldn't touch those without a wooden plug handy. Looks like 1/2" to me. Those old wood backing plates likely weep a bit if they dry out, then snug up again when they get wet. Hence all the old caulking.
I have several, and a rubber mallet ready. Still doesn't give me faith. I should be on the hard in the next two days so that'll be the time to make a plan.
 

supersailor

Contributing Partner
Woah! I wouldn't touch those until you have hauled and are ready to replace which is hopefully very soon. A couple of those shutoffs don't appear to be marine grade bronze but instead hardware store shutoffs. This is not a place to scrimp (how well I know). Boats sink over this kind of stuff. I have a plug tied to every thru hull on Terra Nova and there are certainly enough thru hulls. As Tegski said, don't forget the mallet or hammer.
 

toddster

Curator of Broken Parts
Blogs Author
Sadly, that is what 70's Ericsons came with from the factory. (The Apollo valve is an aftermarket upgrade.)
 

Tegski

Junior Member
All the other fittings have the Apollo valve. And look far better. If they are the 1/2", ill likely replace the whole set with Marelon fittings. What sealant would you suggest, if I may be redoing them in a year with flanged versions?
 

Loren Beach

O34 - Portland, OR
Senior Moderator
Blogs Author
Speaking of the 70's, gate valves were very common from all production boat builders. There are several good choices for sealant. I like "Life Seal" and I have used 4200, also.
You might consider the ForeSpar series 93 sea cocks. Bronze is great when you have a reliable brand, but it's nice not to have to worry about electrolysis. Whatever you install, if you do it correctly, will probably outlive your ownership of the boat.

Great info in this prior thread : https://ericsonyachts.org/ie/threads/seacock-install-traditional.6244/
Note that there are links within that thread, also.
 
Last edited:

bigd14

Contributing Partner
Blogs Author
Wow, sketchy!


Maine Sail’s write ups (one of which I think he made after posting in the thread Loren included above) on his Marine How To website gives complete instructions on the proper way to do these replacements. G10 can be found at McMaster Carr. It’s a bit of work and $$ but well worth the peace of mind. Keep us updated on your progress!

edit: +1 for SikaFlex 292.
 

Tegski

Junior Member
If you were going to make your own plates out of fiberglass cloth, what sort of household item would you use as a surface? I have a glass table, but its the dining table and I would loose my spouse if I ruined it.
 

Loren Beach

O34 - Portland, OR
Senior Moderator
Blogs Author
If you were going to make your own plates out of fiberglass cloth, what sort of household item would you use as a surface? I have a glass table, but its the dining table and I would loose my spouse if I ruined it.
I have done that. I used some heavy mil. plastic sheeting. Put down two layers if you want to be sure. Be certain that you understand just how much cloth and resin will be needed to produce a 1/4" thick finished piece..... it is enough that you may find that it is less expensive to buy it from a plastics vendor.
:)
 

toddster

Curator of Broken Parts
Blogs Author
As you begin to provide service to your E29, you will discover that there are many places where hardware was installed on the deck before the hull and deck were joined. The only way to get access to these places is to cut an access port and fill it with a deck plate, small hatch, or some small accessory. Save all the cut-outs! At least the ones that are solid fiberglass (e.g. from the liner). They make great backing-plate material.
 

Tegski

Junior Member
As you begin to provide service to your E29, you will discover that there are many places where hardware was installed on the deck before the hull and deck were joined. The only way to get access to these places is to cut an access port and fill it with a deck plate, small hatch, or some small accessory. Save all the cut-outs! At least the ones that are solid fiberglass (e.g. from the liner). They make great backing-plate material.
Can you provide an example of such a fixture? I'm guessing stanchions, since I haven't attempted to locate their below deck areas yet. I've also wondered how one would access the starboard cockpit cleats and wench bases.

I also feel my bow pulpit is a bit shaky, and I'd like to attempt to add backing plates to that.

Regarding the backing plates: I purchased a square yard of biaxial cloth, and I'm sure I can get at least 2 plates out of it. However....I dont have the tools to cut them! So im considering options b and c to deal with it.
 

toddster

Curator of Broken Parts
Blogs Author
Mounting bolts for the starboard side winches & associated hardware, on my boat, are accessed through a deck plate in the overhead of the quarterberth, above the "shelf." IDK if a PO put it there, or the factory. It takes a bit of contortion to achieve. One could also go in through the coaming from outside.

Looks like your boat has a wheel and associated "bridge deck," so some details are likely to be different. I had to cut through the liner at the transom to get at the hardware for the pushpit and the (transom-mounted) traveler. And the aft corner of the starboard coaming. (I'm going to enlarge that hole to mount a cockpit shower box that I've obtained. Some people put stereo speakers in similar holes, but I think something a little stouter than a speaker cone is needed, if the cockpit gets filled with water.) These openings were also needed to mount a swim ladder and windvane.
Some boats have easy access through a cockpit locker at the back, so don't have that problem.

To access the pulpit and docking cleat bolts, and worn-out nav lights, I enlarged the 3" vent hole up front into a 6" deck plate, but that bit of cored deck cutout isn't necessarily of any use except as a core sample.

The stanchions aren't too bad to access. But they do need to be potted and re-bedded ASAP if they haven't been already - none of the deck hardware was potted to begin with and there are likely voids all around where the balsa core has rotted. Front stanchions bolt through into the V-berth lockers. The middle and aft ones are half in the "ducts" and half in the salon. You have to remove the plywood covers over the ducts to get at the outer pair of bolts.

The biggest pieces of fiberglass that I cut out were holes in the liner to access the hidden spaces behind the settees.
 

Tegski

Junior Member
We certainly have varying designs. I have no hole in my foredeck. The only access to my Pulpit is through the V Berth locker. I do have the aft cockpit locker that makes accessing that area a breeze. The space behind my settees also have access already, and it's very uniform so im guessing it happened at the factory. The POs had the seat backs screwed into place, so convenient access is not yet available but I intend on doing hinges soon.


Any advice on the Head Portlight. The PO siliconed the sliding glass piece and also siliconed off the vent. I have removed both because I'd really prefer airflow in those areas and deal with water intrusion another way. Not to mention, i dont think silicone is the way to go on any of this stuff.

Haven't made a decision on the backing plates. I'm going to see if I can get ahold of some already done fiberglass to make it, and if not, ill go with plywood until I have the kind I want finished for when I redo all the thruhulls again next year.
 

toddster

Curator of Broken Parts
Blogs Author
The head portlight extrusion is exactly the same as the non-opening port extrusions - they just put the two pieces of glass in different grooves, left one piece un-caulked so it moves, and added some shims to make it work. I suspect that there was some kind of wiper gasket, like from a car roll-up window, glued in there that didn't last long. I couldn't see any good way to make it work without leaking - when I re-glazed, I put a solid piece of glass in there. The long term solution is to replace the whole thing with a conventional opening port that dogs closed.

But then that one port looks different, so the OCD among us :rolleyes: must do ALL the ports that way... it's a slippery slope.
 
Top