-

Untitled Document The 2024-2025 Fund Raising Season has Opened!
EricsonYachts.org has opened the season for raising funds to support the expenses of the site. If you would like to participate, please see the link below for additional information.
Thanks so much for your continued support of EricsonYachts.org!
You are using an out of date browser. It may not display this or other websites correctly.
You should upgrade or use an alternative browser.
You should upgrade or use an alternative browser.
My 3/4" solid marine holly/teak sole going in this week >>>
- Thread starter 1911tex
- Start date
Mitchy
Marta, 1983 Ericson 35-3, Universal M25
Greetings 1911tex and Filkee. I am ready to order the Teak and Holly. May I inquire how many sheets or 4x8' did you need? I was thinking (2) but would love your advice. I have a 1983 E35-3 with a Universal M25 as well. Thank you!
Mitch Kessler
Mitch.kessler@sbcglobal.net
Benicia, CA 94510
Mitch Kessler
Mitch.kessler@sbcglobal.net
Benicia, CA 94510
Filkee
Sustaining Member
PS if you really want to be sure, rough it out on some junky 1/4”. That way you don’t have to order twice.Wound up using about 1 1/2 for the 32-3. You’re a little bigger, but I think two should do it as much of your biggerness is storage and a shower stall.
JSM
Sustaining Member
When I put my new sole down I used an adjustable counter sink bit and set it up to go a bit deeper so as to drill a pilot hole for the screw. No need to thread the hole in the TAFG , just drive the screw in.
1911tex
Sustaining Member
Yes we used a full 2 sheets on our E35-3.Greetings 1911tex and Filkee. I am ready to order the Teak and Holly. May I inquire how many sheets or 4x8' did you need? I was thinking (2) but would love your advice. I have a 1983 E35-3 with a Universal M25 as well. Thank you!
Mitch Kessler
Mitch.kessler@sbcglobal.net
Benicia, CA 94510
1911tex
Sustaining Member
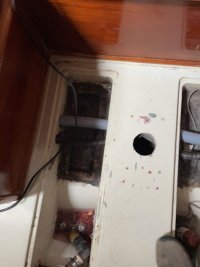
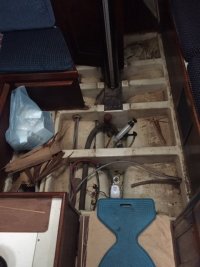
OP here: Finally all the sole removed...cleanup next, then new sole to be installed over the next 10 days...whew, due to freezing weather, etc., taking much longer than expected...can't wait 'till this is done! Last week 2 degrees, today 72 and heavy rains on the way:
Attachments
Filkee
Sustaining Member
You're gonna lap me. My teak is pretty much ready to go down, but I bought some bilge paint and I feel like I have to use it. 55+ degrees is not in the cards here in the great white north for a while and I don't want to put the boards down only to pull them up again. I put some conduit in the bilge for my battery cables finally secured my new battery charger andOP here: Finally all the sole removed...cleanup next, then new sole to be installed over the next 10 days...whew, due to freezing weather, etc., taking much longer than expected...can't wait 'till this is done! Last week 2 degrees, today 72 and heavy rains on the way:
 and did some scrubbing today. It's just good to be there.
1911tex
Sustaining Member
Filkee: Looks like you already varnished the side boards...beautiful!...way ahead of me! Have you decided what to stain/seal/coat the surface of your new sole with...once its down? I am trying to decide on a quality high gloss varnish or a gym polyurethane gloss oil base finish. I am still not sure if I want to leave it in its natural state or stain.
What are your thoughts? What are everyones thoughts?
What are your thoughts? What are everyones thoughts?
Filkee
Sustaining Member
Ive been finishing the pieces at home. I have ten coats of Epifanes high gloss on. Did an a/b test with the family and they voted satin for the final. I’m not sure how it will wear but there’s only one way to find out. And the kick panels in the photo are Epifanes high gloss. Im also planning to out down a carpet runner to make it easier on our clumsy dog.
1911tex
Sustaining Member
Rubber booties for the pup? Smart applying the coats of varnish at home....me...not smart thinking about doing it your way at home. Whatever I put on, because we are doing it on location....just have to be careful not to trap myself in a corner, if you get my drift!
Filkee: What stain and color did you use, or did you go natural ?
For a final finish...thinking? about something like this product...used on our local school gym floors and hallways. They use it straight out of the can:

 www.miscoproducts.com
Filkee: What stain and color did you use, or did you go natural ?
For a final finish...thinking? about something like this product...used on our local school gym floors and hallways. They use it straight out of the can:

Prime Time WF - PRI
RESOURCES: English Spec / Data SheetEnglish SDS SheetIngredient Disclosure AVAILABILITY:107712: 2 x 2.5 Gallon107707: 5 Gallon pail107715: 55 Gallon drum
Last edited:
Any tips on the best way to make templates for the replacement boards?
Trace the edges on butcher paper?
It seems like getting the outline just right is the hard part, then one can do a practice set with a cheap sheet product.
Trace the edges on butcher paper?
It seems like getting the outline just right is the hard part, then one can do a practice set with a cheap sheet product.
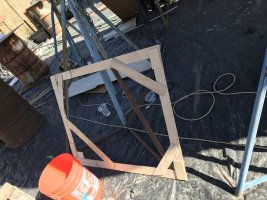
I tried using heavy paper and masking tape. It was a nightmare. I finally gave up. Then I tried templating with 1/8" plywood. I cut 2-3" wide strips, then matched the strips to the edges of the floor. Using a hot glue gun, I glued smaller pieces of the strips to hold the templated pieces in place. This worked the first time for me! Good luck.
Attachments
I agree with the sentiment that the flexible paper product just will not do the job. I have been making patterns for various parts of our boat's curved hull ceilings, for the last several years. After some failures with paper and even the thicker poster board, I ended up with 'peg board' -- bendable enough and cheaper than door skins where I was shopping. The hot glue gun for adding the last bits to get it accurate is a good idea, too.Any tips on the best way to make templates for the replacement boards?
Trace the edges on butcher paper?
It seems like getting the outline just right is the hard part, then one can do a practice set with a cheap sheet product.
Filkee
Sustaining Member
I used that pinkish, heavy paper that painters tape down as drop cloth. I creased along the edges, cut it out and then transferred to a piece of cheap plywood. Then I test-fit and trimmed. It was only necessary for the piece near the mast. The other two came up without disintegrating.
Did you have curved corners to follow for any pieces or were they all squared/angular?I tried using heavy paper and masking tape. It was a nightmare. I finally gave up. Then I tried templating with 1/8" plywood. I cut 2-3" wide strips, then matched the strips to the edges of the floor. Using a hot glue gun, I glued smaller pieces of the strips to hold the templated pieces in place. This worked the first time for me! Good luck.
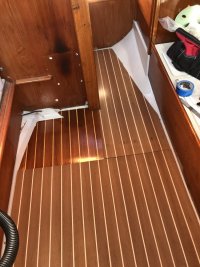
Dave, the photo of the sole was before it was installed and the hatches had not been cut in and the table wasn't reinstalled yet. The settee by the mast compression post had been removed by a previous owner to (improperly) install a diesel cabin heater. You can see the scorch marks on the bulkhead!
Tom, there were curved corners. I collected a variety of bottle tops and other round items to see which ones would fit the corners closely. I then cut small corner pieces of templating plywood using the correct radius. These small pieces were fitted in the corners, then the edge pieces were placed next to them, and both were glued down with another piece of plywood strip over the top. The photo doesn't show these corners well because that was a middle piece with only one corner. You can see that individual corner piece just behind the bucket in the photo. I cut the sole plywood very slightly oversized on the corners and sanded it to fit. On the 30+ its only 1/4 inch plywood for the sole, and there is a little radius all around the edge that required the bottom edge of the sole to be sanded to fit. The template gets you close, but there was quite a bit of final fitting required to get it all flush.
Tom, there were curved corners. I collected a variety of bottle tops and other round items to see which ones would fit the corners closely. I then cut small corner pieces of templating plywood using the correct radius. These small pieces were fitted in the corners, then the edge pieces were placed next to them, and both were glued down with another piece of plywood strip over the top. The photo doesn't show these corners well because that was a middle piece with only one corner. You can see that individual corner piece just behind the bucket in the photo. I cut the sole plywood very slightly oversized on the corners and sanded it to fit. On the 30+ its only 1/4 inch plywood for the sole, and there is a little radius all around the edge that required the bottom edge of the sole to be sanded to fit. The template gets you close, but there was quite a bit of final fitting required to get it all flush.


