removing wet core in bow

mjsouleman

Sustaining Member
Moderator
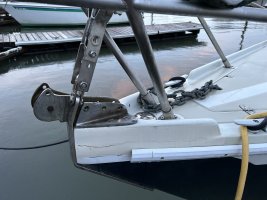
I am removing wet core from the underside of the bow on my 1983 E-30+. Several years ago I had a "reputable" shop re-core the decks. 2 months later I got the boat back and told no more worries. Now I find the work did not involve removing stanchions and removing the wet core under them. So begins my story.

Wet bow core removal is complete except at the very point of the bow where the bronze anchor roller is attached.
I am having difficulty hanging upside down from open anchor locker with an oscillating multi-tool in my hand to reach any further without falling into the locker.

Any suggestions?
 

Bolo

Contributing Partner
Just a suggestion. I’ve had a few cases on the boat where seeing what I need to work on and doing the work couldn’t be done at the same time because of the tight space in which I was working. So I used a mirror in one hand and a tool in the other. Takes a bit of practice because the mirror is a reversed image but it can be done. Can you rig a small mirror to provide you with a view of the area in question? Like I said, just a suggestion.
 

mjsouleman

Sustaining Member
Moderator
Good morning Bob,

that is a good idea, however the problem is that I am on my back with my behind balanced on the rim of the open anchor locker. reaching into the bow any further and I will fall into the open bow.

I really do not want to open up the top skin under the bow anchor roller but at this moment it looks like to only way to get at this area.
I will post pictures later this week if I don't fall in. I will make sure I bring my phone so I can call for help to get out of the hole.
 

Frank Langer

1984 Ericson 30+, Nanaimo, BC
Hi Mark,
I don't know if your 1983 has a different configuration there than my 1984, so pics will help. In the meantime I'll assume they're similar.
I got pretty good access to that area by removing the anchor locker, which also allowed me to rebed and seal it. If necessary, one could cut out that foreward bulkhead, lay a piece of plywood in the v-berth extending into the bow to lay on though you would still be working upwards while on your back. You would need to replace the bulkhead afterwards, but that's a fairly easy fibreglass job, I think.
Good luck with this annoying project.
Frank
 

bigd14

Contributing Partner
Blogs Author
Mark, if you do go after it, you might consider tying a line to the mast with some knots on it and taking that in with you. If you get stuck it might help to extricate yourself to have something to pull on. Good luck! No fun.

I will be doing the same thing soon to fix the cracks in the "foc's'le" but I have to go in from the top.

IMG_1063.jpeg
 

mjsouleman

Sustaining Member
Moderator
Frank/Bigd14,

Frank, the configuration is the same for the 84 and 83 and your suggestion to remove the bulkhead is a good one, I have considered it but did not want to expand the project but it looks like the only way to get at stuff.

At this point, the forward chainplate and bow pulpit are removed, removing the anchor roller will not add too much,

Thank you for the helpful advice
 

Loren Beach

O34 - Portland, OR
Senior Moderator
Blogs Author
While there is likely no way to eliminate some difficult work from underneath, I would be looking at doing it from the top. I could imagine filling in where the old balsa had deteriorated with half inch foam and thickened epoxy. Getting the color and non skid to blend with the rest of the the fore deck would be fiddly work, but quite do-able. That's all IMHO, and of course YMMV. :)
 

bigd14

Contributing Partner
Blogs Author
Mark, I stuck a camera in there the other day to see how to remove the bow plate and found one of the nuts was glassed over. I guess they added the anchor roller plate to the deck before it was placed on the hull. Hopefully you don’t have the same issue but I figured I would give you a heads up. Please post some photos of what core material you find in there when you get to it. Thanks!


IMG_1375.jpeg
 

mjsouleman

Sustaining Member
Moderator
While there is likely no way to eliminate some difficult work from underneath, I would be looking at doing it from the top. I could imagine filling in where the old balsa had deteriorated with half inch foam and thickened epoxy. Getting the color and non skid to blend with the rest of the the fore deck would be fiddly work, but quite do-able. That's all IMHO, and of course YMMV. :)
Loren,

Thank you for the advice. I have already removed all but the last ~12 inches under the anchor roller. I definitely will be using 1/2 foam.

As to attacking from the top side Vrs. underside - When the decks were cored by a "professional", I found the 4 inches to the toe rail were left undone, and soaking wet. Because this work is behind cabinets in the galley, salon, and head, I have no choice but to attack from the top side.
 

mjsouleman

Sustaining Member
Moderator
Mark, I stuck a camera in there the other day to see how to remove the bow plate and found one of the nuts was glassed over. I guess they added the anchor roller plate to the deck before it was placed on the hull. Hopefully you don’t have the same issue but I figured I would give you a heads up. Please post some photos of what core material you find in there when you get to it. Thanks!


View attachment 46540
My anchor roller is bolted through but the underside is dimpled making getting a wrench on the nuts difficult, but that is for another day.
I will post pictures latter this week.
 

Loren Beach

O34 - Portland, OR
Senior Moderator
Blogs Author

One of the pix here shows the underside of our bow compartment. You can observe the two layers of G10 and thickened epoxy that is now under the anchor roller bracket and also the backing plate for the larger cleats. It appears that I have a little more space in which to work way up forward, altho it's a multi step process to get both shoulders in there, with trouble light and tools, etc.
:)
 
Last edited:

bigd14

Contributing Partner
Blogs Author
It appears that I have a little more to work way up forward,
Yes the 30+ is pretty pointy up there. It’s a one-handed endeavor if you have to attack it from above like I do now that I glassed the anchor locker in. No way I am going to fit in that anchor locker without suffering permanent damage so I might temporarily regret the decision to glass it in. Too bad my kids are all grown up…
 

mjsouleman

Sustaining Member
Moderator
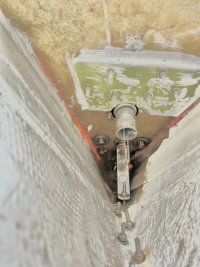
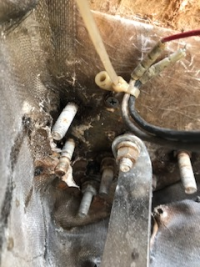
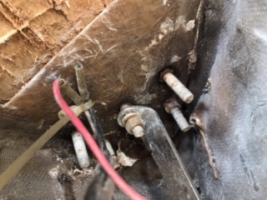
Finally got back to the boat today and got the pictures of the last 12 inches of the very pointy E-30+ bow underside. This shows the through bolts holding the anchor roller in place. This last bit of work required the removal of half of the forward bulk head to allow contortionist like access.

1681252156868.png1681252182368.png
 

mjsouleman

Sustaining Member
Moderator
Mark, if you do go after it, you might consider tying a line to the mast with some knots on it and taking that in with you. If you get stuck it might help to extricate yourself to have something to pull on. Good luck! No fun.

I will be doing the same thing soon to fix the cracks in the "foc's'le" but I have to go in from the top.

View attachment 46532
BigD,
Let us know how you make out with those cracks. I will be doing the same on Discovery and could use a pointer or two. Pictures please.
 

bigd14

Contributing Partner
Blogs Author
BigD,
Let us know how you make out with those cracks. I will be doing the same on Discovery and could use a pointer or two. Pictures please.
I hope to get to this in mid May when I have a haulout scheduled. Unfortunately it is last on the list after bottom paint, mast step repair/reseal and new furler install. Applying the rule of threes to my haulout work schedule (3x longer and 3x more $$ than estimated), it’s unlikely I will get to it. If I do I will definitely document it!
 

mjsouleman

Sustaining Member
Moderator
My anchor roller is bolted through but the underside is dimpled making getting a wrench on the nuts difficult, but that is for another day.
I will post pictures latter this week.
The anchor roller bolts looked dimpled because the core was rotten and the anchor roller crushed and collapsed the underside fiberglass. All this has been removed and a single .5 inch heart shaped piece of plywood was epoxed in place. The plywood had been prepared with penetrating epoxy from Jamestown marine.

Part two of this project... when the E-30 was built, the deck was laid and then an two inches of plywood covered with fiberglass. This elevated bow piece became the footing for the anchor roller. Not knowing how to go about filling this space, I assume two successive layers of. 5 inch plywood will be needed to get me even with the original deck layers.

Pictures to be posted on my return to the boat.
 
Top